Animation
Содержание:
- Оглавление
- Frequently Asked Questions
- Как создать анимацию Рика и Морти?
- CSS Properties
- The @keyframes Rule
- Canvas
- CSS Tutorial
- AniJS
- Как создать анимацию погодного переключателя?
- Как создать анимацию с кроликом на облаке?
- Классы animate.css для задержки анимации
- Books
- Как создать анимацию бесстыжего кота?
- Используйте комбинации из animation-timing-function
- CSS Reference
- CSS Properties
- Анимация при скролле с помощью Animate.css и плагина wow.js
- Property Values
- CSS Reference
- CSS Properties
- Функция плавности вывода кадров
Оглавление
- Как создать анимацию Рика и Морти?
- Как создать анимацию с псевдо-3D поворотом?
- Создание анимации зависшего робота.
- Как создать анимацию чайного пакетика?
- Как создать анимацию рыцаря?
- Как создать анимацию вылетающего ноутбука?
- Как создать анимацию с кроликом на облаке?
- Как создать анимацию пингвина?
- Как создать анимацию погодного переключателя?
- Как создать анимацию с персонажами Gravity Falls?
- Как создать космическую анимацию в Adobe After Effects?
- Как создать анимацию собаки?
- Разбираем домашнее задание.
- Как создать анимацию детского цветочного горшка?
- Как создать анимацию с морфингом?
- Как создать анимацию с маяком?
- Как создать анимацию рыбы?
- Как создать анимацию на тему регби?
- Как создать анимацию кота-повара?
- Как создать анимацию из мультфильма «По ту сторону изгороди»?
- Как создать анимацию с бургером и японскими палочками?
- Как создать анимацию испуганного рулона?
- Как создать анимацию свечек?
- Как создать анимацию псевдо-3D midi-клавиатуры в After Effects?
- Как создать анимацию космонавта?
- Как создать анимацию саксофониста?
- Как создать анимацию с мышью и холодильником?
- Как создать анимацию с медузами?
- Как анимировать самолетик?
- Как анимировать тачку?
- Как создать анимацию с изометрией?
- Как создать анимацию бесстыжего кота?
- Как создать анимацию с НЛО?
01.
Frequently Asked Questions
-
How much time do I need to render my animation?
The rendering depends on your machine’s hardware and your internet upload bandwidth, but also on
the complexity and resolution of the animation.A 3-6 seconds short animation, with a few filters used, should not take more than 30
seconds to save and render.
More complex animations can take a few minutes to be rendered. -
If you reach the limit and need to make more animations, you can upgrade to the Diamond subscription and have
all the limits removed. This way you can freely enjoy all the benefits. -
What is the best format to download my animations?
For the best quality, we recommend downloading your animation as an MP4 video.
It has the best quality for small size files.To help you work faster, you can create an animation, and set the loop value on download (this
will increase its length), without needing to adjust the timeline to achieve this.However, sometimes, you might need a GIF file format. This has lower quality and it is larger in
size than MP4. Since some applications support this format, it’s easier to embed a gif into your
website or blog. Plus, it’s a fun way to have a looped animation to share on social media. So
get creative!
Как создать анимацию Рика и Морти?
Программа Adobe After Effects – отличный инструмент для тех, кого интересует моушн и анимация. Ее возможности безграничны, и помогают создавать массу креативных гифок любой сложности. Присоединившись к курсу, вы с первого же урока узнаете, как научиться работе в программе Adobe After Effects CC 2017.
В первом уроке автор покажет и расскажет, как создать анимационных персонажей Рика и Морти, на основе несложной иллюстрации из Сети. Можно найти такую же, или набросать свою. Из первого урока вы также узнаете, как настроить рабочую область под себя, какие инструменты вам понадобятся на начальном этапе, как создавать новый проект, открывать файлы, импортировать их из Photoshop и многое другое.
02.
CSS Properties
align-contentalign-itemsalign-selfallanimationanimation-delayanimation-directionanimation-durationanimation-fill-modeanimation-iteration-countanimation-nameanimation-play-stateanimation-timing-functionbackface-visibilitybackgroundbackground-attachmentbackground-blend-modebackground-clipbackground-colorbackground-imagebackground-originbackground-positionbackground-repeatbackground-sizeborderborder-bottomborder-bottom-colorborder-bottom-left-radiusborder-bottom-right-radiusborder-bottom-styleborder-bottom-widthborder-collapseborder-colorborder-imageborder-image-outsetborder-image-repeatborder-image-sliceborder-image-sourceborder-image-widthborder-leftborder-left-colorborder-left-styleborder-left-widthborder-radiusborder-rightborder-right-colorborder-right-styleborder-right-widthborder-spacingborder-styleborder-topborder-top-colorborder-top-left-radiusborder-top-right-radiusborder-top-styleborder-top-widthborder-widthbottombox-decoration-breakbox-shadowbox-sizingbreak-afterbreak-beforebreak-insidecaption-sidecaret-color@charsetclearclipclip-pathcolorcolumn-countcolumn-fillcolumn-gapcolumn-rulecolumn-rule-colorcolumn-rule-stylecolumn-rule-widthcolumn-spancolumn-widthcolumnscontentcounter-incrementcounter-resetcursordirectiondisplayempty-cellsfilterflexflex-basisflex-directionflex-flowflex-growflex-shrinkflex-wrapfloatfont@font-facefont-familyfont-feature-settingsfont-kerningfont-sizefont-size-adjustfont-stretchfont-stylefont-variantfont-variant-capsfont-weightgapgridgrid-areagrid-auto-columnsgrid-auto-flowgrid-auto-rowsgrid-columngrid-column-endgrid-column-gapgrid-column-startgrid-gapgrid-rowgrid-row-endgrid-row-gapgrid-row-startgrid-templategrid-template-areasgrid-template-columnsgrid-template-rowshanging-punctuationheighthyphens@importisolationjustify-content@keyframesleftletter-spacingline-heightlist-stylelist-style-imagelist-style-positionlist-style-typemarginmargin-bottommargin-leftmargin-rightmargin-topmax-heightmax-width@mediamin-heightmin-widthmix-blend-modeobject-fitobject-positionopacityorderoutlineoutline-coloroutline-offsetoutline-styleoutline-widthoverflowoverflow-xoverflow-ypaddingpadding-bottompadding-leftpadding-rightpadding-toppage-break-afterpage-break-beforepage-break-insideperspectiveperspective-originpointer-eventspositionquotesresizerightrow-gapscroll-behaviortab-sizetable-layouttext-aligntext-align-lasttext-decorationtext-decoration-colortext-decoration-linetext-decoration-styletext-indenttext-justifytext-overflowtext-shadowtext-transformtoptransformtransform-origintransform-styletransitiontransition-delaytransition-durationtransition-propertytransition-timing-functionunicode-bidiuser-selectvertical-alignvisibilitywhite-spacewidthword-breakword-spacingword-wrapwriting-modez-index
The @keyframes Rule
When you specify CSS styles inside the
rule, the animation will gradually change from the current style to the new style
at certain times.
To get an animation to work, you must bind the animation to an element.
The following example binds the «example» animation to the <div> element.
The animation will last for 4 seconds, and it will gradually change the
background-color of the <div> element from «red» to «yellow»:
Example
/* The animation code */
@keyframes example {
from {background-color: red;}
to {background-color: yellow;}
}/* The element to apply the animation to */
div { width: 100px; height: 100px;
background-color: red;
animation-name: example; animation-duration: 4s;
}
Note: The property
defines how long an animation should take to complete. If the property is not specified,
no animation will occur, because
the default value is 0s (0 seconds).
In the example above we have specified when the style will change by using
the keywords «from» and «to» (which represents 0% (start) and 100% (complete)).
It is also possible to use percent. By using percent, you can add as many
style changes as you like.
The following example will change the background-color of the <div>
element when the animation is 25% complete, 50% complete, and again when the animation is 100% complete:
Example
/* The animation code */@keyframes example
{
0% {background-color: red;}
25% {background-color: yellow;}
50% {background-color: blue;}
100% {background-color: green;}
}/* The element to apply the animation to */div {
width: 100px; height: 100px; background-color: red; animation-name: example; animation-duration: 4s;}
The following example will change both the background-color and the position of the <div>
element when the animation is 25% complete, 50% complete, and again when the animation is 100% complete:
Example
/* The animation code */@keyframes example
{
0% {background-color:red; left:0px; top:0px;}
25% {background-color:yellow; left:200px; top:0px;}
50% {background-color:blue; left:200px; top:200px;}
75% {background-color:green; left:0px; top:200px;}
100% {background-color:red; left:0px; top:0px;}
}/* The element to apply the animation to */div {
width: 100px; height: 100px;
position: relative; background-color: red; animation-name: example; animation-duration: 4s;}
Canvas
- EaselJS — EaselJS is a library for building high-performance interactive 2D content in HTML5.
- Fabric.js — JavaScript canvas library with animation support.
- Paper.js — The Swiss Army Knife of Vector Graphics Scripting – Scriptographer ported to JavaScript and the browser, using HTML5 Canvas.
- Konva — Konva.js is an HTML5 Canvas JavaScript framework that extends the 2d context by enabling canvas interactivity for desktop and mobile applications.
- Two.js — A renderer agnostic two-dimensional drawing api for the web with animation support.
- Ocanvas — JavaScript library for object-based canvas drawing.
- Curtainsjs — Lightweight vanilla WebGL JavaScript library that turns HTML DOM elements into interactive textured planes.
- Hover-effect — JavaScript library to draw and animate images on hover.
- Pts.js — Pts is a typescript/javascript library for visualization and creative-coding.
- tsParticles — tsParticles is a lightweight typescript/javascript library for creating easily particles animations.
CSS Tutorial
CSS HOMECSS IntroductionCSS SyntaxCSS SelectorsCSS How ToCSS CommentsCSS Colors
Colors
RGB
HEX
HSL
CSS Backgrounds
Background Color
Background Image
Background Repeat
Background Attachment
Background Shorthand
CSS Borders
Borders
Border Width
Border Color
Border Sides
Border Shorthand
Rounded Borders
CSS Margins
Margins
Margin Collapse
CSS PaddingCSS Height/WidthCSS Box ModelCSS Outline
Outline
Outline Width
Outline Color
Outline Shorthand
Outline Offset
CSS Text
Text Color
Text Alignment
Text Decoration
Text Transformation
Text Spacing
Text Shadow
CSS Fonts
Font Family
Font Web Safe
Font Fallbacks
Font Style
Font Size
Font Google
Font Pairings
Font Shorthand
CSS IconsCSS LinksCSS ListsCSS Tables
Table Borders
Table Size
Table Alignment
Table Style
Table Responsive
CSS DisplayCSS Max-widthCSS PositionCSS OverflowCSS Float
Float
Clear
Float Examples
CSS Inline-blockCSS AlignCSS CombinatorsCSS Pseudo-classCSS Pseudo-elementCSS OpacityCSS Navigation Bar
Navbar
Vertical Navbar
Horizontal Navbar
CSS DropdownsCSS Image GalleryCSS Image SpritesCSS Attr SelectorsCSS FormsCSS CountersCSS Website LayoutCSS UnitsCSS SpecificityCSS !important
AniJS
Our final library is interesting for its unique approach. AniJS is an animation library that allows you to add animations to elements in a simple ‘sentence-like’ structure. Take the following format:
If click, On Square, Do wobble animated To .container-box
If you don’t have much familiarity with JavaScript, this may well be a great way to step into JS-choreographed movements.
- Creator: Dariel Noel
- Released: 2014
- Current Version: 0.9.3
- Popularity: 3.524 stars on GitHub
- Description: “A Library to Raise your Web Design without Coding.”
- Library Size: 10.5 kB
- GitHub: https://github.com/anijs/anijs
- License:
AniJS is a library with a very reasonable size factoring in its functionality. The format it uses for implementation is quite original and different as compared to other animation libraries (which many others might find unconventional).
Nevertheless, this library is worth giving a try, at least once for your projects.
Как создать анимацию погодного переключателя?
Основное внимание в уроке уделяется возможностям горячим клавишам. Рисуем в программе более сложные – многоугольные – фигуры и элементы
Знакомимся со смежными техниками, используем инструмент «Сетка», знакомимся с ее функциями. Автор покажет, где искать этот инструмент, работает с заливкой, создает дополнительные элементы, которые мы будем использовать в анимации.
Работаем с фоном и с эффектами. В результате у вас получиться довольно простая, но эффектная анимация, построенная на основе движения множества одинаковых элементов, которые должны появляться в кадре плавно и одновременно.
На основе полученных навыков вы сможете создавать еще более сложную анимацию на основе похожей техники, чем существенно расширите свои возможности.
10.
Как создать анимацию с кроликом на облаке?
Рисуем милую анимацию – кролика на облаке. Кроме полноценной пошаговой инструкции с разбором параметров, нюансов и фишек программы вы также узнаете, почему лучше использовать англоязычную версию программа. Более того, спикер расскажет, в чем отличия англоязычной и русскоязычной версии, и почему профессионалы устанавливают именно первый вариант.
Вы также узнаете, на какие окна в первую очередь обратить внимание, что такое Project и для чего он нужен. Автор покажет и расскажет, что такое подменю и что в него входит
Подробно поговорим о композиции, создании нового проекта, импортировании файлов и особенностей процесса. Также вы узнаете, где искать недавно открытые файлы. Урок научит экономить время во время работы, оптимизировать процесс и другие лайфхаки. Также автор расскажет о скрытых возможностях программы.
08.
Классы animate.css для задержки анимации
В том случае, если вам нужно, чтобы блоки запускались с задержкой, необходимо использовать любой из 5 классов для задержки от 1 до 5 секунд:
Классы для задержки анимации от 1 до 5 секунд
animate__delay-1s 1s
animate__delay-2s 2s
animate__delay-3s 3s
animate__delay-4s 4s
animate__delay-5s 5s
|
1 |
animate__delay-1s1s animate__delay-2s2s animate__delay-3s3s animate__delay-4s4s animate__delay-5s5s |
Пример с задержкой анимации:
See the Pen animate.css with delay by Elen (@ambassador)on CodePen.0
Если вам нужны другие значения задержек с одинаковым шагом, достаточно изменить значение css-переменной.
Изменение задержки анимации с помощью переменной
CSS
/* Переменная для задания исходного значения задержки анимации */
:root {
—animate-delay: 2s;
}
/* Изменяем начальное значение переменной */
:root {
—animate-delay: 0.5s;
}
/* Использование переменной в классах с задержкой */
.animate__animated.animate__delay-1s {
-webkit-animation-delay: 1s;
animation-delay: 1s;
-webkit-animation-delay: var(—animate-delay);
animation-delay: var(—animate-delay);
}
.animate__animated.animate__delay-2s {
-webkit-animation-delay: calc(1s * 2);
animation-delay: calc(1s * 2);
-webkit-animation-delay: calc(var(—animate-delay) * 2);
animation-delay: calc(var(—animate-delay) * 2);
}
|
1 |
/* Переменная для задания исходного значения задержки анимации */ :root { —animate-delay2s; } :root { —animate-delay0.5s; } .animate__animated.animate__delay-1s { -webkit-animation-delay1s; animation-delay1s; -webkit-animation-delayvar(—animate-delay); animation-delayvar(—animate-delay); } .animate__animated.animate__delay-2s { -webkit-animation-delaycalc(1s*2); animation-delaycalc(1s*2); -webkit-animation-delaycalc(var(—animate-delay)*2); animation-delaycalc(var(—animate-delay)*2); } |
Books

SVG is extremely powerful, with its reduced HTTP requests and crispness on any display. It becomes increasingly more interesting as you explore its capabilities for responsive animation and performance boons. When you animate SVG, you must be aware of normal image traits like composition, color, implementation, and optimization. But when you animate, it increases the complexity of each of these factors exponentially.

Thanks to faster browsers, better web standards support, and more powerful devices, the web now defines the next generation of user interfaces that are fun, practical, fluid, and memorable. The key? Animation. But learning how to create animations is hard, and existing learning material doesnt explain the context of the UI problem that animations are trying to solve. Thats where this book comes in.

Add life and depth to your web applications and improve user experience through the discrete use of CSS transitions and animations. With this concise guide, you’ll learn how to make page elements move or change in appearance, whether you want to realistically bounce a ball, gradually expand a drop-down menu, or simply bring attention to an element when users hover over it.

Effective interface animation deftly combines form and function to improve feedback, aid in orientation, direct attention, show causality, and express your brands personality. Designing Interface Animation shows you how to create web animation that balances purpose and style while blending seamlessly into the users experience. This book is a crash course in motion design theory and practice for web designers, UX professionals, and front-end developers alike.

We’ve come a long way since the days of flashing banner ads and scrolling news tickers. Today, the stunning motion design of iOS and Android dramatically improves a users experience — instead of detracting from it. The best sites and apps of today leverage animation to improve the feel and intuitiveness of their interfaces. Sites without animation are starting to feel antiquated. This book provides you with a technical foundation to implement animation in a way thats both visually stunning and programmatically maintainable.

Modern websites use a variety of animated effects not only to improve usability but also to delight and surprise users. Some of these effects require complex scripting or programming skills, but many are within the grasp of designers who are already familiar with CSS and HTML. CSS Animations and Transitions for the Modern Web shows designers how to add movement to web pages over time using CSS3 style definitions.

This book will help you create practical / usable / wickedly-cool animations in HTML, CSS, and JavaScript. Each chapter is filled with cleanly explained concepts, beautifully illustrated diagrams, colorific code snippets, and cringeworthy one-liners guaranteed to make your friend who laughs at everything groan. You will start by learning how to create animations and transitions in CSS. Towards the end, you will learn how to create animations in JavaScript by manipulating DOM elements as well as pushing pixels on the canvas.

Foundation HTML5 Animation with JavaScript covers everything that you need to know to create dynamic scripted animation using the HTML5 canvas. It provides information on all the relevant math you’ll need, before moving on to physics concepts like acceleration, velocity, easing, springs, collision detection, conservation of momentum, 3D, and forward and inverse kinematics. Foundation HTML5 Animation with JavaScript is a fantastic resource for all web developers working in HTML5 or switching over from Flash to create standards-compliant games, applications, and animations that will work across all modern browsers and most mobile devices, including iPhones, iPads, and Android devices.
Как создать анимацию бесстыжего кота?
По традиции – начинаем с основ, а именно, с рабочих инструментов, создания нового проекта. Автор расскажет, что такое навигация, поделиться различными фишками, которые помогут вам продумать рабочий процесс и оптимизировать его. Также в уроке небольшой обзор основных инструментов и информация о горячих клавишах
Активно используем ключи и таймлайн, работаем со слоями и движением, вносим правки, особое внимание уделяем движению персонажа и деталям
Одновременно с этим автор отвечает на вопросы слушателей вебинара, например, о том, почему для работы необходима именно англоязычная версия программы, а также насколько актуальна сама анимация, в том числе, в качестве профессиональной занятости.
33.
Используйте комбинации из animation-timing-function
Одна из очень частых стенок в головах у начинающих верстальщиков – это мысль о том, что animation-timing-function существует в единственном экземпляре на всю анимацию. Так вот, это не так.
Мы можем задавать в каждом фрейме в keyframes свою функцию и она будет работать до следующего фрейма, а в следующем – никто не мешает задать еще одну и.т.д. В последнем фрейме, разумеется, уже ничего не указываем – анимация там заканчивается.
Пример:
Зачем это может быть нужно? В первую очередь для создания всевозможных подпрыгиваний, отпрыгиваний, смены скорости движения в соответствии с физикой, но без прибегания к скриптам. На самом деле пользователь и не заметит, если где-то движения будут не совсем соответствовать физическим законам, особенно если они будут намеренно преувеличенными, мультяшными. Это определенно стоит взять на вооружение.
Чтобы лучше понять, о чем идет речь, посмотрим красивый пример от David Lewis (концепт не адаптивный, лучше открыть на большом экране в новой вкладке):
CSS Reference
CSS ReferenceCSS Browser SupportCSS SelectorsCSS FunctionsCSS Reference AuralCSS Web Safe FontsCSS Font FallbacksCSS AnimatableCSS UnitsCSS PX-EM ConverterCSS ColorsCSS Color ValuesCSS Default ValuesCSS Entities
CSS Properties
align-content
align-items
align-self
all
animation
animation-delay
animation-direction
animation-duration
animation-fill-mode
animation-iteration-count
animation-name
animation-play-state
animation-timing-function
backface-visibility
background
background-attachment
background-blend-mode
background-clip
background-color
background-image
background-origin
background-position
background-repeat
background-size
border
border-bottom
border-bottom-color
border-bottom-left-radius
border-bottom-right-radius
border-bottom-style
border-bottom-width
border-collapse
border-color
border-image
border-image-outset
border-image-repeat
border-image-slice
border-image-source
border-image-width
border-left
border-left-color
border-left-style
border-left-width
border-radius
border-right
border-right-color
border-right-style
border-right-width
border-spacing
border-style
border-top
border-top-color
border-top-left-radius
border-top-right-radius
border-top-style
border-top-width
border-width
bottom
box-decoration-break
box-shadow
box-sizing
break-after
break-before
break-inside
caption-side
caret-color
@charset
clear
clip
clip-path
color
column-count
column-fill
column-gap
column-rule
column-rule-color
column-rule-style
column-rule-width
column-span
column-width
columns
content
counter-increment
counter-reset
cursor
direction
display
empty-cells
filter
flex
flex-basis
flex-direction
flex-flow
flex-grow
flex-shrink
flex-wrap
float
font
@font-face
font-family
font-feature-settings
font-kerning
font-size
font-size-adjust
font-stretch
font-style
font-variant
font-variant-caps
font-weight
gap
grid
grid-area
grid-auto-columns
grid-auto-flow
grid-auto-rows
grid-column
grid-column-end
grid-column-gap
grid-column-start
grid-gap
grid-row
grid-row-end
grid-row-gap
grid-row-start
grid-template
grid-template-areas
grid-template-columns
grid-template-rows
hanging-punctuation
height
hyphens
@import
isolation
justify-content
@keyframes
left
letter-spacing
line-height
list-style
list-style-image
list-style-position
list-style-type
margin
margin-bottom
margin-left
margin-right
margin-top
max-height
max-width
@media
min-height
min-width
mix-blend-mode
object-fit
object-position
opacity
order
outline
outline-color
outline-offset
outline-style
outline-width
overflow
overflow-x
overflow-y
padding
padding-bottom
padding-left
padding-right
padding-top
page-break-after
page-break-before
page-break-inside
perspective
perspective-origin
pointer-events
position
quotes
resize
right
row-gap
scroll-behavior
tab-size
table-layout
text-align
text-align-last
text-decoration
text-decoration-color
text-decoration-line
text-decoration-style
text-indent
text-justify
text-overflow
text-shadow
text-transform
top
transform
transform-origin
transform-style
transition
transition-delay
transition-duration
transition-property
transition-timing-function
unicode-bidi
user-select
vertical-align
visibility
white-space
width
word-break
word-spacing
word-wrap
writing-mode
z-index
Анимация при скролле с помощью Animate.css и плагина wow.js
В том случае, если вам нужно, чтобы анимация запускалась только после того, как пользователь доберется до нужного места html-страницы с помощью скроллинга (полосы прокрутки), одной animate.css будет недостаточно. Проще всего воспользоваться для этого плагином WOW.js, который был написан еще в 2015 году, но работает до сих пор.
Подключение wow.js
Для того чтобы у вас срабатывала анимация при скролле, необходимо , но и файл плагина. Поскольку плагин написан на JavaSript, то после всей разметки перед закрывающим тегом нужно разместить тег с ссылкой на CDN:
Подключение wow.js
<script src=»https://cdnjs.cloudflare.com/ajax/libs/wow/1.1.2/wow.min.js»></script>
| 1 | <script src=»https://cdnjs.cloudflare.com/ajax/libs/wow/1.1.2/wow.min.js»></script> |
Можно также скачать плагин wow.js с репозитория на Github и подключить из локальной папки js:
Подключаем wow.js из локальной папки
JavaScript
<script src=»js/wow.min.js»></script>
| 1 | <script src=»js/wow.min.js»></script> |
После этого тега размещаем ниже еще один тег с вызовом основной функции плагина:
Вызов функции плагина WOW.js
JavaScript
<script>
new WOW().init();
</script>
|
1 |
<script> newWOW().init(); </script> |
Добавление в разметку класса wow
Это еще не все . Для того чтобы код плагина сработал, нужно к анимированным блоками добавить еще один класса — .
Добавить класс wow
<div class=»wow box animate__animated animate__pulse»><img src=»images/pic1.jpg» alt=»Dog»></div>
<div class=»wow box animate__animated animate__backInDown»><img src=»images/pic2.jpg» alt=»Girl»></div>
<div class=»wow box animate__animated animate__bounceIn»><img src=»images/pic3.jpg» alt=»Cat»></div>
|
1 |
<div class=»wow box animate__animated animate__pulse»><img src=»images/pic1.jpg»alt=»Dog»><div> <div class=»wow box animate__animated animate__backInDown»><img src=»images/pic2.jpg»alt=»Girl»><div> <div class=»wow box animate__animated animate__bounceIn»><img src=»images/pic3.jpg»alt=»Cat»><div> |
После этого плагин выполнит свою работу, т.е. будет отслеживать, где находится в данный момент полоса прокрутки, и запускать анимацию, когда появится нужный блок.
Смотрим на пример:
See the Pen animate.css wow.js by Elen (@ambassador) on CodePen.0
Настройки плагина wow.js
У плагина wow.js есть свои настройки, которые можно задать в коде при вызове основной функции:
Настройки wow.js
JavaScript
let wow = new WOW({
boxClass: ‘wow’, // класс блока по умолчанию
animateClass: ‘animated’, // класс анимации по умолчанию
offset: 0, // смещение от нижнего края браузера по умолчанию
mobile: true, // поддержка мобильных по умолчанию
live: true // постоянно проверяйте наличие новых WOW-элементов на странице по умолчанию
});
wow.init();
|
1 |
let wow=newWOW({ boxClass’wow’,// класс блока по умолчанию animateClass’animated’,// класс анимации по умолчанию offset,// смещение от нижнего края браузера по умолчанию mobiletrue,// поддержка мобильных по умолчанию livetrue// постоянно проверяйте наличие новых WOW-элементов на странице по умолчанию }); wow.init(); |
Также настройки можно задать с помощью data-атрибутов:
- – позволяет указать время проигрывания анимации. Значение указывается в секундах (s) или миллисекундах (ms). Заменяет классы с типа в animate.css;
- – задает задержку перед проигрыванием анимации в секундах (s) или миллисекундах (ms). Заменяет собой в animate.css, но при этом вы устанавливаете свое значение;
- – количество пикселей от низа экрана до края элемента, когда включается анимация для него;
- – количество повторов анимации. Заменяет в animate.css.
Пример:
Настройки wow.js с помощью data-атрибутов
<div class=»wow animate__animated animate__flipInY» data-wow-offset=»200″
data-wow-delay=»1.5s» data-wow-duration=»2s»>
<img src=»images/pic1.jpg» alt=»Cat»>
</div>
|
1 |
<div class=»wow animate__animated animate__flipInY»data-wow-offset=»200″ data-wow-delay=»1.5s»data-wow-duration=»2s»> <img src=»images/pic1.jpg»alt=»Cat»> <div> |
Все эти атрибуты не являются обязательными и указываются по мере необходимости. Если их нет, анимация будет проигрываться по умолчанию, как только элемент появится на экране при прокрутке окна браузера.
Просмотров:
36
Property Values
| Value | Description |
|---|---|
| animation-name | Specifies the name of the keyframe you want to bind to the selector |
| animation-duration | Specifies how many seconds or milliseconds an animation takes to complete |
animation-timing-function |
Specifies the speed curve of the animation |
| animation-delay | Specifies a delay before the animation will start |
animation-iteration-count |
Specifies how many times an animation should be played |
| animation-direction | Specifies whether or not the animation should play in reverse on alternate cycles |
| animation-fill-mode | Specifies what values are applied by the animation outside the time it is executing |
| animation-play-state | Specifies whether the animation is running or paused |
| initial | Sets this property to its default value. Read about initial |
| inherit | Inherits this property from its parent element. Read about inherit |
CSS Reference
CSS ReferenceCSS Browser SupportCSS SelectorsCSS FunctionsCSS Reference AuralCSS Web Safe FontsCSS Font FallbacksCSS AnimatableCSS UnitsCSS PX-EM ConverterCSS ColorsCSS Color ValuesCSS Default ValuesCSS Entities
CSS Properties
align-content
align-items
align-self
all
animation
animation-delay
animation-direction
animation-duration
animation-fill-mode
animation-iteration-count
animation-name
animation-play-state
animation-timing-function
backface-visibility
background
background-attachment
background-blend-mode
background-clip
background-color
background-image
background-origin
background-position
background-repeat
background-size
border
border-bottom
border-bottom-color
border-bottom-left-radius
border-bottom-right-radius
border-bottom-style
border-bottom-width
border-collapse
border-color
border-image
border-image-outset
border-image-repeat
border-image-slice
border-image-source
border-image-width
border-left
border-left-color
border-left-style
border-left-width
border-radius
border-right
border-right-color
border-right-style
border-right-width
border-spacing
border-style
border-top
border-top-color
border-top-left-radius
border-top-right-radius
border-top-style
border-top-width
border-width
bottom
box-decoration-break
box-shadow
box-sizing
break-after
break-before
break-inside
caption-side
caret-color
@charset
clear
clip
clip-path
color
column-count
column-fill
column-gap
column-rule
column-rule-color
column-rule-style
column-rule-width
column-span
column-width
columns
content
counter-increment
counter-reset
cursor
direction
display
empty-cells
filter
flex
flex-basis
flex-direction
flex-flow
flex-grow
flex-shrink
flex-wrap
float
font
@font-face
font-family
font-feature-settings
font-kerning
font-size
font-size-adjust
font-stretch
font-style
font-variant
font-variant-caps
font-weight
gap
grid
grid-area
grid-auto-columns
grid-auto-flow
grid-auto-rows
grid-column
grid-column-end
grid-column-gap
grid-column-start
grid-gap
grid-row
grid-row-end
grid-row-gap
grid-row-start
grid-template
grid-template-areas
grid-template-columns
grid-template-rows
hanging-punctuation
height
hyphens
@import
isolation
justify-content
@keyframes
left
letter-spacing
line-height
list-style
list-style-image
list-style-position
list-style-type
margin
margin-bottom
margin-left
margin-right
margin-top
max-height
max-width
@media
min-height
min-width
mix-blend-mode
object-fit
object-position
opacity
order
outline
outline-color
outline-offset
outline-style
outline-width
overflow
overflow-x
overflow-y
padding
padding-bottom
padding-left
padding-right
padding-top
page-break-after
page-break-before
page-break-inside
perspective
perspective-origin
pointer-events
position
quotes
resize
right
row-gap
scroll-behavior
tab-size
table-layout
text-align
text-align-last
text-decoration
text-decoration-color
text-decoration-line
text-decoration-style
text-indent
text-justify
text-overflow
text-shadow
text-transform
top
transform
transform-origin
transform-style
transition
transition-delay
transition-duration
transition-property
transition-timing-function
unicode-bidi
user-select
vertical-align
visibility
white-space
width
word-break
word-spacing
word-wrap
writing-mode
z-index
Функция плавности вывода кадров
Существует специальная функция плавности вывода анимируемых кадров. Она называется и определяет скорость воспроизведения анимации. По умолчанию значения функции работают так, что анимация запускается медленно, затем увеличивает скорость и к концу вновь замедляется.
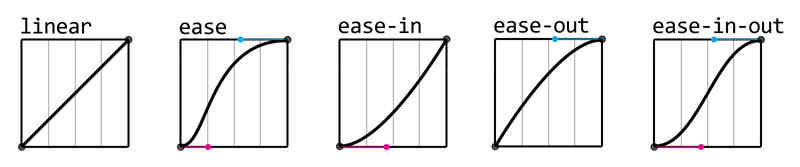
На разных этапах воспроизведения анимация имеет разную скорость
Есть несколько значений, которые вы можете использовать в коде:
- — кадры будут сменяться равномерно на протяжении всего времени без каких-либо колебаний;
- — значение, используемое по умолчанию, то есть сначала воспроизводится медленно, затем ускоряется и замедляется к завершению;
- / — в первом варианте анимация запускается медленно и плавно, ускоряется к своему завершению, во втором — начинается быстро, а под конец замедляется;
- / — значения анимации в шагах, для которых изменения запускаются в начале или в конце каждого шага.
Анимацию также можно разделить на комбинацию численных значений, используя ступенчатую временную функцию , которая включает в себя количество шагов и направление движения, например:
В этом случае в анимации будет пять шагов, последний из которых осуществится прямо перед ее окончанием. Вторым параметром функции может быть одно из следующих значений:
- ;
- ;
- ;
- .
Они определяют момент, когда начинается анимация. Например, означает, что анимация будет начинаться вначале шага, а при , наоборот, в конце с определенной паузой. Используя пошаговую анимацию можно генерировать разные эффекты, такие как отображение процесса загрузки или появляющийся на экране текст.