Стилизация скролла
Содержание:
- Pros and Cons of a Custom Scrollbar
- Примеры кода с полосой прокрутки
- Магия Angular
- Scroll Bar Colors and Metrics
- Customize the Scrollbar
- API
- Scroll Bar Requests
- Menus
- Методы, унаследованные от класса Control
- Keyboard Interface for a Scroll Bar
- How to Create Custom Scrollbars with CSS
- Attaching ScrollBar to a Flickable
- Images
- Настройка скроллбара с помощью Jquery
- Настройка CSS-анимации с помощью ключевых кадров
- Методы, унаследованные от класса Object
- Standard Scroll Bars and Scroll Bar Controls
- Specifying the scope of the custom scrollbar
- Магия CSS
- Hide Scrollbars But Keep Functionality
Pros and Cons of a Custom Scrollbar
Before jumping into the code, I think it’s worth looking at some potential tradeoffs that come with creating a custom scrollbar for your website or app.
The upside is that it can give your website a chance to standout compared to the millions of websites using the browser default scrollbar. Anything that can make your website even a little bit more memorable to visitors will benefit you long term.
On the other hand, many UI designers believe that you should never interfere with «standardized» UI components like the scrollbar. If you modify your scrollbar too much, it may confuse people using your website or app.
If you are doing this for your own personal website you probably don’t need to worry about it as long as you like how it looks.
On the other hand if you are thinking about implementing a custom scrollbar at work or some project where you want to make money, you should try A/B testing and make a data driven decision based on the results.
At the end of the day most of us are writing code to drive revenue for a business, so you always need to keep that in mind.
Примеры кода с полосой прокрутки
Пример 1
Условие примера 1
- На пользовательской форме VBA Excel расположены элементы управления ScrollBar1 и Label1.
- Необходимо задать для полосы прокрутки ScrollBar1 интервал значений от -100 до 100 единиц с шагом 5 и отображением текущего значения на элементе Label1.
- При открытии формы полоса прокрутки должна быть установлена на значении 0.
Решение примера 1
Первоначальные настройки при открытии пользовательской формы:
|
1 |
PrivateSubUserForm_Initialize() Me.Caption=»Пример 1″ WithScrollBar1 .Min=-100 .Max=100 .SmallChange=5 .Value= EndWith Label1.Caption=»0″ EndSub |
Обработка события Change объекта ScrollBar1:
|
1 |
PrivateSubScrollBar1_Change() Label1.Caption=ScrollBar1.Value EndSub |
Обе процедуры размещаются в модуле пользовательской формы VBA Excel.
Пример 2
Условие примера 2
- На пользовательской форме расположены элементы управления ScrollBar1 и TextBox1.
- Интервал значений для полосы прокрутки ScrollBar1 от 0 до 1000 единиц с шагом 10 и отображение текущего значения в поле элемента TextBox1.
- При открытии формы полоса прокрутки должна быть установлена в значение 0.
- Установка соответствующего значения полосы прокрутки при ручном изменении содержимого текстового поля.
- Предусмотреть сообщение о значении TextBox1, не входящем в интервал значений элемента управления ScrollBar1.
Решение примера 2
Первоначальные настройки при открытии пользовательской формы:
|
1 |
PrivateSubUserForm_Initialize() Me.Caption=»Пример 2″ WithScrollBar1 .Min= .Max=1000 .SmallChange=10 .Value= EndWith TextBox1.Text=»0″ EndSub |
Обработка события Change объекта ScrollBar1:
|
1 |
PrivateSubScrollBar1_Change() TextBox1.Text=ScrollBar1.Value EndSub |
Обработка события Change объекта TextBox1:
|
1 |
PrivateSubTextBox1_Change() On ErrorGoToInstr ScrollBar1.Value=TextBox1.Text ExitSub Instr TextBox1.Text=»Недопустимое значение» EndSub |
Если содержимое элемента управления TextBox1 не соответствует интервалу значений полосы прокрутки, возникает ошибка (преобразование в число происходит автоматически). Чтобы ее избежать и вывести сообщение о недопустимости значения, используется обработчик ошибок.
Все три процедуры размещаются в модуле пользовательской формы.
Магия Angular
Бывалый ангулярщик может заметить, что у этого решения крайне низкая производительность. На каждый экземпляр скроллбара мы слушаем все события на документе и каждый раз запускаем проверку изменений. Так дело не пойдет. К счастью, Angular позволяет работать с событиями иначе, о чем я писал ранее. Воспользовавшись библиотекой @tinkoff/ng-event-plugins, мы избавимся от лишних вызовов проверки изменений. Для этого добавим модификатор к подписке и декоратор к обработчику:
Теперь проверка изменений и обработчики событий будут запускаться, только когда мы действительно тянем ползунок. Наш скроллбар готов к использованию. В качестве доработки еще можно следить за изменениями размера самого контейнера, чтобы пересчитать размер ползунков. Для этого отлично подойдет и наша библиотека @ng-web-apis/resize-observer, о которой вы можете почитать тут. Полноценное демо скроллбара доступно на Stackblitz.
Scroll Bar Colors and Metrics
The system-defined color value, COLOR_SCROLLBAR, controls the color within a scroll bar shaft. Use the GetSysColor function to determine the color of the scroll bar shaft and the SetSysColors function to set the color of the scroll bar shaft. Note, however, that this change of color affects all scroll bars in the system.
You can get the dimensions of the bitmaps that the system uses in standard scroll bars by calling the GetSystemMetrics function. Following are the system metric values associated with scroll bars.
| System metric | Description |
|---|---|
| SM_CXHSCROLL | Width of arrow bitmap on horizontal scroll bar |
| SM_CXHTHUMB | Width of scroll box on horizontal scroll bar. This value retrieves the width a scroll bar that has a page size of zero. |
| SM_CXVSCROLL | Width of arrow bitmap on vertical scroll bar |
| SM_CYHSCROLL | Height of arrow bitmap on horizontal scroll bar |
| SM_CYVSCROLL | Height of arrow bitmap on vertical scroll bar |
| SM_CYVTHUMB | Height of scroll box on vertical scroll bar. This value retrieves the height of a scroll bar that has a page size of zero. |
Customize the Scrollbar
Over the years, browser manufacturers have implemented their own means for customizing the appearance of scrollbars.
WebKit Browsers
If you’re using a WebKit browser, you will see that the following scrollbars have been styled using WebKit extensions. See HTML scrollbars for more examples.
WebKit based browsers such as Chrome, Safari, and Opera can take advantage of the various scrollbar pseudo-elements and pseudo-classes.
These allow you to customize all aspects of a scrollbar — from its color, to its size, shadows, and more.
Here are the WebKit pseudo-elements for styling scrollbars:
And here’s where they fit within a scrollbar:
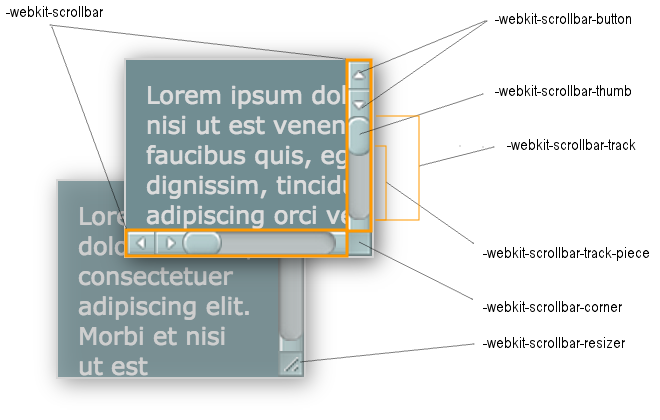
Pseudo-Classes
Here are the WebKit scrollbar pseudo-classes as outlined on the WebKit blog:
- Applies to any scrollbar piece that has a horizontal orientation.
- Applies to any scrollbar piece that has a vertical orientation.
- Applies to buttons and track pieces. It indicates whether or not the button or track piece will decrement the view’s position when used (e.g., up on a vertical scrollbar, left on a horizontal scrollbar).
- Applies to buttons and track pieces. It indicates whether or not the button or track piece will decrement the view’s position when used (e.g., up on a vertical scrollbar, left on a horizontal scrollbar).
- Applies to buttons and track pieces. It indicates whether the object is placed before the thumb.
- Applies to buttons and track pieces. It indicates whether the object is placed after the thumb.
- Applies to buttons and track pieces. It is used to detect whether a button is part of a pair of buttons that are together at the same end of a scrollbar. For track pieces it indicates whether the track piece abuts a pair of buttons.
- Applies to buttons and track pieces. It is used to detect whether a button is by itself at the end of a scrollbar. For track pieces it indicates whether the track piece abuts a singleton button.
- Applies to track pieces and indicates whether or not the track piece runs to the edge of the scrollbar, i.e., there is no button at that end of the track.
- Applies to all scrollbar pieces and indicates whether or not a scrollbar corner is present.
- Applies to all scrollbar pieces and indicates whether or not the window containing the scrollbar is currently active.
You can also use the CSS , , and pseudo-classes with the various scrollbar pieces.
Microsoft also added prefixed versions of these properties that can be used as a synonym for the other properties (eg, can be used as a synonym for in IE8 Standards mode).
API
There are some methods of the plugin you may want to call.
setAnimationSpeed(speed)
Changes programmatic scroll animation speed to the passed – an integer indicating how many milliseconds the animation should last.
It’s also possible to set the animation speed upon plugin initialization. By default it equals .
Note that you may use this method if want to have some scrolls animated and some without animation – to get rid of the animation just call it with .
scrollTo(element)
Scrolls viewport to a given element inside scrolled content. An element might be jQuery object or a selector string. To control animation speed use initialization option. Example usage:
scrollToX(x)
Sets horizontal scrollbar position to pixels. should be in range from 0 to scrolled content width. If it’s outside that range, content will be scrolled to the start or to the end. To control animation speed use initialization option.
scrollToY(y)
Sets vertical scrollbar position to pixels. should be in range from 0 to scrolled content height. If it’s outside that range, content will be scrolled to the start or to the end. To control animation speed use initialization option.
resize(keepPosition)
Recalculates and sets sizes of all scrollbar components. Call this whenever your scrolled block changes its size and scrollbar becomes invalid. After you call it scrollbar is adjusted to new sizes of your block.
Use parameter to decide if the scrollbar should stay in the same position () or change position () so that the thumb position change is proportional to the size change. The first case is useful if your container changes size and you want to show exactly the same content that was visible before size change. The second case is useful when you’re listening to window resize.
Scroll Bar Requests
The user makes scrolling requests by clicking various parts of a scroll bar. The system sends the request to the specified window in the form of a WM_HSCROLL or WM_VSCROLL message. A horizontal scroll bar sends the WM_HSCROLL message; a vertical scroll bar sends the WM_VSCROLL message. Each message includes a request code that corresponds to the user’s action, to the handle to the scroll bar (scroll bar controls only), and, in some cases, to the position of the scroll box.
The following diagram shows the request code that the user generates when clicking various parts of a scroll bar.

The SB_ values specify the action the user takes. An application examines the codes that accompany the WM_HSCROLL and WM_VSCROLL messages and then performs the appropriate scrolling operation. In the following table, the user’s action is specified for each value, followed by the application’s response. In each case, a unit is defined by the application as appropriate for the data. For example, the typical unit for scrolling text vertically is a line of text.
| Request | Action | Response |
|---|---|---|
| SB_LINEUP | The user clicks the top scroll arrow. | Decrements the scroll box position; scrolls toward the top of the data by one unit. |
| SB_LINEDOWN | The user clicks the bottom scroll arrow. | Increments the scroll box position; scrolls toward the bottom of the data by one unit. |
| SB_LINELEFT | The user clicks the left scroll arrow. | Decrements the scroll box position; scrolls toward the left end of the data by one unit. |
| SB_LINERIGHT | The user clicks the right scroll arrow. | Increments the scroll box position; scrolls toward the right end of the data by one unit. |
| SB_PAGEUP | The user clicks the scroll bar shaft above the scroll box. | Decrements the scroll box position by the number of data units in the window; scrolls toward the top of the data by the same number of units. |
| SB_PAGEDOWN | The user clicks the scroll bar shaft below the scroll box. | Increments the scroll box position by the number of data units in the window; scrolls toward the bottom of the data by the same number of units. |
| SB_PAGELEFT | The user clicks the scroll bar shaft to the left of the scroll box. | Decrements the scroll box position by the number of data units in the window; scrolls toward the left end of the data by the same number of units. |
| SB_PAGERIGHT | The user clicks the scroll bar shaft to the right of the scroll box. | Increments the scroll box position by the number of data units in the window; scrolls toward the right end of the data by the same number of units. |
| SB_THUMBPOSITION | The user releases the scroll box after dragging it. | Sets the scroll box to the position specified in the message; scrolls the data by the same number of units the scroll box has moved. |
| SB_THUMBTRACK | The user drags the scroll box. | Sets the scroll box to the position specified in the message and scrolls the data by the same number of units the scroll box has moved for applications that draw data quickly. Applications that cannot draw data quickly must wait for the SB_THUMBPOSITION request code before moving the scroll box and scrolling the data. |
| SB_ENDSCROLL | The user releases the mouse after holding it on an arrow or in the scroll bar shaft. | No response is needed. |
A scroll bar generates SB_THUMBPOSITION and SB_THUMBTRACK request code when the user clicks and drags the scroll box. An application should be programmed to process either the SB_THUMBTRACK or SB_THUMBPOSITION request code.
The SB_THUMBPOSITION request code occurs when the user releases the mouse button after clicking the scroll box. An application that processes this message performs the scrolling operation after the user has dragged the scroll box to the desired position and released the mouse button.
The SB_THUMBTRACK request code occurs as the user drags the scroll box. If an application processes SB_THUMBTRACK request codes, it can scroll the content of a window as the user drags the scroll box. However, a scroll bar can generate many SB_THUMBTRACK request code in a short period, so an application should process these request codes only if it can quickly repaint the content of the window.
Menus
Icon BarMenu IconAccordionTabsVertical TabsTab HeadersFull Page TabsHover TabsTop NavigationResponsive TopnavNavbar with IconsSearch MenuSearch BarFixed SidebarSide NavigationResponsive SidebarFullscreen NavigationOff-Canvas MenuHover Sidenav ButtonsSidebar with IconsHorizontal Scroll MenuVertical MenuBottom NavigationResponsive Bottom NavBottom Border Nav LinksRight Aligned Menu LinksCentered Menu LinkEqual Width Menu LinksFixed MenuSlide Down Bar on ScrollHide Navbar on ScrollShrink Navbar on ScrollSticky NavbarNavbar on ImageHover DropdownsClick DropdownsCascading DropdownDropdown in TopnavDropdown in SidenavResp Navbar DropdownSubnavigation MenuDropupMega MenuMobile MenuCurtain MenuCollapsed SidebarCollapsed SidepanelPaginationBreadcrumbsButton GroupVertical Button GroupSticky Social BarPill NavigationResponsive Header
Методы, унаследованные от класса Control
| Имя метода | Краткое описание | |
| Метод addClass добавляет CSS-класс к компоненту. |
||
| addEvent | Метод addEvent добавляет обработчик события на DOM-вершину. |
|
| addEventHandler | Метод addEventHandler добавляет обработчик события на DOM-вершину. |
|
| addEvents | Метод addEvents добавляет массив обработчиков событий на DOM-вершину. |
|
| Метод addStateClass добавляет CSS-класс к компоненту и удаляет прежний CSS-класс. |
||
| addStyleBySelector | Метод addStyleBySelector создает блок со стилем с указанным css-селектором. |
|
| Метод addToNode добавляет компонент в указанную вершину. |
||
| bindEvents | Метод bindEvents подписывает элемент на все стандартные события. |
|
| Метод clearStylesCache очищает кэш стилей компонента. |
||
| Метод getAnchorFlags возвращает JSON-объект с настройками текущей позиции компонента. |
||
| Метод getClass возвращает текущие css-классы компонента. |
||
| Метод getCssStyle возвращает стили для указанной вершины. |
||
| Метод getDomNode возвращает главную DOM-вершину компонента. |
||
| Метод getFocused определяет наличие фокуса у компонента. |
||
| getFunctionByName | Метод getFunctionByName возвращает функцию по имени. |
|
| getIsBinded | Метод getIsBinded возвращает признак подписи элемента на события DOM-вершины. |
|
| Метод hasClass определяет, задан ли для корневой DOM-вершины элемента управления указанный CSS-класс. |
||
| Метод hide скрывает элемент управления. |
||
| Метод hideToolTip очищает таймаут появления подсказки и скрывает ее, если она был показана. |
||
| Метод isResingNow определяет, изменяются ли в данный момент размеры компонента. |
||
| refreshBindingProperty | Метод refreshBindingProperty обновляет привязанное свойство по имени. |
|
| refreshItemsStyle | Метод refreshItemsStyle обновляет CSS-стили дочерних элементов. |
|
| refreshStyle | Метод refreshStyle обновляет CSS-стили элемента. |
|
| Метод removeClass удаляет CSS-класс из компонента. |
||
| Метод removeEvent удаляет обработчик события у DOM-вершины. |
||
| removeEventHandler | Метод removeEventHandler удаляет обработчик события DOM-вершины. |
|
| removeFromDOM | Метод removeFromDOM удаляет вершину из DOM-структуры. |
|
| Метод removeStateClasses удаляет CSS-классы компонента. |
||
| Метод setDraggable устанавливает возможность перетаскивания компонента на html-странице. |
||
| Метод setFocus устанавливает фокус компонента. |
||
| Метод setIsHovered отображает компонент как при наведении на него курсора. |
||
| Метод setIsPressed отображает компонент как при клике по нему. |
||
| Метод setOpacityIE8 устанавливает значение прозрачности компонента в браузере InternetExplorer 8. |
||
| Метод setSize устанавливает размеры компонента. |
||
| Метод show отображает элемент управления. |
||
| unBindEvents | Метод unBindEvents отписывает элемент от всех стандартных событий. |
|
|
Метод updatePosition корректирует размер и положение при абсолютном позиционировании на основе текущих параметров. |
||
| Метод updateSize обновляет размеры компонента подгонке размеров контейнера, в котором находится компонент. |
Keyboard Interface for a Scroll Bar
A scroll bar control provides a built-in keyboard interface that enables the user to issue scrolling requests by using the keyboard; a standard scroll bar does not. When a scroll bar control has the keyboard focus, it sends WM_HSCROLL and WM_VSCROLL messages to its parent window when the user presses the arrow keys. The request code is sent with each message corresponding to the arrow key the user has pressed. Following are the arrow keys and their corresponding request codes.
| Arrow key | Request code |
|---|---|
| DOWN | SB_LINEDOWN or SB_LINERIGHT |
| END | SB_BOTTOM |
| HOME | SB_TOP |
| LEFT | SB_LINEUP or SB_LINELEFT |
| PGDN | SB_PAGEDOWN or SB_PAGERIGHT |
| PGUP | SB_PAGEUP or SB_PAGELEFT |
| RIGHT | SB_LINEDOWN or SB_LINERIGHT |
| UP | SB_LINEUP or SB_LINELEFT |
Note
The keyboard interface of a scroll bar control sends the SB_TOP and SB_BOTTOM request codes. The SB_TOP request code indicates that the user has reached the top value of the scrolling range. An application scrolls the window content downward so that the top of the data object is visible. The SB_BOTTOM request code indicates that the user has reached the bottom value of the scrolling range. If an application processes the SB_BOTTOM request code, it scrolls the window content upward so that the bottom of the data object is visible.
If you want a keyboard interface for a standard scroll bar, you can create one yourself by processing the WM_KEYDOWN message in your window procedure and then performing the appropriate scrolling action based on the virtual-key code that accompanies the message. For information about how to create a keyboard interface for a scroll bar, see Creating a Keyboard Interface for a Standard Scroll Bar.
How to Create Custom Scrollbars with CSS
With our setup out of the way, we can jump into the fun part of the tutorial. The first part of this section will be learning the various CSS properties available to use for styling.
In the second part we’ll implement four different types of scrollbars to give you some ideas for making your own scrollbars.
Unfortunately we still don’t have any standardized cross-browser support for styling scrollbars with CSS. Firefox and Webkit-based browsers like Chrome, Edge, and Safari have different properties for styling.
This tutorial will mainly focus on Webkit browsers, because they offer more options for styling, but we will briefly cover Firefox as well.
- – the entire scrollbar
- – the entire progress bar area of the scrollbar
- – the draggable section of the scrollbar
The below properties are available but are less commonly used:
- – the up/down buttons at each end of the scrollbar
- – part of scrollbar not covered by the thumb
- – bottom corner where horizontal and vertical scrollbars meet
There are currently two available CSS properties for styling scrollbars in Firefox
- – controls width of scrollbar, with only two options available being or
- – takes two colors which are used for the coloring of the thumb and track of the scrollbar in that order
Now that you know your options for customizing scrollbars, let’s put it into practice with some examples.
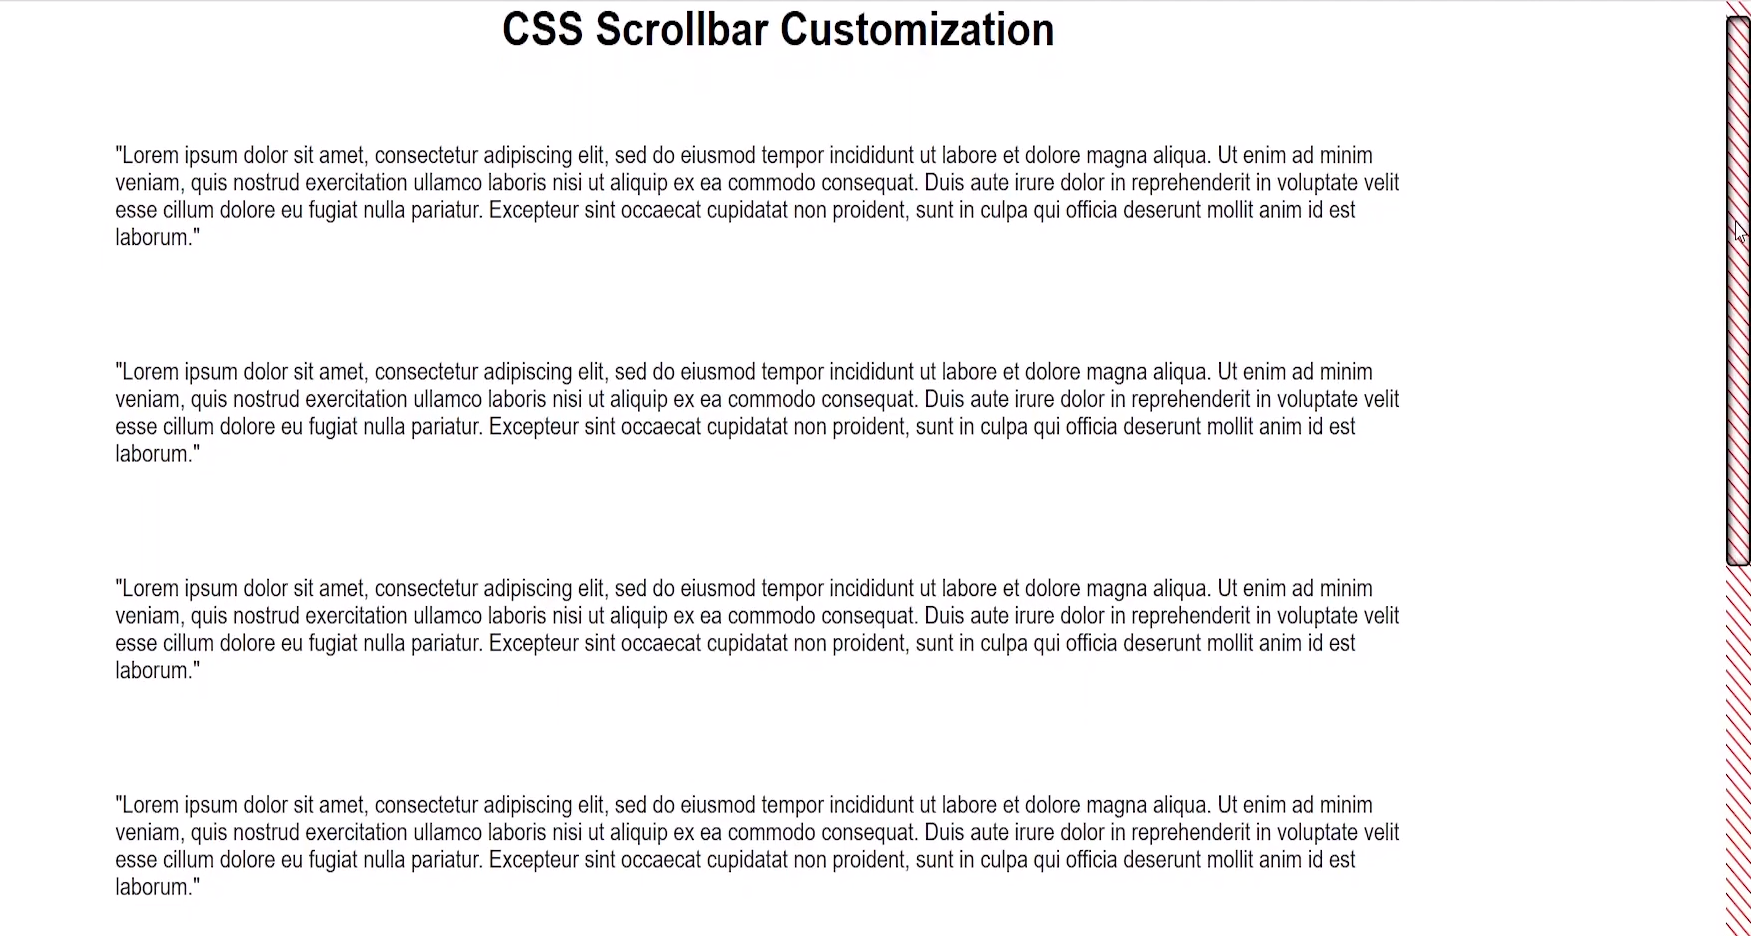
Dark theme websites are all the rage right now. Sticking with the default browser scrollbar could come off as jarring to users because it doesn’t fit all that well with a dark themed website.
Let’s use our newfound knowledge of CSS to create a dark theme scrollbar with a rounded border inspired by CSS Tricks’ website:
The result is a little hard to see in the screenshot, but the track is black and the thumb is a darkish gray color.
For this example you’ll be making a minimalist scrollbar. This type of scrollbar would work well if you are going for a simple, elegant style for your website.
The most important thing to note is that you have the ability to use and pseudo-elements from CSS to further style your scrollbar. In this case the scrollbar will turn a darker gray when you hover and drag on the thumb.
The result:
In this section, the focus is on using a repeating linear gradient to create a pattern effect on our scrollbar track. The same could be done for the scrollbar thumb as well.
Another thing to notice is that you can style the scrollbar thumb with a border, which you can use to create a number of cool effects. In this case I made the background color of the thumb transparent so that you can see the scrollbar track pattern as we scroll.
The result:
This example uses a linear gradient and a trick with box shadow to make it look like the scrollbar is changing color as you move up and down the page. What’s really happening is that the background of the scrollbar track is being revealed beneath the thumb.
It works because the box-shadow takes up all the space of the scrollbar except for where the thumb is. Because the thumb is transparent the gradient color of the background shows through.
The result:
Attaching ScrollBar to a Flickable
When ScrollBar is attached or to a Flickable, its geometry and the following properties are automatically set and updated as appropriate:
An attached ScrollBar re-parents itself to the target Flickable. A vertically attached ScrollBar resizes itself to the height of the Flickable, and positions itself to either side of it based on the . A horizontally attached ScrollBar resizes itself to the width of the Flickable, and positions itself to the bottom. The automatic geometry management can be disabled by specifying another parent for the attached ScrollBar. This can be useful, for example, if the ScrollBar should be placed outside a clipping Flickable. This is demonstrated by the following example:
Flickable {
    id: flickable
    clip: true

    ScrollBar.vertical: ScrollBar {
        parent: flickable.parent
        anchors.top: flickable.top
        anchors.left: flickable.right
        anchors.bottom: flickable.bottom
    }
}
Notice that ScrollBar does not filter key events of the Flickable it is attached to. The following example illustrates how to implement scrolling with up and down keys:
Flickable {
    focus: true

    Keys.onUpPressed: scrollBar.decrease()
    Keys.onDownPressed: scrollBar.increase()

    ScrollBar.vertical: ScrollBar { id: scrollBar }
}
Images
SlideshowSlideshow GalleryModal ImagesLightboxResponsive Image GridImage GridTab GalleryImage Overlay FadeImage Overlay SlideImage Overlay ZoomImage Overlay TitleImage Overlay IconImage EffectsBlack and White ImageImage TextImage Text BlocksTransparent Image TextFull Page ImageForm on ImageHero ImageBlur Background ImageChange Bg on ScrollSide-by-Side ImagesRounded ImagesAvatar ImagesResponsive ImagesCenter ImagesThumbnailsBorder Around ImageMeet the TeamSticky ImageFlip an ImageShake an ImagePortfolio GalleryPortfolio with FilteringImage ZoomImage Magnifier GlassImage Comparison Slider
Настройка скроллбара с помощью Jquery
Если вам нравится программирование front-end, вы можете использовать Jquery-плагин JScrollPane. Он довольно прост в использовании. После того, как вы загрузили и подключили соответствующие файлы в заголовке документа, нужно вызвать одну Javascript-функцию для инициализации панели прокрутки. Вы можете легко изменить дизайн полосы прокрутки с помощью CSS или выбрать одну из существующих тем.
С помощью этого плагина вы можете создавать скроллинг для всех типов браузеров. Так что я бы посоветовал вам воспользоваться им, чтобы сэкономить время и охватить сразу все браузеры:
<link rel="stylesheet" type="text/css" href="jquery.jscrollpane.css" />

<!-- jQuery file from Google CDN -->
<script src="https://ajax.googleapis.com/ajax/libs/jquery/1.8.2/jquery.min.js"></script>

<!-- the jScrollPane script -->
<script src="jquery.jscrollpane.min.js"></script>

<script>
    $(document).ready(function () {
        $('.container').jScrollPane();
    }
});
</script>
Если вы захотите изменить настройки CSS scroll по умолчанию, предоставленные JScrollPane, нужно редактировать стили соответствующих элементов:
.jspTrack {
    background: #b46868;
    position: relative;
}

.jspDrag {
    background: #c43232;
    position: relative;
    cursor: pointer;
}
Настройка CSS-анимации с помощью ключевых кадров
Начнем с создания CSS-анимации, которая определяется ключевыми кадрами .
@keyframes wipe-enter {
  0% {
    transform: scale(0, .025);
  }
  50% {
    transform: scale(1, .025);
  }
}
Анимацию можно назвать как угодно, пусть будет . Здесь HTML-элемент будет увеличиваться в ширину, а затем в высоту.
После того, как определены ключевые кадры, можно использовать анимацию для элемента, установив свойству название ключевых кадров: . Кроме этого необходимо установить — продолжительность анимации и — счетчик итераций, указывающий, сколько раз анимация должна воспроизводиться, например — бесконечно.
CSS-класс пусть будет заключён в медиа-запрос . Это обеспечит запуск анимации только в том случае, если пользователь не ограничил её и не включил параметр «уменьшить движение» в своей операционной системе.
В этом примере будет анимирован HTML-элемент квадратной формы:
See this code CSS-animation width+height demo on x.xhtml.ru.
Для CSS-анимации можно использовать сокращённое написание свойства , например:
Методы, унаследованные от класса Object
| Имя метода | Краткое описание | |
| clone | Метод clone создает копию объекта. |
|
| dispose | Метод dispose уничтожает компонент. |
|
| getHashCode | Метод getHashCode возвращает хэш-код объекта репозитория. |
|
| getSettings | Метод getSettings возвращает настройки объекта репозитория. |
|
| getTypeName | Метод getTypeName возвращает имя типа объекта без пространства имен, к которому он принадлежит. |
|
| isEqual | Метод isEqual определяет, равен ли заданный объект текущему объекту репозитория. |
|
| isLive | Метод isLive определяет действительность объекта репозитория. |
|
| removeAllEvents | Метод removeAllEvents удаляет все обработчики событий объекта по заданному контексту. |
|
| setSettings | Метод setSettings задает настройки объекта репозитория. |
|
| defineProps | Метод defineProps создает методы get и set из массива имен для указанного класса. |
|
| keys | Метод keys возвращает массив названий методов и свойств для указанного объекта. |
См. также:
Справочная
система на версию 9.3
от 29/06/2021,
ООО «ФОРСАЙТ»,
Standard Scroll Bars and Scroll Bar Controls
A scroll bar is included in a window either as a standard scroll bar or as a scroll bar control. A standard scroll bar is located in the nonclient area of a window. It is created with the window and displayed when the window is displayed. The sole purpose of a standard scroll bar is to enable the user to generate scrolling requests for viewing the entire content of the client area. You can include a standard scroll bar in a window by specifying WS_HSCROLL, WS_VSCROLL, or both styles when you create the window. The WS_HSCROLL style creates a horizontal scroll bar positioned at the bottom of the client area. The WS_VSCROLL style creates a vertical scroll bar positioned at the right of the client area. The SM_CXHSCROLL and SM_CYHSCROLL system metric values define the width and height of a standard horizontal scroll bar. The SM_CXVSCROLL and SM_CYVSCROLL values define the width and height of a standard vertical scroll bar. A standard scroll bar is part of its associated window and therefore does not have a window handle of its own.
A scroll bar control is a control window that belongs to the SCROLLBAR window class. A scroll bar control appears and functions like a standard scroll bar, but it is a separate window. As a separate window, a scroll bar control takes direct input focus. Unlike a standard scroll bar, a scroll bar control also has a built-in keyboard interface.
You can use as many scroll bar controls as needed in a single window. When you create a scroll bar control, you must specify the scroll bar’s size and position. However, if a scroll bar control’s window can be resized, adjustments to the scroll bar’s size must be made whenever the size of the window changes.
The advantage of using a standard scroll bar is that the system creates the scroll bar and automatically sets its size and position. However, standard scroll bars are sometimes too restrictive. For example, suppose that you want to divide a client area into quadrants and use a separate set of scroll bars to control the content of each quadrant. You cannot use standard scroll bars because you can only create one set of scroll bars for a particular window. Use scroll bar controls instead, because you can add as many of them to a window as you want.
Applications can provide scroll bar controls for purposes other than scrolling the content of a window. For example, a screen saver application might provide a scroll bar for setting the speed at which graphics are moved about on the screen.
A scroll bar control can have a number of styles that serves to control the orientation and position of the scroll bar. You specify the styles that you want when you call the CreateWindowEx function to create a scroll bar control. Some of the styles create a scroll bar control that uses a default width or height. However, you must always specify the x- and y-coordinates and the other dimensions of the scroll bar.
For a table of scroll bar control styles, see Scroll Bar Control Styles.
Note
To use visual styles with scroll bars, an application must include a manifest and must call InitCommonControls at the beginning of the program. For information on visual styles, see Visual Styles. For information on manifests, see Enabling Visual Styles.
Specifying the scope of the custom scrollbar
An important thing to know is that where to customize the scrollbar. Do you want the style to be generic and work for all scrollbars on the website? Or do you want it for specific sections only?
With the old syntax, we can write the selectors without attaching them to an element, and they will be applied to all scrollable elements.
However, if you want to apply for a specific section only, you need to append the element before the selectors.
For the new syntax, it’s almost the same. The thing that I noticed is that if you want a generic style, it should be applied to the element, not the .
I tried adding the above for the but it didn’t work as expected.
Now that we know how the old and new syntax work, let’s get into customizing some scrollbar designs.
Магия CSS
Без нее, конечно, не обойтись. Во-первых, нам нужно скрыть нативные скроллбары. Это уже можно сделать во всех браузерах. Для этого есть стандартное правило , которое на данный момент работает как раз только в Firefox. Для старых версий Edge и IE есть его аналог . Однако IE мы поддерживать не будем, так как нам понадобится . В Chrome и Safari уже давно можно использовать псевдоселектор .
Во-вторых, чтобы не нарушать нативную работу и скроллить сам контейнер, нам нужно обойтись без вложенной скроллящейся обертки. А значит, необходимо реализовать что-то вроде локального для ползунков. Абсолютное позиционирование не поможет: при прокрутке ползунки будут исчезать из виду вместе с содержимым.
Этого мы сможем добиться с помощью хитрой комбинации у ползунков и у самого компонента. Внутри нам понадобятся два контейнера:
Для начала мы изолируем контекст наложения. Не все про это знают, из-за чего на проектах часто можно встретить . Чтобы ничто из контента не смогло перекрыть ползунки, мы повесим на него . Это создаст в его рамках новый контекст наложения и не позволит внутренним элементам перекрыть что-то снаружи.
Ползункам зададим , чтобы поднять их выше контента, а также минимальную ширину 100%. Получим следующую картину:
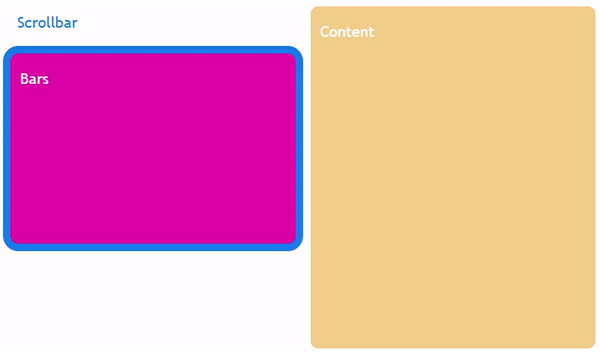
Ползунки заняли все место, сдвинув содержимое вправо. При этом прокрутка работает и ползунки никуда не деваются. Остается добавить им , чтобы они «подвинулись» и освободили место под содержимое компонента.
Hide Scrollbars But Keep Functionality
To hide the scrollbars, but still be able to keep scrolling, you can use the following code:
Example
/* Hide scrollbar for Chrome, Safari and Opera */
.example::-webkit-scrollbar { display: none;}/* Hide scrollbar
for IE, Edge and Firefox */.example { -ms-overflow-style: none; /*
IE and Edge */ scrollbar-width: none; /* Firefox */}
Webkit browsers, such as Chrome, Safari and Opera, supports the non-standard pseudo element, which allows us to modify the look of the browser’s scrollbar. IE and Edge supports the property,
and Firefox supports the property, which allows us to hide the scrollbar, but keep functionality.
❮ Previous
Next ❯