Адаптивные изображения
Содержание:
- Параметр HEIGHT и WIDTH
- HTML Tags
- HTML Теги
- The new loading attribute
- Responsive Image Gallery
- Attributes
- Code Example
- Controlling Image Width
- Informing the Browser — the actual purpose of
- More Examples
- HTML Справочник
- HTML Теги
- HTML Reference
- HTML Tags
- HTML Ссылки
- HTML Теги
- Атрибуты «width» и «height»
- Deprecated attributes
- Определение и использование
- Informing the Browser — the actual purpose of width
- The alt description — Users
- Тень от изображения.
- CSS Advanced
- Информирование браузера — основная цель атрибута width
- Резюме раздела
- Атрибуты
- Размеры изображения
- Изображения в качестве фона.
- The alt description — Search Engines
Параметр HEIGHT и WIDTH
| ШТМЛ: | 3.2 | 4 | XШТМЛ: | 1.0 | 1.1 |
Описание
Для изменения размеров Имаги средствами ШТМЛ предусмотрены параметры
height и width. Допускается
использовать значения в пикселах или процентах. Если установлена процентная
запись, то размеры Имаги вычисляются относительно родительского элемента — контейнера, где находится тег <IMG>.
В случае отсутствия родительского контейнера, в его качестве выступает окно
браузера. Иными словами, width=»100%»
означает, что рисунок будет растянут на всю ширину web-страницы. Добавление
только одного параметра width или height
сохраняет пропорции и отношение сторон Имаги. Браузер при этом ожидает
полной загрузки рисунка, чтобы определить его первоначальную высоту и ширину.
Обязательно задавайте размеры всех рисунков на web-странице. Это несколько
ускоряет загрузку страницы, поскольку браузеру нет нужды вычислять размер каждого
рисунка после его получения
Это утверждение особенно важно для рисунков,
размещенных внутри таблицы
Ширину и высоту Имаги можно менять как в меньшую, так и большую сторону.
Однако на скорость загрузки рисунка это никак не влияет, поскольку размер файла
остается неизменным
Поэтому с осторожностью уменьшайте изображение, т.к. это
может вызвать недоумение у читателей, отчего такой маленький рисунок так долго
грузится
А вот увеличение размеров приводит к обратному эффекту — размер
Имаги велик, но файл относительно Имаги аналогичного размера загружается
быстрее. Но качество рисунка при этом ухудшается.
<img height=»высота»>
<img width=»ширина»>
HTML Tags
<!—><!DOCTYPE><a><abbr><acronym><address><applet><area><article><aside><audio><b><base><basefont><bdi><bdo><big><blockquote><body><br><button><canvas><caption><center><cite><code><col><colgroup><data><datalist><dd><del><details><dfn><dialog><dir><div><dl><dt><em><embed><fieldset><figcaption><figure><font><footer><form><frame><frameset><h1> — <h6><head><header><hr><html><i><iframe><img><input><ins><kbd><label><legend><li><link><main><map><mark><meta><meter><nav><noframes><noscript><object><ol><optgroup><option><output><p><param><picture><pre><progress><q><rp><rt><ruby><s><samp><script><section><select><small><source><span><strike><strong><style><sub><summary><sup><svg><table><tbody><td><template><textarea><tfoot><th><thead><time><title><tr><track><tt><u><ul><var><video>
HTML Теги
<!—><!DOCTYPE><a><abbr><acronym><address><applet><area><article><aside><audio><b><base><basefont><bdi><bdo><big><blockquote><body><br><button><canvas><caption><center><cite><code><col><colgroup><data><datalist><dd><del><details><dfn><dialog><dir><div><dl><dt><em><embed><fieldset><figcaption><figure><font><footer><form><frame><frameset><h1> — <h6><head><header><hr><html><i><iframe><img><input><ins><kbd><label><legend><li><link><main><map><mark><meta><meter><nav><noframes><noscript><object><ol><optgroup><option><output><p><param><picture><pre><progress><q><rp><rt><ruby><s><samp><script><section><select><small><source><span><strike><strong><style><sub><summary><sup><svg><table><tbody><td><template><textarea><tfoot><th><thead><time><title><tr><track><tt><u><ul><var><video>
The new loading attribute
There is a new HTML attribute that allows deferring image and iframe loading until they are close to being shown. The WHATWG has a pull request for this feature, and it is already a part of Chromium (as of v76).
Supported values for the attribute include:
- «lazy» which defers the load until the image or iframe reaches a distance threshold from the viewport.
- «eager» which loads the resource immediately.
- «auto» which is the default behavior, loads the resource.
You can use the lazy value to take advantage of browser-native lazy loading:
Lazy loading is a set of techniques in web and application development that defers the loading of resources on a page to a later point in time when those resources are needed instead of loading them upfront. These techniques help improve performance and utilization of the device’s resources reducing associated costs.
Responsive Image Gallery
CSS can be used to create image galleries. This example use
media queries to re-arrange the images on different screen sizes. Resize the
browser window to see the effect:
Add a description of the image here
Add a description of the image here

Add a description of the image here

Add a description of the image here
Example
.responsive {
padding: 0 6px; float: left; width: 24.99999%;}@media only screen and
(max-width: 700px){ .responsive {
width: 49.99999%; margin: 6px
0; }}@media only screen and (max-width: 500px){ .responsive { width: 100%;
}}
Tip: Read more about Responsive Web Design in our
CSS RWD Tutorial.
Attributes
| Attribute | Value | Description |
|---|---|---|
| alt | text | Specifies an alternate text for an image |
| crossorigin | anonymous use-credentials |
Allow images from third-party sites that allow cross-origin access to be used with canvas |
| height | pixels | Specifies the height of an image |
| ismap | ismap | Specifies an image as a server-side image map |
| eagerlazy | Specifies whether a browser should load an image immediately or to defer loading of images until some conditions are met |
|
| longdesc | URL | Specifies a URL to a detailed description of an image |
| referrerpolicy | no-referrerno-referrer-when-downgradeorigin origin-when-cross-originunsafe-url |
Specifies which referrer information to use when fetching an image |
| sizes | sizes | Specifies image sizes for different page layouts |
| src | URL | Specifies the path to the image |
| srcset | URL-list | Specifies a list of image files to use in different situations |
| usemap | #mapname | Specifies an image as a client-side image map |
| width | pixels | Specifies the width of an image |
Code Example

Controlling Image Width
Before the advent of CSS, the display width of an image was controlled by the attribute. This usage has been deprecated. In the absence of any CSS rules defining the display width of the image, it will still work in most browsers. However, this is specifically contrary to the HTML5 specification.
(Note: The image is much larger than 500px wide.)
For controlling how an image displays you should use CSS instead.
#fixed-width-flamingo { width: 500px; }
Responsive Image Widths
Generally speaking, you usually don’t want to control the exact width of an image. Every visitor who comes to your website has a potentially different size screen. If you specify the width, it may be much too small for some users and much too big for others. Most of the time, the best option is to make sure that your image is inside of a responsive (percent-based) container and then let it fill the container.
#responsive-image {width: 100%;height: auto;}
If you want to ensure a fully-responsive, optimal experience for all users, you can also use to specify additional image sizes or .
Informing the Browser — the actual purpose of
The actual purpose of the attribute, according to the specification, is to inform the browser of the actual, intrinsic width (in CSS pixels) of the image file. In other words — the attribute should be used to describe the source file, not how you want it displayed. This information can then be used by the browser in optimizing the rendering. This means that if you use CSS the way should, then the CSS — and not the element — will determine the actual display size of the image.
Note: On most screens, the image would overflow the container if it was actually 1280 pixels wide.
Should I use ?
Yes. It is not essential, but it will help the browser render your page faster and more cleanly, especially when combined with the element. Consider the example above — the CSS is set to and the is set to . Until the browser is able to download the entire image, and check the file header for its size, how does the browser know how much height to allot for the image? In the absence of a and attribute, it doesn’t. However, if both are specified, the browser can do some math to figure it out:
Doing this will stop that annoying jump that happens when a freshly loaded images suddenly takes up space in the document and shoves all the content down, causing the user to lose their place on the page. So yes, use the (and the ) attribute. But use it correctly — to identify the intrinsic height of the image file, not to specify the desired layout size.
Adam Wood
More Examples
Example
Align image (with CSS):
<img src=»smiley.gif» alt=»Smiley face» width=»42″ height=»42″ style=»vertical-align:bottom»>
<img src=»smiley.gif» alt=»Smiley face» width=»42″ height=»42″ style=»vertical-align:middle»>
<img src=»smiley.gif» alt=»Smiley face» width=»42″ height=»42″ style=»vertical-align:top»>
<img src=»smiley.gif» alt=»Smiley face» width=»42″ height=»42″ style=»float:right»>
<img src=»smiley.gif» alt=»Smiley face» width=»42″ height=»42″ style=»float:left»>
Example
Add image border (with CSS):
<img src=»smiley.gif» alt=»Smiley face» width=»42″ height=»42″
style=»border:5px solid black»>
Example
Add left and right margins to image (with CSS):
<img src=»smiley.gif» alt=»Smiley face» width=»42″ height=»42″
style=»vertical-align:middle;margin:0px 50px»>
Example
Add top and bottom margins to image (with CSS):
<img src=»smiley.gif» alt=»Smiley face» width=»42″ height=»42″ style=»vertical-align:middle;margin:50px 0px»>
Example
How to insert images from another folder or from another web site:
<img src=»/images/stickman.gif» alt=»Stickman» width=»24″ height=»39″>
<img src=»https://www.w3schools.com/images/lamp.jpg» alt=»Lamp» width=»32″
height=»32″>
Example
How to add a hyperlink to an image:
<a href=»https://www.w3schools.com»><img src=»w3html.gif»
alt=»W3Schools.com» width=»100″ height=»132″></a>
Example
How to create an image map, with clickable regions. Each region is a hyperlink:
<img src=»workplace.jpg» alt=»Workplace» usemap=»#workmap» width=»400″
height=»379″><map name=»workmap»> <area shape=»rect»
coords=»34,44,270,350″ alt=»Computer» href=»computer.htm»> <area
shape=»rect» coords=»290,172,333,250″ alt=»Phone» href=»phone.htm»>
<area shape=»circle» coords=»337,300,44″ alt=»Cup of coffee» href=»coffee.htm»>
</map>
HTML Справочник
HTML Теги по алфавитуHTML Теги по категорииHTML АтрибутыHTML Глобальные атрибутыHTML Атрибуты событийHTML ЦветаHTML CanvasHTML Аудио/ВидеоHTML Наборы символовHTML DoctypeHTML URL кодированиеHTML Коды языковHTML Коды странHTTP СообщенияHTTP МетодыPX в EM КонвертерГорячие клавиши
HTML Теги
<!—>
<!DOCTYPE>
<a>
<abbr>
<acronym>
<address>
<applet>
<area>
<article>
<aside>
<audio>
<b>
<base>
<basefont>
<bdi>
<bdo>
<big>
<blockquote>
<body>
<br>
<button>
<canvas>
<caption>
<center>
<cite>
<code>
<col>
<colgroup>
<data>
<datalist>
<dd>
<del>
<details>
<dfn>
<dialog>
<dir>
<div>
<dl>
<dt>
<em>
<embed>
<fieldset>
<figcaption>
<figure>
<font>
<footer>
<form>
<frame>
<frameset>
<h1> — <h6>
<head>
<header>
<hr>
<html>
<i>
<iframe>
<img>
<input>
<ins>
<kbd>
<label>
<legend>
<li>
<link>
<main>
<map>
<mark>
<meta>
<meter>
<nav>
<noframes>
<noscript>
<object>
<ol>
<optgroup>
<option>
<output>
<p>
<param>
<picture>
<pre>
<progress>
<q>
<rp>
<rt>
<ruby>
<s>
<samp>
<script>
<section>
<select>
<small>
<source>
<span>
<strike>
<strong>
<style>
<sub>
<summary>
<sup>
<svg>
<table>
<tbody>
<td>
<template>
<textarea>
<tfoot>
<th>
<thead>
<time>
<title>
<tr>
<track>
<tt>
<u>
<ul>
<var>
<video>
<wbr>
HTML Reference
HTML by AlphabetHTML by CategoryHTML Browser SupportHTML AttributesHTML Global AttributesHTML EventsHTML ColorsHTML CanvasHTML Audio/VideoHTML Character SetsHTML DoctypesHTML URL EncodeHTML Language CodesHTML Country CodesHTTP MessagesHTTP MethodsPX to EM ConverterKeyboard Shortcuts
HTML Tags
<!—>
<!DOCTYPE>
<a>
<abbr>
<acronym>
<address>
<applet>
<area>
<article>
<aside>
<audio>
<b>
<base>
<basefont>
<bdi>
<bdo>
<big>
<blockquote>
<body>
<br>
<button>
<canvas>
<caption>
<center>
<cite>
<code>
<col>
<colgroup>
<data>
<datalist>
<dd>
<del>
<details>
<dfn>
<dialog>
<dir>
<div>
<dl>
<dt>
<em>
<embed>
<fieldset>
<figcaption>
<figure>
<font>
<footer>
<form>
<frame>
<frameset>
<h1> — <h6>
<head>
<header>
<hr>
<html>
<i>
<iframe>
<img>
<input>
<ins>
<kbd>
<label>
<legend>
<li>
<link>
<main>
<map>
<mark>
<meta>
<meter>
<nav>
<noframes>
<noscript>
<object>
<ol>
<optgroup>
<option>
<output>
<p>
<param>
<picture>
<pre>
<progress>
<q>
<rp>
<rt>
<ruby>
<s>
<samp>
<script>
<section>
<select>
<small>
<source>
<span>
<strike>
<strong>
<style>
<sub>
<summary>
<sup>
<svg>
<table>
<tbody>
<td>
<template>
<textarea>
<tfoot>
<th>
<thead>
<time>
<title>
<tr>
<track>
<tt>
<u>
<ul>
<var>
<video>
<wbr>
HTML Ссылки
HTML по АлфавитуHTML по КатегориямHTML Атрибуты ТеговHTML Атрибуты ГлобалHTML Атрибуты СобытийHTML ЦветаHTML ХолстыHTML Аудио / ВидеоHTML Наборы символовHTML DOCTYPEsHTML Кодирование URLHTML Языковые кодыHTML Коды странHTTP Ответы сервераHTTP МетодыPX в EM конвертерГорячие клавиши
HTML Теги
<!—>
<!DOCTYPE>
<a>
<abbr>
<acronym>
<address>
<applet>
<area>
<article>
<aside>
<audio>
<b>
<base>
<basefont>
<bdi>
<bdo>
<big>
<blockquote>
<body>
<br>
<button>
<canvas>
<caption>
<center>
<cite>
<code>
<col>
<colgroup>
<data>
<datalist>
<dd>
<del>
<details>
<dfn>
<dialog>
<dir>
<div>
<dl>
<dt>
<em>
<embed>
<fieldset>
<figcaption>
<figure>
<font>
<footer>
<form>
<frame>
<frameset>
<h1> — <h6>
<head>
<header>
<hr>
<html>
<i>
<iframe>
<img>
<input>
<ins>
<kbd>
<label>
<legend>
<li>
<link>
<main>
<map>
<mark>
<menu>
<menuitem>
<meta>
<meter>
<nav>
<noframes>
<noscript>
<object>
<ol>
<optgroup>
<option>
<output>
<p>
<param>
<picture>
<pre>
<progress>
<q>
<rp>
<rt>
<ruby>
<s>
<samp>
<script>
<section>
<select>
<small>
<source>
<span>
<strike>
<strong>
<style>
<sub>
<summary>
<sup>
<svg>
<table>
<tbody>
<td>
<template>
<textarea>
<tfoot>
<th>
<thead>
<time>
<title>
<tr>
<track>
<tt>
<u>
<ul>
<var>
<video>
<wbr>
Атрибуты «width» и «height»
Вы уже знаете, что браузер загружает изображения после того, как загрузит HTML-документ и начнет отображать веб-страницу. И если вы отдельно не укажете размеры изображения, то браузер не будет их знать до тех пор, пока не загрузит рисунок. В этом случае вместо изображения сначала отображается квадратик, а после загрузки графического файла происходит обновление страницы с соответствующим перемещением текста, других объектов страницы и потерей времени. Если же размеры заданы, то браузер оставляет место для изображения и страница загружается быстрее. Вы также можете указать значения атрибутов width и height, которые меньше или больше, чем фактические размеры изображения, и браузер установит пропорции рисунка так, чтобы они соответствовали новым размерам.
Их значения можно указывать в пикселах или процентах от размера окна (в этом случае после размера ставится знак %). Если после числовых значений атрибутов размерность не указана явно то, по-умолчанию, браузер интерпретирует эти величины в пикселях.
Пример: использования атрибутов width и height
- Результат
- HTML-код
- Попробуй сам »
| Если вам нужно значительно изменить размеры изображения, то используйте специальные графические редакторы для работы с изображениями. Они смогут изменить размеры изображения вовсе без искажений. |
Если указан только один из атрибутов, то второй вычисляется автоматически с сохранением пропорций. При этом размер загружаемого изображения не изменяется, но время на его трансформацию, естественно, требуется. При больших размерах файла затраты времени, при этом, могут быть достаточно ощутимыми.
Если вы используете атрибуты width и height для того, чтобы изменить размеры изображения в браузере, то можно сказать, что вы применяете их для оформления веб-страницы, а в этом случае, лучше использовать CSS, что позволит добиться тех же результатов. Вы можете использовать атрибут style указав свойства width и height изображения:
Deprecated attributes
The element has been a part of the HTML specification almost since the beginning, and has been a vital part of HTML-based page design since before the advent of modern browsers, CSS3, or semantic markup. Because of this history, there are a large number of deprecated (no longer in use) attributes that have previously been used with the element.
Many of the deprecated attributes are related to layout and positioning, other have to do with browser behavior. In most cases, CSS is the preferred method for achieving these layout effects. In other cases, JavaScript is the best way to get the desired results.
Deprecated attributes are marked below in red. Where possible, we have provided additional information on how to achieve the desired effects using modern standards.
For more information about deprecated tags and other changes to the HTML specification, see our article on HTML5.
Определение и использование
Тег используется для встраивания изображения в HTML страницу.
Изображения технически не вставляются на веб страницу; изображения связаны с веб страницами.
Тег создает удерживающее пространство для ссылочного изображения.
Тег имеет два обязательных атрибута:
- src — Указывает путь к изображению
- alt — Задает альтернативный текст для изображения, если изображение по какой-либо причине не может быть отображено
Примечание: Кроме того, всегда указывайте ширину и высоту изображения.
Если ширина и высота не указаны, страница может мерцать во время загрузки изображения.
Совет: Чтобы связать изображение с другим документом,
просто вложите тег в тег <a> (см. пример ниже)
Informing the Browser — the actual purpose of width
The actual purpose of the attribute, according to the specification, is to inform the browser of the actual, intrinsic width (in CSS pixels) of the image file. In other words — the attribute should be used to describe the source file, not how you want it displayed. This information can then be used by the browser in optimizing the rendering. This means that if you use CSS the way should, then the CSS — and not the element — will determine the actual display size of the image.
Note: On most screens, the image would overflow the container if it was actually 1280 pixels wide.
Should I use ?
Yes. It is not essential, but it will help the browser render your page faster and more cleanly, especially when combined with the element. Consider the example above — the CSS is set to and the is set to . Until the browser is able to download the entire image, and check the file header for its size, how does the browser know how much height to allot for the image? In the absence of a and attribute, it doesn’t. However, if both are specified, the browser can do some math to figure it out:
Doing this will stop that annoying jump that happens when a freshly loaded images suddenly takes up space in the document and shoves all the content down, causing the user to lose their place on the page. So yes, use the (and the ) attribute. But use it correctly — to identify the intrinsic height of the image file, not to specify the desired layout size.
The alt description — Users
The attribute provides an “alternative description” for the image. This description is normally not presented to the user, but will be under certain circumstances:
- Assistive technology — If the user is visually impaired, and is using a screen reader, the screen reader will read the description to the user.
- Images turned off — Some users prefer to surf the web with images turned off (to save bandwidth or to minimize distraction). These users will normally see the description instead of the image.
- Image failure — If an image fails to load for any reason (bad file name, connection problems), the user will usually see the description in place of the image.
Here’s an example of displaying the text in place of a failed image (the image points to nothing).
Тень от изображения.
Чтобы создать эффект тени, используется свойство box-shadow.
Первое значение — это сдвиг тени по оси X.
Второе значение – это сдвиг тени по оси Y.
Третье значение – размытие тени. Если этот параметр не указывается, то по умолчанию тень не будет размытой.
Четвёртое значение – растяжение тени. По умолчанию тень того же размера, что и элемент.
Пятое значение – цвет тени. Цвет тени можно задать как в RGB-формате так и в RGBA-формате. По умолчанию цвет чёрный.
img {width: 300px;height: 150px;border: 1px solid #000;border-radius: 10px;box-shadow:5px 5px 10px #2B1015;
}

Обтекание изображения текстом.
Для наглядности в index.html добавьте текст.
<!DOCTYPE html><html> <head> <meta charset=»utf-8″> <link rel= «stylesheet» type= «text/css» href= «style.css» /> <title>Изображения</title> </head> <body> <img src=»images/img1.jpg»> <p>Это текст, который обтекает изображение справа.</p> <p>Для наглядности напишем несколько абзацев</p> <p>Абзац первый</p> <p>Абзац второй</p> <p>Абзац третий</p> <p>А этот абзац обтекает изображение уже снизу.</p> </body> </html>
Если мы хотим, чтобы изображение располагалось слева, а текст обтекал его справа, используем свойство float , значением которого будет left.
А для того, чтобы текст не прилипал к изображению, используем свойство margin-right.
img {width: 300px;height: 150px;border: 1px solid #000;border-radius: 10px;box-shadow:5px 5px 10px #2B1015;float: left;margin-right: 20px;
}

CSS Advanced
CSS Rounded CornersCSS Border ImagesCSS BackgroundsCSS ColorsCSS Color KeywordsCSS Gradients
Linear Gradients
Radial Gradients
CSS Shadows
Shadow Effects
Box Shadow
CSS Text EffectsCSS Web FontsCSS 2D TransformsCSS 3D TransformsCSS TransitionsCSS AnimationsCSS TooltipsCSS Style ImagesCSS Image ReflectionCSS object-fitCSS object-positionCSS ButtonsCSS PaginationCSS Multiple ColumnsCSS User InterfaceCSS Variables
The var() Function
Overriding Variables
Variables and JavaScript
Variables in Media Queries
CSS Box SizingCSS Media QueriesCSS MQ ExamplesCSS Flexbox
CSS Flexbox
CSS Flex Container
CSS Flex Items
CSS Flex Responsive
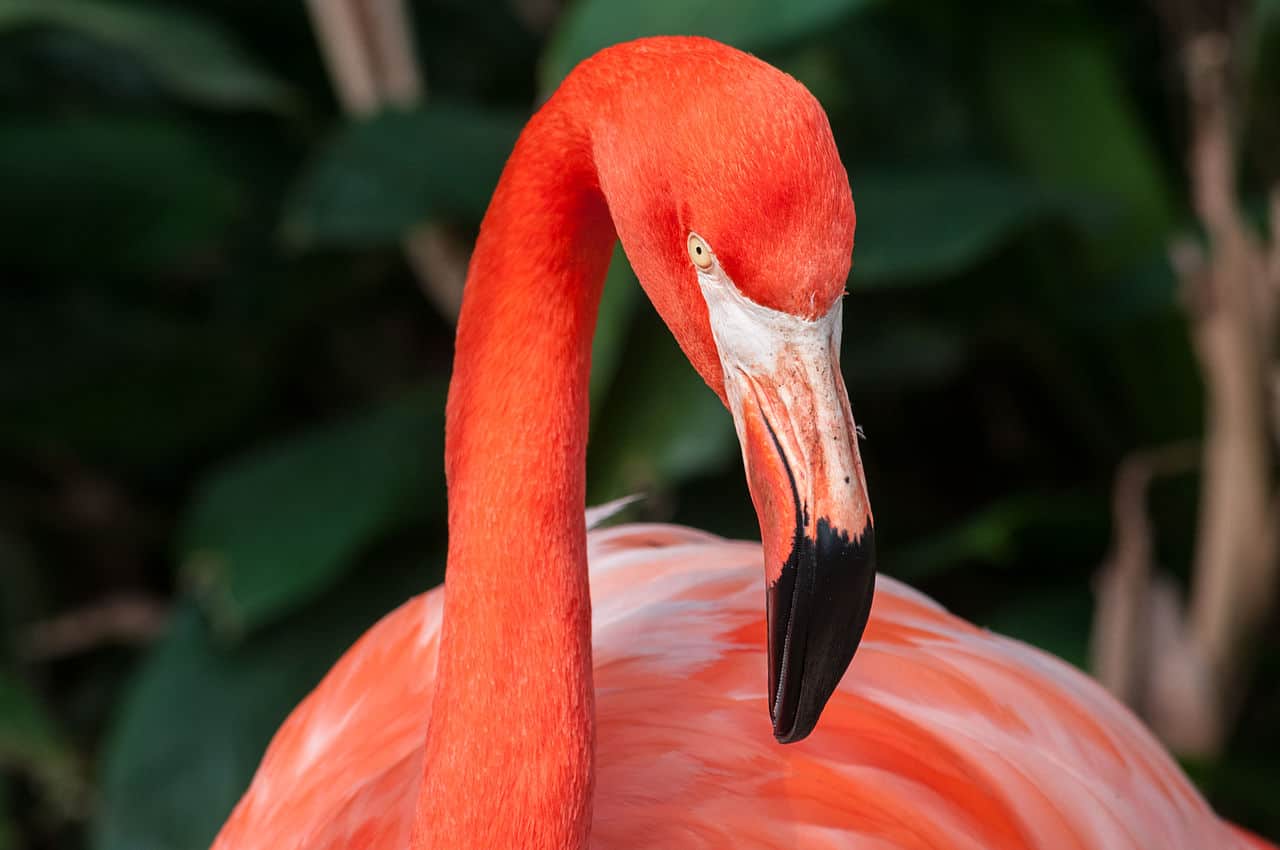
Информирование браузера — основная цель атрибута width
В соответствии со спецификацией, основная цель тега width в HTML- сообщить браузеру фактическую, исходную ширину (в пикселях) изображения. Он должен применяться для описания исходного файла, а не того, как нужно отображать его на экране. Эта информация может быть использована браузером для оптимизации рендеринга. Тогда именно CSS, а не элемент width будет определять фактический размер выводимого изображения:
#responsive-flamingo {  width: 100%;  height: auto; }

<img src="https://www.internet-technologies.ru/wp-content/uploads/very-large-flamingo.jpg" id="responsive-flamingo" width="1280">
Примечание: На большинстве экранов изображение будет выходить за пределы контейнера, если оно имеет ширину более 1280 пикселей.
Резюме раздела
- Используйте HTML элемент для определения изображения
- Используйте HTML атрибут для определения URL изображения
- Используйте HTML атрибут для определения альтернативного текста для изображения, если он не может быть отображен
- Используйте HTML атрибуты и для определения размера изображения
- Используйте CSS свойства и для определения размера изображения (альтернативно)
- Используйте CSS свойство , чтобы позволить изображению плавать
- Используйте HTML элемент для определения изображения-карты
- Используйте HTML элемент для определения интерактивных областей на изображении-карте
- Используйте для HTML элемента атрибут указывающий на изображение-карту
- Используйте HTML элемент для отображения разных изображений для разных устройств
Примечание: Загрузка изображений занимает некоторое время. Большие изображения могут замедлить вашу страницу. Используйте изображения умеренно, при возможности максимально уменьшая их размеры.
Атрибуты
| Атрибут | Значение | Описание |
|---|---|---|
| align | top bottom middle left right |
Не поддерживается в HTML5. Определяет выравнивание изображения в соответствии с окружающими элементами |
| alt | text | Определяет альтернативный текст для изображения |
| border | pixels |
Не поддерживается в HTML5. Определяет ширину границы вокруг изображения |
| crossorigin | anonymous use-credentials |
Разрешить использование изображений со сторонних сайтов, которые позволяют использовать перекрестный доступ с canvas |
| height | pixels | Определяет высоту изображения |
| hspace | pixels |
Не поддерживается в HTML5. Определяет пробел в левой и правой части изображения |
| ismap | ismap | Определяет изображение как серверную карту изображения |
| longdesc | URL | Определяет URL для подробного описания изображения |
| sizes | Определяет размеры изображения для разных макетов страниц | |
| src | URL | Определяет URL изображения |
| srcset | URL | Определяет URL изображения для использования в различных ситуациях |
| usemap | #mapname | Определяет изображение в качестве клиентской карты изображений |
| vspace | pixels |
Не поддерживается в HTML5. Определяет пробел сверху и снизу изображения |
| width | pixels | Определяет ширину изображения |
Размеры изображения
Размеры изображения, отображаемого на сайте, задаются атрибутами – ширины и – высота. Если вы не укажите их, тогда картинка будет выведена в своем реальном размере. Если вы зададите только один атрибут, то второй атрибут будет вычислен пропорционально. По умолчанию единица измерения задается в пикселях, но также можно задать и проценты, например 100%. Пример указания размеров у тега :
Хотя видимый размер изображения при использовании атрибутов высоты и ширины может казаться небольшим, но фактически браузер сначала загружает первоначальную картинку и затем уже масштабирует ее в соответствии с заданными параметрами. Если у вас на сайте используются фотографии большого разрешения или загружается много фотографий, тогда это может привести к длительной загрузке страницы.
Чтобы избежать этого лучше заранее, до загрузки на сайт, уменьшить размер картинок, сделав соответствующим размерам, отображаемым на сайте.
Изображения в качестве фона.
Чтобы использовать изображение в качестве фона для всей страницы, используем свойство background для селектора html. В значении прописываем путь к изображению. Правилом хорошего тона является вместе с изображением задавать ещё и цвет фона на случай, если картинка вдруг не загрузится.
html {background: #D2BFB0 url(images/img1.jpg);
}
Повторяемость фонового изображения.
По умолчанию фоновое изображение повторяется как по горизонтали так и по вертикали. Чтобы это отменить для свойства background пишем значение no-repeat.
html {background: #D2BFB0 url(images/img1.jpg) no-repeat;
}
Чтобы картинка повторялась только по горизонтали, пишем
background: repeat-x;
по вертикали:
background: repeat-y;
Расположение фонового изображения.
Картинка в левом верхнем углу: background: left top;
В правом верхнем углу: background: right top;
В левом нижнем углу: background: left bottom;
В правом нижнем углу: background: right bottom;
По центру: background: center;
По центру вверху: background: center top;
По центру внизу: background: center bottom;
Фиксация фонового изображения.
По умолчанию фоновое изображение прокручивается вместе с контентом.
Чтобы его зафиксировать, свойству background задаём значение fixed.
html {
background: #D2BFB0 url(images/img1.jpg) no-repeat center fixed;
}
The alt description — Search Engines
The description is also very helpful for search engines. Search engines have a hard time figuring out what the content of an image actually is. They are getting better at it, but identifying the subject of a photo or picture is extremely difficult. So search engines rely on the description to know what is actually in a picture (they also use the file name and other attributes). Additionally, in Google Image Search, the description is actually shown to the user.
“American flamingo” is the alt text of flamingo picture. If you care about SEO, you should make sure that you have relevant descriptions for all of your images.