Using the program
Содержание:
- Return, Exit, and General Remarks
- Examples
- Script File Codepage [AHK_L 51+]
- 4 — Running Programs & Websites
- Написание собственных сценариев
- Основные возможности
- Remarks
- Remapping the Keyboard and Mouse
- Examples
- Functions/Commands
- Установка AutoHotkey
- Main Window
- Remarks
- COM Objects
- Ending Characters
- Parameters
- Variant (Duplicate) Hotkeys
- Попробуйте это мгновенный убийца монитора
- Parameters
Return, Exit, and General Remarks
If the flow of execution within a function reaches the function’s closing brace prior to encountering a Return, the function ends and returns a blank value (empty string) to its caller. A blank value is also returned whenever the function explicitly omits Return’s parameter.
When a function uses the Exit command to terminate the current thread, its caller does not receive a return value at all. For example, the statement would leave unchanged if exits. The same thing happens if a function causes a runtime error such as running a nonexistent file (when is not in effect).
A function may alter the value of ErrorLevel for the purpose of returning an extra value that is easy to remember.
To call a function with one or more blank values (empty strings), use an empty pair of quotes as in this example: .
Since calling a function does not start a new thread, any changes made by a function to settings such as SendMode and SetTitleMatchMode will go into effect for its caller too.
The caller of a function may pass a nonexistent variable or array element to it, which is useful when the function expects the corresponding parameter to be . For example, calling would create the variable automatically as a or global (depending on whether the caller is inside a function and whether it has the in effect).
When used inside a function, ListVars displays a function’s along with their contents. This can help debug a script.
Examples
Lists the key-value pairs of an object.
colours := ("red", 0xFF0000, "blue", 0x0000FF, "green", 0x00FF00)
; The above expression could be used directly in place of "colours" below:
for k, v in colours
    s .= k "=" v "`n"
MsgBox % s
Lists all open Explorer and Internet Explorer windows, using the Shell object.
for window in ComObjCreate("Shell.Application").Windows
    windows .= window.LocationName " :: " window.LocationURL "`n"
MsgBox % windows
Class: CEnumerator
Provides a generic enumerator object that can be used for iterating over numeric keys. The array must not be modified during iteration, otherwise the iterated range will be invalid.
It’s possible to define a custom MaxIndex() functions for array boundaries. If there are missing array members between 1 and max index, they will be iterated but will have a value of «». This means that real sparse arrays are not supported by this enumerator by design. Source: Suggestions on documentation improvements
/*
Class: CEnumerator

To make an object use this iterator, insert this function in the class definition:

    _NewEnum()
    {
    	return new CEnumerator(this)
    }
*/

; Iterate over the enumerator
For k, v in Test
    MsgBox %k%=%v%

; Test class for demonstrating usage
class Test
{
    static Data :=

    _NewEnum()
    {
        return new CEnumerator(this.Data)
    }
}

class CEnumerator
{
    __New(Object)
    {
        this.Object := Object
        this.first := true
        ; Cache for speed. Useful if custom MaxIndex() functions have poor performance.
        ; In return, that means that no key-value pairs may be inserted during iteration or the range will become invalid.
        this.ObjMaxIndex := Object.MaxIndex()
    }

    Next(ByRef key, ByRef value)
    {
        if (this.first)
        {
            this.Remove("first")
            key := 1
        }
        else
            key ++
        if (key <= this.ObjMaxIndex)
            value := this.Object
        else
            key := ""
        return key != ""
    }
}
Script File Codepage [AHK_L 51+]
In order for non-ASCII characters to be read correctly from file, the encoding used when the file was saved (typically by the text editor) must match what AutoHotkey uses when it reads the file. If it does not match, characters will be decoded incorrectly. AutoHotkey uses the following rules to decide which encoding to use:
- If the file begins with a UTF-8 or UTF-16 (LE) byte order mark, the appropriate codepage is used and the switch is ignored.
- If the switch is passed on the command-line, codepage n is used. For a list of possible values, see Code Page Identifiers.
Note: The «Default to UTF-8» option in the AutoHotkey installer adds to the command line for all scripts launched via the shell (Explorer).
- In all other cases, the system default ANSI codepage is used.
Note that this applies only to script files loaded by AutoHotkey, not to file I/O within the script itself. FileEncoding controls the default encoding of files read or written by the script, while IniRead and IniWrite always deal in UTF-16 or ANSI.
As all text is converted (where necessary) to the , characters which are invalid or don’t exist in the native codepage are replaced with a placeholder: ANSI ‘?’ or Unicode ‘�’. In Unicode builds, this should only occur if there are encoding errors in the script file or the codepages used to save and load the file don’t match.
RegWrite may be used to set the default for scripts launched from Explorer (e.g. by double-clicking a file):
; Uncomment the appropriate line below or leave them all commented to
;   reset to the default of the current build.  Modify as necessary:
; codepage := 0        ; System default ANSI codepage
; codepage := 65001    ; UTF-8
; codepage := 1200     ; UTF-16
; codepage := 1252     ; ANSI Latin 1; Western European (Windows)
if (codepage != "")
    codepage := " /CP" . codepage
cmd="%A_AhkPath%"%codepage% "`%1" `%*
key=AutoHotkeyScript\Shell\Open\Command
if A_IsAdmin    ; Set for all users.
    RegWrite, REG_SZ, HKCR, %key%,, %cmd%
else            ; Set for current user only.
    RegWrite, REG_SZ, HKCU, Software\Classes\%key%,, %cmd%
This assumes AutoHotkey has already been installed. Results may be less than ideal if it has not.
4 — Running Programs & Websites
mspaint.exe, calc.exe, script.ahkRunhttps://www.autohotkey.com/
; Run a program. Note that most programs will require a FULL file path:
Run, %A_ProgramFiles%\Some_Program\Program.exe

; Run a website:
Run, https://www.autohotkey.com
There are some other advanced features as well, such as command line parameters and CLSID. If you want to learn more about that stuff, visit the Run page.
Here are a few more samples:
; Several programs do not need a full path, such as Windows-standard programs:
Run, notepad.exe
Run, mspaint.exe

; Run the "My Documents" folder using a :
Run, %A_MyDocuments%

; Run some websites:
Run, https://www.autohotkey.com
Run, https://www.google.com
For more in-depth information and examples, check out the Run page.
Написание собственных сценариев
В прошлом мы уже много рассказывали об AutoHotkey, в том числе о том, как улучшить Windows с помощью специальных скриптов AHK.
— поэтому я буду кратко о его использовании здесь. Если вы только начинаете работать с AHK, вы, вероятно, больше всего выиграете от расширения текста
,
По сути, расширение текста позволяет вам набрать немного текста, который автоматически расширяется. У вас есть повторяющиеся письма
Вы отправляете несколько раз в день? Как часто вы вводите свой адрес электронной почты при входе на веб-сайты и тому подобное? Вместо того, чтобы тратить время на ввод этих элементов каждый раз, настройте расширение текста и сделайте его более продуктивным.
Если вы загрузили скрипт автозамены выше, внизу есть место, куда вы можете добавить любые собственные фразы, что является идеальным местом для добавления однострочного расширения. Если вы не используете этот скрипт, просто создайте новый скрипт для ваших записей.
Все довольно просто: введите две двоеточия, а затем текст горячей клавиши. После еще двух двоеточий введите фразу для расширения. Итак, если вы хотите, чтобы при наборе «@@» автоматически расширялся ваш адрес электронной почты, сценарий был бы:
Возможностей здесь много — вы можете сделать горячую клавишу CTRL + ALT + C выплевывать консервированные сообщения электронной почты, которые вы вводите несколько раз в день, или любое количество других задач, имеющих отношение к вашей работе:
После того, как вы настроили какое-либо расширение текста, вы можете начать переназначение ключей, если вы обнаружите, что некоторые из них бесполезны в их текущем состоянии.
Хотите, чтобы кнопка «Вставка» была ярлыком для «Копировать»? Вы можете сделать это!
Проверьте учебники AutoHotkey для получения дополнительной информации.
Основные возможности
- автоматизация различных действий путем эмуляции нажатия определенных клавиш на мыши и клавиатуре;
- написание или запись макросов с использованием рекордера;
- назначение горячих клавиш;
- быстрая расшифровка аббревиатур;
- создание произвольных форм для ввода информации;
- изменение назначения любых клавиш;
- обработка сигналов, переданных внешними устройствами управления;
- преобразование скриптов;
- управление громкостью и другими настройками звуковых карт;
- выполнение мониторинга системы;
- изменение содержимого в буфере обмена;
- отображение на экране надписей и диалоговых окон;
- автоматизация действий в играх;
- любые операции с текстовыми файлами и др.
Плюсы и минусы
Плюсы:
- автоматический запуск практически любых операций на ПК;
- встроенный скриптовый язык;
- переназначение любых клавиш;
- поддержка разных устройств для вывода.
Минусы:
некоторые сложности в освоении.
Похожие программы
Auto-Clicker. Программа для запоминания и последующего воспроизведения всех действий компьютерной мыши. Записанные действия в ней можно повторять произвольное количество раз, настраивая скорость их воспроизведения.
Macro Recorder. Приложение, которое может автоматизировать все рутинные процессы на компьютере. С его помощью можно создавать макросы, которые будут самостоятельно запускать необходимые программы, выполнять клики мышкой, вводить текст и т. д.
Как пользоваться приложением
Для того чтобы с помощью программы назначить автоматическое выполнение какого-либо действия, нужно создать скрипт. Он представляет собой всплывающее окно с пометкой «Я рогалег». С этой целью используем команду MsgBox, которую можно вызвать любым текстом. Надпись и команду необходимо вписать в любой текстовый редактор, так как сама программа как такового отдельного окна не имеет. Далее сохраняем файл, обязательно указав для него расширение «ahk». Скрипт будет выполнен при нажатии на него двойным щелчком.
Выполнение скрипта
При запуске скрипта появится значок «Autohotkey». Нажав на него правой кнопкой, вы сможете выбрать необходимые команды.
Выбор команд
Код, который должен автоматически выполняться при запуске скрипта, помещается вверху файла. Идентификаторы нужно указывать для горячих клавиш.
Рассмотрим, как это действует, на примере назначения автоматического запуска блокнота Notepad++ при нажатии определенных клавиш.
Для начала набираем «#n:: Run notepad++» и сохраняем файл. Дважды щелкаем по нему и набираем команду «Win+n». В области уведомления появится значок, а программа будет запущена при нажатии указанной комбинации клавиш.
В команде значок «#n» определяет кнопки, «::» — разделяет обозначения самих клавиш от команд. Остальные базовые кнопки обозначаются таким образом:
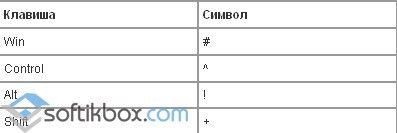 Обозначения кнопок
AutoHotkey поможет легко и быстро выполнять любые операции и действия, которые вам приходится часто производить на своем ПК.
Remarks
Expression is evaluated only once, before the loop begins. If its result is not an object, execution jumps immediately to the line following the loop’s body; otherwise, the object’s method is called to retrieve an enumerator object. At the beginning of each iteration, the enumerator’s method is used to retrieve the next key-value pair. If Next() returns zero or an empty string, the loop terminates.
Although not exactly equivalent to a for-loop, the following demonstrates this process:
_enum := (Expression)._NewEnum()
if IsObject(_enum)
    while _enum.Next(Key, Value)
    {
        ...
    }
Existing key-value pairs may be modified during the loop, but inserting or removing keys may cause some items to be skipped or enumerated multiple times. One workaround is to build a list of keys to remove, then use a second loop to remove the keys after the first loop completes. Note that can be used to remove a range of keys without looping.
A for-loop is usually followed by a block, which is a collection of statements that form the body of the loop. However, a loop with only a single statement does not require a block (an «if» and its «else» count as a single statement for this purpose). The One True Brace (OTB) style may optionally be used, which allows the open-brace to appear on the same line rather than underneath. For example: .
As with all loops, Break, Continue and may be used.
Remapping the Keyboard and Mouse
The syntax for the built-in remapping feature is . For example, a script consisting only of the following line would make A behave like B:
a::b
The above example does not alter B itself. B would continue to send the «b» keystroke unless you remap it to something else as shown in the following example:
a::b
b::a
The examples above use lowercase, which is recommended for most purposes because it also remaps the corresponding uppercase letters (that is, it will send uppercase when CapsLock is «on» or Shift is held down). By contrast, specifying an uppercase letter on the right side forces uppercase. For example, the following line would produce an uppercase B when you type either «a» or «A» (as long as CapsLock is off):
a::B
However, a remapping opposite to the one above would not work as one might expect, as a remapping never «releases» the modifier keys which are used to trigger it. For example, is typically equivalent to and is equivalent to . This is because each remapping to allow the key or key combination to be combined with other modifiers.
Mouse Remapping
To remap the mouse instead of the keyboard, use the same approach. For example:
| Example | Description |
|---|---|
| Makes the middle button behave like Shift. | |
| Makes the fourth mouse button behave like the left mouse button. | |
| Makes the right Alt behave like the right mouse button. |
Other Useful Remappings
| Example | Description |
|---|---|
| Makes CapsLock become Ctrl. To retain the ability to turn CapsLock on and off, add the remapping first. This toggles CapsLock on and off when you hold down Shift and press CapsLock. Because both remappings allow additional modifier keys to be held down, the more specific remapping must be placed first for it to work. | |
| Makes the fifth mouse button (XButton2) produce a control-click. | |
| Makes the right Alt become Menu (which is the key that opens the context menu). | |
| Makes the right Ctrl become the right Win. | |
| Makes both Ctrl behave like Alt. However, see . | |
| Makes Ctrl+X produce Ctrl+C. It also makes Ctrl+Alt+X produce Ctrl+Alt+C, etc. | |
| Disables the right Win by having it simply return. |
You can try out any of these examples by copying them into a new text file such as «Remap.ahk», then launching the file.
See the Key List for a complete list of key and mouse button names.
Examples
Creates a Ctrl-Alt-Z hotkey.
Hotkey, ^!z, MyLabel
return

MyLabel:
MsgBox You pressed %A_ThisHotkey%.
return
Makes RCtrl & RShift operate like Alt-Tab.
Hotkey, RCtrl & RShift, AltTab
Re-enables the Win-C hotkey.
Hotkey, #c, On
Disables the Shift-Win-C hotkey.
Hotkey, $+#c, Off
Changes a hotkey to allow 5 threads.
Hotkey, ^!a, , T5
Creates a Ctrl-Alt-C hotkey that works only in Notepad.
Hotkey, IfWinActive, ahk_class Notepad
Hotkey, ^!c, MyLabelForNotepad
Creates a GUI that allows to register primitive three-key combination hotkeys.
Gui Add, Text, xm, Prefix key:
Gui Add, Edit, yp x100 w100 vPrefix, Space
Gui Add, Text, xm, Suffix hotkey:
Gui Add, Edit, yp x100 w100  vSuffix, f & j
Gui Add, Button, Default, Register
Gui Show
return

ButtonRegister() {
    global
    Gui Submit, NoHide
    local fn
    fn := Func("HotkeyShouldFire").Bind(Prefix)
    Hotkey If, % fn
    Hotkey % Suffix, FireHotkey
}

HotkeyShouldFire(prefix, thisHotkey) {
    return GetKeyState(prefix)
}

FireHotkey() {
    MsgBox %A_ThisHotkey%
}

GuiClose:
GuiEscape:
ExitApp
Functions/Commands
A function or command is the basic means by which a script does something.
In essence, functions and commands are the same thing, so the concepts explained here apply to both. However, the long history of AutoHotkey v1 and an emphasis on backward-compatibility have resulted in a divide between commands, which require legacy syntax, and functions, which require expression syntax.
Commands and functions can have many different purposes. Some functions might do no more than perform a simple calculation, while others have immediately visible effects, such as moving a window. One of AutoHotkey’s strengths is the ease with which scripts can automate other programs and perform many other common tasks by simply calling a few functions. See the command and function list for examples.
Throughout this documentation, some common words are used in ways that might not be obvious to someone without prior experience. Below are several such words/phrases which are used frequently in relation to functions and commands:
- Call a function or command
-
Calling a function or command causes the program to invoke, execute or evaluate it. In other words, a function call temporarily transfers control from the script to the function. When the function has completed its purpose, it returns control to the script. In other words, any code following the function call does not execute until after the function completes.
However, sometimes a function or command completes before its effects can be seen by the user. For example, the Send command sends keystrokes, but may return before the keystrokes reach their destination and cause their intended effect.
- Parameters
-
Usually a command or function accepts parameters which tell it how to operate or what to operate on. Each parameter is a , such as a string or number. For example, WinMove moves a window, so its parameters tell it which window to move and where to move it to. Parameters can also be called arguments. Common abbreviations include param and arg.
- Pass parameters
-
Parameters are passed to a function or command, meaning that a value is specified for each parameter of the function or command when it is called. For example, one can pass the name of a key to to determine whether that key is being held down.
- Return a value
-
Functions return a value, so the result of the function is often called a return value. For example, StrLen() returns the number of characters in a string. Commands do not return a result directly; instead, they store the result in a . Functions may also do this, such as when there is more than one result.
Functions and commands usually expect parameters to be written in a specific order, so the meaning of each parameter value depends on its position in the comma-delimited list of parameters. Some parameters can be omitted, in which case the parameter can be left blank, but the comma following it can only be omitted if all remaining parameters are also omitted. For example, the syntax for ControlSend is:
ControlSend , Control, Keys, WinTitle, WinText, ExcludeTitle, ExcludeText
Square brackets signify that the enclosed parameters are optional (the brackets themselves should not appear in the actual code). However, ControlSend isn’t useful unless Keys are specified, and usually one must also specify the target window. For example:
ControlSend, Edit1, ^{Home}, A  ; Correct. Control is specified.
ControlSend, ^{Home}, A         ; Incorrect: Parameters are mismatched.
ControlSend,, ^{Home}, A        ; Correct. Control is omitted.
Methods
Methods are functions which operate on a particular . While there can only be one function named (for example), there can be as many methods named as there are objects, as each object (or class of objects) can respond in a different way. For this reason, the target object (which may be a variable or sub-expression) is specified to left of the method name instead of inside the parameter list. For details, see .
Установка AutoHotkey
Прежде чем вы сможете протестировать некоторые скрипты или создать свои собственные, вам нужно установить AutoHotkey. Посетите главную страницу AHK, нажмите Скачать на правой стороне, и выберите монтажник захватить самую простую версию для установки. Запустите диалог быстрой установки, и AutoHotkey будет запущен и готов к работе!
Теперь только что установленная программа обрабатывает выполнение сценариев, которые вы пишете на языке AutoHotkey, но у вас еще нет запущенных сценариев! Чтобы создать новый, убедитесь, что AutoHotkey запущен (откройте меню «Пуск» и введите AutoHotkey запустить программу), затем щелкните правой кнопкой мыши в любом месте на рабочем столе или в любом другом удобном месте и выберите New> AutoHotkey Script. Назовите это что-нибудь полезное и убедитесь, что файл заканчивается .АХК, или это не будет работать правильно.
Если вы собираетесь писать несколько сценариев для AutoHotkey, неплохо бы обновить ваш текстовый редактор из мягкого блокнота
, Notepad ++ — отличный бесплатный вариант, который рекомендуется для этой цели
Обратите внимание, что вы можете открыть свой текстовый редактор, ввести код и просто сохранить его как файл, оканчивающийся на .АХК и вы достигнете того же результата, что и вышеописанный метод
Теперь, когда у вас есть программное обеспечение для запуска сценариев, вы можете загрузить код, написанный другими, для автоматизации всех видов задач. Чтобы сохранить скрипт, просто загрузите его как .АХК файл и сохранить его, где вы хотите.
Возможно, вы захотите, чтобы некоторые из этих сценариев запускались сразу после загрузки компьютера, поэтому вам не нужно каждый раз запускать их вручную. Для этого скопируйте и вставьте .АХК файлы в папку «Автозагрузка», набрав оболочка: запуск в меню «Пуск» или перейдя по следующему адресу:
Это обеспечит их запуск сразу после запуска, поэтому вы не пытаетесь использовать комбинации клавиш и ничего не получаете!
Main Window
The script’s main window is usually hidden, but can be shown via the or one of the commands listed below to gain access to information useful for debugging the script. Items under the View menu control what the main window displays:
- Lines most recently executed — See ListLines.
- Variables and their contents — See ListVars.
- Hotkeys and their methods — See ListHotkeys.
- Key history and script info — See KeyHistory.
Known issue: Keyboard shortcuts for menu items do not work while the script is displaying a message box or other dialog.
The built-in variable contains the unique ID (HWND) of the script’s main window.
Closing this window with WinClose (even from another script) causes the script to exit, but most other methods just hide the window and leave the script running.
Minimizing the main window causes it to automatically be hidden. This is done to prevent any owned windows (such as GUI windows or certain dialog windows) from automatically being minimized, but also has the effect of hiding the main window’s taskbar button. To instead allow the main window to be minimized normally, override the default handling with OnMessage. For example:
; This prevents the main window from hiding on minimize:
OnMessage(0x0112, Func("PreventAutoMinimize")) ; WM_SYSCOMMAND = 0x0112
OnMessage(0x0005, Func("PreventAutoMinimize")) ; WM_SIZE = 0x0005
; This prevents owned GUI windows (but not dialogs) from automatically minimizing:
OnMessage(0x0018, Func("PreventAutoMinimize"))

PreventAutoMinimize(wParam, lParam, uMsg, hwnd) {
    if (uMsg = 0x0112 && wParam = 0xF020 && hwnd = A_ScriptHwnd) { ; SC_MINIMIZE = 0xF020
        WinMinimize
        return 0 ; Prevent main window from hiding.
    }
    if (uMsg = 0x0005 && wParam = 1 && hwnd = A_ScriptHwnd) ; SIZE_MINIMIZED = 1
        return 0 ; Prevent main window from hiding.
    if (uMsg = 0x0018 && lParam = 1) ; SW_PARENTCLOSING = 1
        return 0 ; Prevent owned window from minimizing.
}
Main Window Title
The title of the script’s main window is used by the #SingleInstance and Reload mechanisms to identify other instances of the same script. Changing the title prevents the script from being identified as such. The default title depends on how the script was loaded:
| Loaded From | Title Expression | Example |
|---|---|---|
| .ahk file | E:\My Script.ahk — AutoHotkey v1.1.33.09 | |
| Main resource (compiled script) | E:\My Script.exe | |
| Any other resource | E:\My AutoHotkey.exe — *BUILTIN-TOOL.AHK |
The following code illustrates how the default title could be determined by the script itself (but the actual title can be retrieved with WinGetTitle):
title := A_ScriptFullPath
if !A_IsCompiled
    title .= " - AutoHotkey v" A_AhkVersion
; For the correct result, this must be evaluated by the resource being executed,
; not an #include (unless the #include was merged into the script by Ahk2Exe):
else if SubStr(A_LineFile, 1, 1) = "*" && A_LineFile != "*#1"
    title .= " - " A_LineFile
Remarks
The determines the of a hotkey upon which the Hotkey command will operate.
If the goal is to disable selected hotkeys or hotstrings automatically based on the type of window that is active, is usually less convenient than using #IfWinActive/Exist (or their dynamic counterparts «Hotkey IfWinActive/Exist» ).
Creating hotkeys via double-colon labels performs better than using the Hotkey command because the hotkeys can all be enabled as a batch when the script starts (rather than one by one). Therefore, it is best to use this command to create only those hotkeys whose key names are not known until after the script has started running. One such case is when a script’s hotkeys for various actions are configurable via an INI file.
A given label can be the target of more than one hotkey. If it is known that a label was called by a hotkey, you can determine which hotkey by checking the built-in variable .
If the script is suspended, newly added/enabled hotkeys will also be suspended until the suspension is turned off (unless they are exempt as described in the Suspend section).
The keyboard and/or mouse hooks will be installed or removed if justified by the changes made by this command.
Although the Hotkey command cannot directly enable or disable hotkeys in scripts other than its own, in most cases it can override them by creating or enabling the same hotkeys. Whether this works depends on a combination of factors: 1) Whether the hotkey to be overridden is a hook hotkey in the other script (non-hook hotkeys can always be overridden); 2) The fact that the most recently started script’s hotkeys generally take precedence over those in other scripts (therefore, if the script intending to override was started most recently, its override should always succeed); 3) Whether the enabling or creating of this hotkey will newly activate the keyboard or mouse hook (if so, the override will always succeed).
Once a script has at least one hotkey, it becomes persistent, meaning that ExitApp rather than Exit should be used to terminate it. Hotkey scripts are also automatically #SingleInstance unless has been specified.
COM Objects
Since Key and Value are passed directly to the enumerator’s Next() method, the values they are assigned depends on what type of object is being enumerated. For COM objects, Key contains the value returned by IEnumVARIANT::Next() and Value contains a number which represents its variant type. For example, when used with a Scripting.Dictionary object, each Key contains a key from the dictionary and Value is typically 8 for strings and 3 for integers. See ComObjType() for a list of type codes.
: When enumerating a SafeArray, Key contains the current element and Value contains its variant type.
Ending Characters
Unless the is in effect, you must type an ending character after a hotstring’s abbreviation to trigger it. Ending characters initially consist of the following: -()[]{}’:;»/\,.?!`n `t (note that `n is Enter, `t is Tab, and there is a plain space between `n and `t). This set of characters can be changed by editing the following example, which sets the new ending characters for all hotstrings, not just the ones beneath it:
#Hotstring EndChars -()[]{}:;'"/\,.?!`n `t
: The ending characters can be changed while the script is running by calling the Hotstring function as demonstrated below:
Hotstring("EndChars", "-()[]{}:;")
Parameters
When a function is defined, its parameters are listed in parentheses next to its name (there must be no spaces between its name and the open-parenthesis). If a function does not accept any parameters, leave the parentheses empty; for example: .
ByRef Parameters: From the function’s point of view, parameters are essentially the same as unless they are defined as ByRef as in this example:
Swap(ByRef Left, ByRef Right)
{
    temp := Left
    Left := Right
    Right := temp
}
In the example above, the use of ByRef causes each parameter to become an alias for the variable passed in from the caller. In other words, the parameter and the caller’s variable both refer to the same contents in memory. This allows the Swap function to alter the caller’s variables by moving Left’s contents into Right and vice versa.
By contrast, if ByRef were not used in the example above, Left and Right would be copies of the caller’s variables and thus the Swap function would have no external effect.
Since return can send back only one value to a function’s caller, ByRef can be used to send back extra results. This is achieved by having the caller pass in a variable (usually empty) in which the function stores a value.
When passing large strings to a function, ByRef enhances performance and conserves memory by avoiding the need to make a copy of the string. Similarly, using ByRef to send a long string back to the caller usually performs better than something like .
: If something other than a modifiable variable is passed to a ByRef parameter, the function behaves as though the keyword «ByRef» is absent. For example, stores the value of A_Index in i, but the value assigned to Left is discarded once the Swap function returns.
: The function can be used to determine whether the caller supplied a variable for a given ByRef parameter.
Known limitations:
- Fields of objects are not considered variables for the purposes of ByRef. For example, if is passed to a ByRef parameter, it will behave as though ByRef was omitted.
- It is not possible to pass Clipboard, , or to a function’s ByRef parameter, even when #NoEnv is absent from the script.
- Although a function may call itself recursively, if it passes one of its own or non-ByRef parameters to itself ByRef, the new layer’s ByRef parameter will refer to its own local variable of that name rather than the previous layer’s. However, this issue does not occur when a function passes to itself a , , or ByRef parameter.
- If a parameter in a function-call resolves to a variable (e.g. or or ), other parameters to its left or right can alter that variable before it is passed to the function. For example, would unexpectedly pass 1 and 0 when Var is initially 0, even when the function’s first parameter is not ByRef. Since this behavior is counterintuitive, it might change in a future release.
- ByRef is not directly supported in functions called by COM clients, or when calling COM methods. Instead, the script receives or must pass a containing the VarType and address of the value.
Variant (Duplicate) Hotkeys
A particular hotkey can be created more than once if each definition has different IfWin criteria. These are known as hotkey variants. For example:
Hotkey, IfWinActive, ahk_class Notepad
Hotkey, ^!c, MyLabelForNotepad
Hotkey, IfWinActive, ahk_class WordPadClass
Hotkey, ^!c, MyLabelForWordPad
Hotkey, IfWinActive
Hotkey, ^!c, MyLabelForAllOtherWindows
If more than one variant of a hotkey is eligible to fire, only the one created earliest will fire. The exception to this is the global variant (the one with no IfWin criteria): It always has the lowest precedence, and thus will fire only if no other variant is eligible.
When creating duplicate hotkeys, the order of such as ^!+# does not matter. For example, is the same as . However, keys must be spelled consistently. For example, Esc is not the same as Escape for this purpose (though the case does not matter). Finally, any hotkey with a is entirely separate from a non-wildcard one; for example, and would each have their own set of variants.
For more information about IfWin hotkeys, see .
Попробуйте это мгновенный убийца монитора
AutoHotkey также может отправлять системные команды. Если вы целый день работаете за компьютером, возможно, вы не будете активно его использовать, но не хотите его выключать. Этот скрипт мгновенно обрежет сигнал на экране, а не будет ждать, пока он истечет, или заставка сработает.
Скачать: monitor_sleep.ahk
После загрузки откройте скрипт и нажмите F1, Разбудите его снова, перемещая мышь или нажимая любую клавишу на клавиатуре. AutoHotkey может управлять многими элементами вашей системы аналогично этому, включая отправку команд выключения, открытия пользовательских проводников Windows и даже команд в командной строке.
Parameters
- Target
-
A document, URL, executable file (.exe, .com, .bat, etc.), shortcut (.lnk), or to launch (see remarks). If Target is a local file and no path was specified with it, will be searched first. If no matching file is found there, the system will search for and launch the file if it is integrated («known»), e.g. by being contained in one of the PATH folders.
To pass parameters, add them immediately after the program or document name. If a parameter contains spaces, it is safest to enclose it in double quotes (even though it may work without them in some cases).
- WorkingDir
-
The working directory for the launched item. Do not enclose the name in double quotes even if it contains spaces. If omitted, the script’s own working directory () will be used.
- Options
-
If omitted, the command launches Target normally and shows a warning dialog whenever Target could not be launched. To change this behavior, specify one or more of the following words:
Max: launch maximized
Min: launch minimized
Hide: launch hidden (cannot be used in combination with either of the above)
Note: Some applications (e.g. Calc.exe) do not obey the requested startup state and thus Max/Min/Hide will have no effect.
UseErrorLevel: UseErrorLevel can be specified alone or in addition to one of the above words (by separating it from the other word with a space). If the launch fails, this option skips the warning dialog, sets ErrorLevel to the word ERROR, and allows the current thread to continue. If the launch succeeds, RunWait sets ErrorLevel to the program’s exit code, and Run sets it to 0.
When UseErrorLevel is specified, the variable A_LastError is set to the result of the operating system’s GetLastError() function. A_LastError is a number between 0 and 4294967295 (always formatted as decimal, not hexadecimal). Zero (0) means success, but any other number means the launch failed. Each number corresponds to a specific error condition (to get a list, search www.microsoft.com for «system error codes»). Like ErrorLevel, A_LastError is a per-thread setting; that is, interruptions by other threads cannot change it. However, A_LastError is also set by .
- OutputVarPID
-
The name of the variable in which to store the newly launched program’s unique Process ID (PID). The variable will be made blank if the PID could not be determined, which usually happens if a system verb, document, or shortcut is launched rather than a direct executable file. RunWait also supports this parameter, though its OutputVarPID must be checked in another thread (otherwise, the PID will be invalid because the process will have terminated by the time the line following RunWait executes).
After the Run command retrieves a PID, any windows to be created by the process might not exist yet. To wait for at least one window to be created, use .