Как выровнять элемент по вертикали внутри блочного элемента
Содержание:
- Синтаксис
- CSS Reference
- CSS Properties
- line-height: о проблемах и прочих вопросах
- Плавающий div
- Выравнивание текста по центру CSS
- CSS Свойства
- Вертикальное центрирование
- Чего оно не делаетСкопировать ссылку
- Property Values
- Значения свойства для ячеек таблицы
- CSS Table Method
- Floater Div
- Описание
- Равные отступы сверху и снизу
- IE6-7: метод expression
- Значения свойств
- Line-Height Method
- Values
- Давайте приступим к делу!
- Центрируем два адаптивных div-элемента рядом друг с другом
Синтаксис
- Элементы расположены вплотную друг к другу, прижавшись к началу контейнера выравнивания по поперечной оси.
- Элементы расположены вплотную друг к другу, прижавшись к концу контейнера выравнивания по поперечной оси.
- Элементы расположены вплотную друг к другу, прижавшись к краю контейнера выравнивания в зависимости от поперечной стороны начала (cross-start) контейнера flex.
Это относится только к элементам макета flex. Для элементов, которые не являются потомками flex контейнера, это значение трактуется как . - Элементы расположены вплотную друг к другу, прижавшись к краю контейнера выравнивания в зависимости от поперечной стороны конца (cross-end) контейнера flex.
Это относится только к элементам макета flex. Для элементов, которые не являются потомками flex контейнера, это значение трактуется как . - Элементы расположены вплотную друг к другу в центре контейнера выравнивания по поперечной оси.
- Элементы расположены в их дефолтной позиции как если бы не было определено.

- Определяет участие в выравнивании первой или последней базовой линии: выравнивает базовую линию выравнивания первого или последнего базового набора блока с соответствующей базовой линией в общем первом или последнем базовом наборе всех блоков в его группе совместного использования базовой линии.
Резервное выравнивание для равно , для — . - Элементы равномерно распределены внутри контейнера выравнивания вдоль поперечной оси. Интервал между каждой парой соседних элементов одинаков. Первый элемент находится на одном уровне с начальной кромкой контейнера выравнивания на поперечной оси, а последний элемент находится на одном уровне с конечной кромкой контейнера выравнивания на поперечной оси.
- Элементы равномерно распределены внутри контейнера выравнивания вдоль поперечной оси. Интервал между каждой парой соседних предметов одинаков. Пустое пространство до первого и после последнего элемента равно половине пространства между каждой парой смежных элементов.
- Элементы равномерно распределены внутри контейнера выравнивания вдоль поперечной оси. Интервал между каждой парой соседних элементов, начальным краем и первым элементом, а также конечным краем и последним элементом абсолютно одинаков.
- Если объединённый размер элементов вдоль поперечной оси меньше размера контейнера выравнивания, размер любого -размерного элемента увеличивается одинаково (не пропорционально), но при этом соблюдаются ограничения, налагаемые / (или эквивалентной функциональности), так что объединённый размер точно заполняет контейнер выравнивания вдоль поперечной оси.
- Используется вместе с ключевым словом выравнивания. Если выбранное ключевое слово означает, что элемент переполняет контейнер выравнивания, что приводит к потере данных, вместо этого элемент выравнивается, как если бы режим выравнивания был .
- Используется вместе с ключевым словом выравнивания. Независимо от относительных размеров элемента и контейнера выравнивания и от того, может ли произойти переполнение, которое приводит к потере данных, данное значение выравнивания учитывается.
normal
где
CSS Reference
CSS ReferenceCSS Browser SupportCSS SelectorsCSS FunctionsCSS Reference AuralCSS Web Safe FontsCSS AnimatableCSS UnitsCSS PX-EM ConverterCSS ColorsCSS Color ValuesCSS Default ValuesCSS Entities
CSS Properties
align-content
align-items
align-self
all
animation
animation-delay
animation-direction
animation-duration
animation-fill-mode
animation-iteration-count
animation-name
animation-play-state
animation-timing-function
backface-visibility
background
background-attachment
background-blend-mode
background-clip
background-color
background-image
background-origin
background-position
background-repeat
background-size
border
border-bottom
border-bottom-color
border-bottom-left-radius
border-bottom-right-radius
border-bottom-style
border-bottom-width
border-collapse
border-color
border-image
border-image-outset
border-image-repeat
border-image-slice
border-image-source
border-image-width
border-left
border-left-color
border-left-style
border-left-width
border-radius
border-right
border-right-color
border-right-style
border-right-width
border-spacing
border-style
border-top
border-top-color
border-top-left-radius
border-top-right-radius
border-top-style
border-top-width
border-width
bottom
box-decoration-break
box-shadow
box-sizing
caption-side
caret-color
@charset
clear
clip
color
column-count
column-fill
column-gap
column-rule
column-rule-color
column-rule-style
column-rule-width
column-span
column-width
columns
content
counter-increment
counter-reset
cursor
direction
display
empty-cells
filter
flex
flex-basis
flex-direction
flex-flow
flex-grow
flex-shrink
flex-wrap
float
font
@font-face
font-family
font-kerning
font-size
font-size-adjust
font-stretch
font-style
font-variant
font-weight
grid
grid-area
grid-auto-columns
grid-auto-flow
grid-auto-rows
grid-column
grid-column-end
grid-column-gap
grid-column-start
grid-gap
grid-row
grid-row-end
grid-row-gap
grid-row-start
grid-template
grid-template-areas
grid-template-columns
grid-template-rows
hanging-punctuation
height
hyphens
@import
isolation
justify-content
@keyframes
left
letter-spacing
line-height
list-style
list-style-image
list-style-position
list-style-type
margin
margin-bottom
margin-left
margin-right
margin-top
max-height
max-width
@media
min-height
min-width
object-fit
opacity
order
outline
outline-color
outline-offset
outline-style
outline-width
overflow
overflow-x
overflow-y
padding
padding-bottom
padding-left
padding-right
padding-top
page-break-after
page-break-before
page-break-inside
perspective
perspective-origin
pointer-events
position
quotes
resize
right
tab-size
table-layout
text-align
text-align-last
text-decoration
text-decoration-color
text-decoration-line
text-decoration-style
text-indent
text-justify
text-overflow
text-shadow
text-transform
top
transform
transform-origin
transform-style
transition
transition-delay
transition-duration
transition-property
transition-timing-function
unicode-bidi
user-select
vertical-align
visibility
white-space
width
word-break
word-spacing
word-wrap
z-index
line-height: о проблемах и прочих вопросах
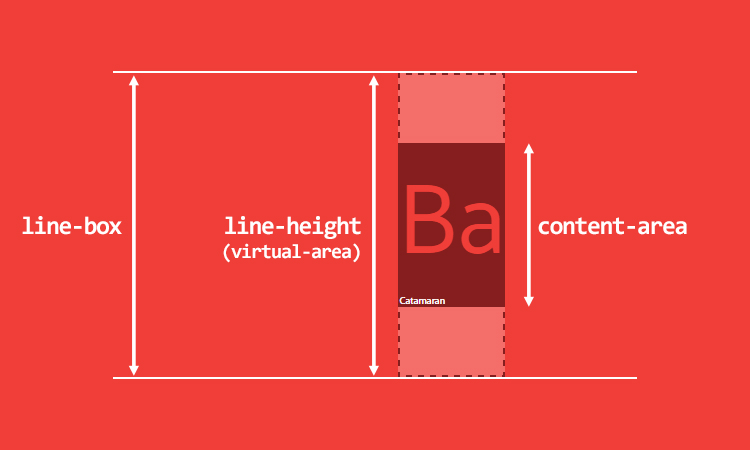
у строчного элемента есть две различных высоты: высота области содержимого и высота виртуальной области (virtual-area)
- Высота области содержимого определяется метриками шрифта (как мы уже видели ранее).
- Высота виртуальной области (virtual-area) представляет собой , и это — высота, которая используется для вычисления высоты контейнера строки.
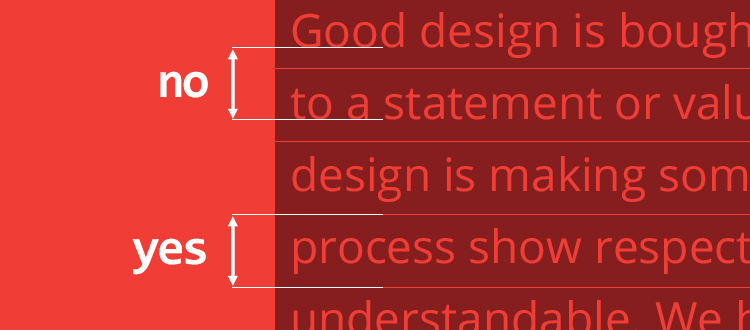 В других редакторских программах это может быть расстоянием между базовыми линиями. Например, в Word и Photoshop это так и есть. Основная разница в том, что в CSS это расстояние есть и для первой строки.
- замещаемые строчные элементы (, , и т. д.);
- и все элементы типа ;
- строчные элементы, которые задействованы в особом контексте форматирования (например, в элементе flexbox все flex-компоненты блокофицируются).
- Общие значения Ascent/Descent: высота верхнего выносного элемента — 770, нижнего — 230. Используются для создания символов (таблица «OS/2»).
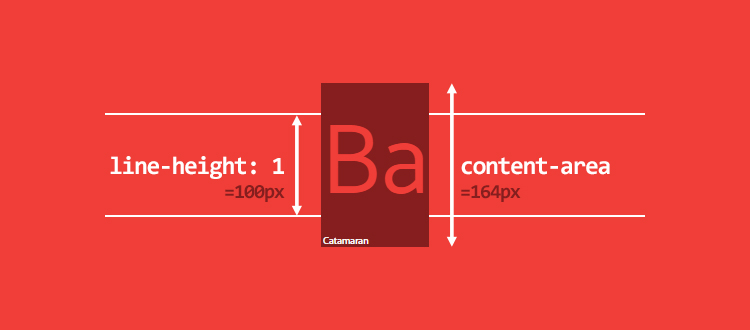
- Метрики Ascent/Descent: высота верхнего выносного элемента — 1100, нижнего — 540. Используются для определения высоты области содержимого (таблицы «hhea» и «OS/2»).
- Метрика Line Gap (междустрочный интервал). Используется для определения , данное значение прибавляется к метрикам Ascent/Descent (таблица «hhea»).
- Для строчных элементов — padding и border увеличивают область фона, но не высоту области содержимого (и не высоту контейнера строки). Поэтому область содержимого — это не всегда то, что видно на экране. От и нет никакого эффекта.
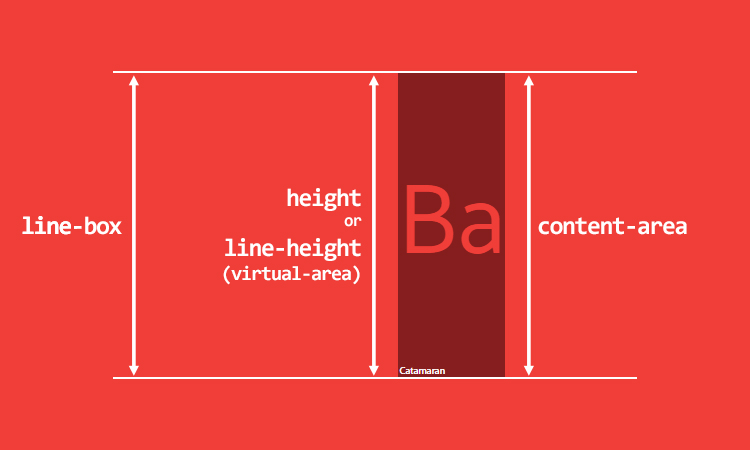
- Для замещаемых строчных элементов, элементов типа и блокофицированных строчных элементов — , и увеличивают и, следовательно, высоту области содержимого и контейнера строки.
Плавающий div
Данный метод использует пустой элемент div, который плавает и помогает управлять положением нашего вложенного элемента в документе
Обратите внимание, что плавающий div размещается до нашего вложенного элемента в коде HTML
CSS:
#parent {height: 250px;}
#floater {
	float: left;
	height: 50%;
	width: 100%;
	margin-bottom: -50px;
}
#child {
	clear: both;
	height: 100px;
}
Мы смещаем пустой div влево или вправо и задаем для него высоту 50% родительского элемента. Таким образом, он будет заполнять верхнюю половину родительского элемента.
Так как данный div является плавающим, то он удаляется из обычного потока документа, и нам нужно отменить обтекание текстом для вложенного элемента. В примере используется clear: both, но вполне достаточно использовать тоже направление, что и смещение плавающего пустого элемента div.
Верхняя граница вложенного элемента div находится непосредственно под нижней границей пустого элемента div. Нам нужно сместить вложенный элемент вверх на половину высоты плавающего пустого элемента. Для решения задачи используется отрицательное значение свойства margin-bottom для плавающего пустого элемента div.
Данный метод также работает во всех браузерах. Однако его использование требует дополнительного пустого элемента div и знаний о высоте вложенного элемента.
Выравнивание текста по центру CSS
Как правило, совместно с задачей выровнять текст по вертикали необходимо сделать выравнивание текста по центру в CSS. Для этого мы можем использовать стандартное свойство text-align со значением center, которое нужно задать для родительского элемента, то есть для блока, в котором находится нужный текст.
Зададим для блока с текстом, который мы использовали в первом примере, выравнивание текста по ширине в CSS:
CSS
.text-vertical-al p{
display:table-cell;
vertical-align:middle;
text-align:center;
}
|
1 |
.text-vertical-al p{ displaytable-cell; vertical-alignmiddle; text-aligncenter; } |
Теперь текст выровнен точно по центру блока:
Выравнивание текста по вертикали CSS
Обратите внимание! Свойство text-align:center; задано для тега , так как в данном случае абзац является родительским блоком для текста.
CSS Свойства
align-contentalign-itemsalign-selfallanimationanimation-delayanimation-directionanimation-durationanimation-fill-modeanimation-iteration-countanimation-nameanimation-play-stateanimation-timing-functionbackface-visibilitybackgroundbackground-attachmentbackground-blend-modebackground-clipbackground-colorbackground-imagebackground-originbackground-positionbackground-repeatbackground-sizeborderborder-bottomborder-bottom-colorborder-bottom-left-radiusborder-bottom-right-radiusborder-bottom-styleborder-bottom-widthborder-collapseborder-colorborder-imageborder-image-outsetborder-image-repeatborder-image-sliceborder-image-sourceborder-image-widthborder-leftborder-left-colorborder-left-styleborder-left-widthborder-radiusborder-rightborder-right-colorborder-right-styleborder-right-widthborder-spacingborder-styleborder-topborder-top-colorborder-top-left-radiusborder-top-right-radiusborder-top-styleborder-top-widthborder-widthbottombox-decoration-breakbox-shadowbox-sizingcaption-sidecaret-color@charsetclearclipcolorcolumn-countcolumn-fillcolumn-gapcolumn-rulecolumn-rule-colorcolumn-rule-stylecolumn-rule-widthcolumn-spancolumn-widthcolumnscontentcounter-incrementcounter-resetcursordirectiondisplayempty-cellsfilterflexflex-basisflex-directionflex-flowflex-growflex-shrinkflex-wrapfloatfont@font-facefont-familyfont-kerningfont-sizefont-size-adjustfont-stretchfont-stylefont-variantfont-weightgridgrid-areagrid-auto-columnsgrid-auto-flowgrid-auto-rowsgrid-columngrid-column-endgrid-column-gapgrid-column-startgrid-gapgrid-rowgrid-row-endgrid-row-gapgrid-row-startgrid-templategrid-template-areasgrid-template-columnsgrid-template-rowshanging-punctuationheighthyphens@importisolationjustify-content@keyframesleftletter-spacingline-heightlist-stylelist-style-imagelist-style-positionlist-style-typemarginmargin-bottommargin-leftmargin-rightmargin-topmax-heightmax-width@mediamin-heightmin-widthmix-blend-modeobject-fitobject-positionopacityorderoutlineoutline-coloroutline-offsetoutline-styleoutline-widthoverflowoverflow-xoverflow-ypaddingpadding-bottompadding-leftpadding-rightpadding-toppage-break-afterpage-break-beforepage-break-insideperspectiveperspective-originpointer-eventspositionquotesresizerighttab-sizetable-layouttext-aligntext-align-lasttext-decorationtext-decoration-colortext-decoration-linetext-decoration-styletext-indenttext-justifytext-overflowtext-shadowtext-transformtoptransformtransform-origintransform-styletransitiontransition-delaytransition-durationtransition-propertytransition-timing-functionunicode-bidiuser-selectvertical-alignvisibilitywhite-spacewidthword-breakword-spacingword-wrapwriting-modez-index
Вертикальное центрирование
CSS уровня 2 не обладает свойством вертикального центрирования. Вероятно, оно появится в версии CSS уровня 3 (см. ). Но даже в CSS2 вы можете центрировать блоки вертикально при помощи комбинирования нескольких свойств. Хитрость заключается в том, чтобы указать, что внешний блок должен быть отформатирован как ячейка таблицы, т.к. содержимое ячейки таблицы
может быть выровнено по центру вертикально.
Пример, приведенный ниже, демонстрирует центрирование абзаца внутри блока, который имеет определенную заданную высоту. Отдельный пример показывает абзац, который центрирован вертикально в окне браузера, потому что находится внутри блока, позиционированного абсолютно и по высоте окна.
DIV.container {
    min-height: 10em;
    display: table-cell;
    vertical-align: middle }
...
<DIV class="container">
  <P>Этот маленький абзац...
</DIV>
Чего оно не делаетСкопировать ссылку
Распространенное заблуждение о состоит в том, что применяясь к одному элементу, оно заставляет все элементы внутри него изменить свою вертикальную позицию. Например, когда элементу задан , это подразумевает, что его содержимое поднимется к его же верхней границе.
Вспоминаются времена, когда мы делали раскладки на основе таблиц:
В данном примере с ячейкой таблицы использование свойства (в настоящее время ) приведёт к тому, что элементы внутри ячейки прижмутся к её верху. И естественно, когда верстальщики начинают использовать , они думают, что получится то же самое, и содержимое элемента выровняется в соответствии со значением свойства.
Но работает не так.
Property Values
| Value | Description | Play it |
|---|---|---|
| baseline | The element is aligned with the baseline of the parent. This is default | Play it » |
| length | Raises or lower an element by the specified length. Negative values are allowed. Read about length units | Play it » |
| % | Raises or lower an element by a percent of the «line-height» property. Negative values are allowed |
Play it » |
| sub | The element is aligned with the subscript baseline of the parent | Play it » |
| super | The element is aligned with the superscript baseline of the parent | Play it » |
| top | The element is aligned with the top of the tallest element on the line |
Play it » |
| text-top | The element is aligned with the top of the parent element’s font |
Play it » |
| middle | The element is placed in the middle of the parent element | Play it » |
| bottom | The element is aligned with the lowest element on the line |
Play it » |
| text-bottom | The element is aligned with the bottom of the parent element’s font |
Play it » |
| initial | Sets this property to its default value. Read about initial | Play it » |
| inherit | Inherits this property from its parent element. Read about inherit |
Значения свойства для ячеек таблицы
| Значение | Описание |
|---|---|
| top | Выравнивает содержимое относительно верхнего края ячейки. |
| middle | Выравнивает содержимое относительно середины ячейки. |
| bottom | Выравнивает содержимое относительно нижнего края ячейки. |
| baseline (sub, super, text-top, text-bottom, величина, и %) | Базовой линией ячейки таблицы является базовая линия первой текстовой строки в ячейке. Если в ячейке нет никакой текстовой строки, то базовой линией является нижний край элемента, расположенного внутри ячейки. Базовая линия, имеющая максимальную дистанцию до верхнего края ячейки таблицы, является базовой линией для всей строки. Значение baseline используется для выравнивания содержимого нескольких ячеек (для которых установлено выравнивание по базовой линии) по одной базовой линии в строке. |
Пример
CSS Свойство:
vertical-align:
Результат:
Демонстрация свойства vertical-aligns.
CSS Код:
span#mySpan { background-color: yellow; vertical-align: baseline; }
Кликните на любое значение свойства, чтобы увидеть результат
CSS Table Method
Above I mentioned that vertical-align applies to table cells which leads us to this method. We’ll display our elements as table and table cell and then use the vertical-align property to center the content.
Note: CSS tables are not the same as html tables.
css
#parent {display table;}
|
|
#child {
|
|
display table-cell; |
|
vertical-align middle; |
|
} |
We set the parent div to display as a table and the child div to display as a table-cell. We can then use vertical-align on the child div and set its value to middle. Anything inside this child div will be vertically centered.
Unlike the method above the content can be dynamic as the div will grow with what’s placed inside. The downside of this method is it doesn’t work in older versions of IE, though there is a fix, which is to add display: inline-block to the child element.
#child {
|
|
display inline-block; |
|
} |
- Flexible height vertical centering with CSS, beyond IE7
- CSS Vertical Centering

Floater Div
This last method requires an empty div which is floated and used to control where our child element sits in the document flow. Notice the floater div comes before our child div in the html below.
css
#parent {height 250px;}
|
|
#floater {
|
|
float left; |
|
height 50%; |
|
width 100%; |
|
margin-bottom -50px; |
|
} |
|
#child {
|
|
clear both; |
|
height 100px; |
|
} |
We float the empty div to the left (or right) and give it a height of 50% of the parent div. That causes it to fill up the entire upper half of the parent element.
Because this div is floated it’s removed from the normal document flow so we need to clear the child element. Here I’ve used clear: both, but you just need to clear in the same direction you floated the empty floater div.
The top edge of the child div should now be immediately below the bottom edge of the floater div. We need to bring the child element up by an amount equal to half its height and to do so we set a negative margin-bottom on the floater div.
This method also works across browsers. The downside is that it requires an empty div and that you know the height of the child element.
How To Center Content Vertically Using CSS
Описание
CSS свойство vertical-align управляет вертикальным выравниванием строчных элементов и содержимого ячеек таблицы.
Если свойство применяется к строчному элементу, то оно влияет на выравнивание самого строчного элемента, а не его содержимого.
Если vertical-align применяется к ячейке таблицы, то оно влияет на выравнивание всего содержимого, расположенного в ячейке таблицы, а не на саму ячейку.
Допускается использование отрицательных значений.
| Значение по умолчанию: | baseline (для строчных элементов), middle (для ячеек таблицы) |
|---|---|
| Применяется: | к строчным элементам (inline, inline-block) и ячейкам таблицы (table-cell) |
| Анимируется: | да |
| Наследуется: | нет |
| Версия: | CSS1 |
| Синтаксис JavaScript: | object.style.verticalAlign=»bottom» |
Равные отступы сверху и снизу
В данном методе явно задаются равные отступы сверху и снизу от родительского элемента.
CSS:
#parent {
	padding: 5% 0;
}
#child {
	padding: 10% 0;
}
В коде CSS примера отступы сверху и снизу задаются для обоих элементов. Для вложенного элемента установка отступов будет служить для вертикального центрирования. А отступы родительского элемента будут центрировать вложенный элемент в нём.
Для динамического изменения размеров элементов используются относительные единицы измерения. А для абсолютных единиц измерения придется проделать расчеты.
Например, если родительский элемент имеет высоту 400 px, а вложенный элемент — 100px, то необходимы отступы 150px сверху и снизу.
150 + 150 + 100 = 400
Использование % позволяет расчеты оставить браузеру.
Данный метод работает везде. Обратной стороной является необходимость в расчетах.
Примечание: Данный метод работает за счет установки внешних отступов элемента. Вы можете также использовать поля внутри элемента. Решение о применении полей или отступов нужно принимать в зависимости от специфики проекта.
IE6-7: метод expression
Т.к. предыдущий способ не работает в IE6-7, то надо исправить эту неприятность.
Expression — короткие куски JS кода, которые помещаются в файл стилей, выполняются один раз и работают только в IE. Expression невалидны. Добавляем к предыдущему примеру в файлы стилей для IE6 и 7 такой кусок кода:
.wrapper p {
   z-index:  expression(
      runtimeStyle.zIndex  = 1,
      this ==  ((200/2)-parseInt(offsetHeight)/2) < 0
      ?  style.marginTop="0" :  style.marginTop=(200/2)-(parseInt(offsetHeight)/2) +'px'
   );
}
Рассматривать достоинства и недостатки смысла тут нет, т.к. достоинств нет, кроме того, что этот способ дополняет первый в IE6-7, но т.к. эти браузеры уже устарели, на них можно закрыть глаза.
Значения свойств
| Значение | Описание | |
|---|---|---|
| baseline | Элемент выравнивается по базовой линии родительского элемента. Это значение по умолчанию | |
| length | Поднимает или понижает элемент по заданной длине. Допустимы отрицательные значения. Читать о единицах длины | |
| % | Увеличивает или понижает элемент в процентах от свойства «высота строки». Допустимы отрицательные значения | |
| sub | Элемент выравнивается по базовому индексу родительского | |
| super | Элемент выравнивается по базовому индексу родительского | |
| top | Элемент выравнивается по верхней части самого высокого элемента на линии | |
| text-top | Элемент выравнивается по верхнему краю шрифта родительского элемента | |
| middle | Элемент помещается в середину родительского элемента | |
| bottom | Элемент выравнивается по нижнему элементу в строке | |
| text-bottom | Элемент выравнивается по нижнему краю шрифта родительского элемента | |
| initial | Присваивает этому свойству значение по умолчанию. (Читайте о initial) | |
| inherit | Наследует это свойство из родительского элемента. (Читайте о inherit) |
Line-Height Method
This method will work when you want to vertically center a single line of text. All we need to do is set a line-height on the element containing the text larger than its font-size.
By default equal space will be given above and below the text and so the text will sit in the vertical center.
Most tutorials will also set the height on the element with the same value given to the line-height. I don’t think setting the height is necessary, but if line-height alone doesn’t work for you setting the height of the element will likely be the solution.
<div id="parent"> |
|
<div id="child">Text here</div> |
|
</div> |
css
#child {
|
|
line-height 200px; |
|
} |
The above works in all browsers, however it will only work for a single line of text. If your text could wrap to a 2nd line you need to use a different method. The value of 200px above is arbitrary. You can use any value you want as long as its larger than the font-size that’s been set.
Added: As Jeff pointed out in the comments below, there’s one small got’cha with this method in that you have to be careful when using the shortcut for the font property. This method relies on you setting the line-height as a value greater than the font-size. When you use the font shortcut any property you don’t specifically set gets set to its default value. With line-height that default is 1. If you use the font shortcut, just make sure to explicitly set the line-height inside.
Centering an Image with Line-Height
What if the content you want centered is an image? Will this method work? The answer is yes with one additional line of css.
css
#parent {
|
|
line-height 200px; |
|
} |
|
#parent img {
|
|
vertical-align middle; |
|
} |
You set the line-height as we did above (It’ll need to be greater than the height of the image) and then set vertical-align: middle on the image.

Values
For each of the following values, we will apply it to an inline image inside a line box of a list item. The line box in each of the images has a dotted gray border. The line which is used to align the images for each value is red.
- baseline
-
This is the default value. It aligns the baseline of the element with the baseline of the line box. If the element does not have a baseline, it aligns the bottom margin edge with the line’s baseline.
 An image aligned to the baseline of the line box, sitting next to the text in the line. This is the default vertical alignment.
 - middle
-
Aligns the vertical midpoint of the element with the baseline of the line plus half the x-height of the line (determined by the font).
 The vertical midpoint of the image is aligned with the line that is half the x-height of the line above the baseline.
This is one of the most commonly used value for the property, and is usually used to align icons and list markers with the text in line.
- sub
-
Lowers the baseline of the element to the proper position for subscripts on the line. (This value has no effect on the font size of the element’s text.)
 An image’s bottom edge is lowered so that it is aligned with the baseline of the subscript.
 - super
-
Raises the baseline of the element to the proper position for superscripts on the line. (This value has no effect on the font size of the element’s text.)
 An image’s bottom edge is lifted so that it is aligned with the baseline of the superscript.
 - text-top
-
Aligns the top of the element with the top of the line’s content area. The height of the content area is just high enough for the maximum ascenders and descenders of all the fonts in the line, and the alignment line is the top of that height. Note that the height may be larger than any of the font sizes involved, depending on the baseline alignment of the fonts.
 The image is aligned with the line just above the ascenders of the font. If more than one font is used, this line will be just above the highest ascender of all the fonts.
 - text-bottom
-
Aligns the bottom of the element with the bottom of the line’s content area. The height of the content area is just high enough for the maximum descenders and ascenders of all the fonts in the line, and the alignment line is the bottom of that height. Note that the height may be larger than any of the font sizes involved, depending on the baseline alignment of the fonts.
 The image is aligned with the line just below the descenders of the font. If more than one font is used, this line will be just below the lowest descender of all the fonts.
 - top
-
Aligns the top of the element with the top of the entire line. This means that if there are other elements on the line each with different heights, like multiple images, for example, the top of the line will be as high as the highest of the two images.
 An image aligned to the top of the line box. The top is specified by the highest element on the line which, in this case, is the second image.
If the line has an explicitly set that is higher than the highest content on the line, the top of the line box will then be determined by that height.
 An image aligned to the top of the line box that has an explicit line-height specified that is greater than the height of all of its content.
 - bottom
-
Aligns the element to the bottom of the entire line.
If the line has an explicitly set that is lower than the lowest content on the line, the bottom of the line box will then be determined by that height.
 The image is aligned to the bottom of the entire line box. The line has a specified which stretches the bottom of the line downwards, and the image is aligned with that bottom.
 - <percentage>
-
Raise the element above the baseline (if the percentage value is positive), or lower the element below the baseline (if the percentage value is negative) by the specified amount. The amount specified is a percentage of the value. The value means the same as .
 The image is aligned using a 50% value. The specified is 100px, so the image is lifted up by 50px above the baseline.
 - <length>
- Raise the element above the baseline (if the length value is positive), or lower the element below the baseline (if the length value is negative) by the specified amount. A value ‘0’ means the same as .The image is raised from the baseline by a specified amount.
Notes
The values , , and behave as expected when applied to table-cell elements. However, other values may have unexpected behavior in some browsers. Chris Coyier says it best:
Давайте приступим к делу!
Вы хотите осуществить CSS выравнивание по центру по вертикали? Сначала создайте элемент с относительной позицией и размерами. Например: 100% по ширине и высоте.
Второй шаг может быть различным в зависимости от целевых браузеров, но можно использовать один из двух вариантов:
Старое свойство: нужно знать точный размер окна, чтобы удалить половину ширины и половину высоты. Посмотрите приведенный ниже пример.
Новое свойство CSS3: можно добавить свойство transform со значением translate 50% и блок всегда будет в центре. Посмотрите приведенный ниже пример.
В принципе, если вы хотите центрировать контент, никогда не используйте top: 40% или left: 300px. Это прекрасно работает на тестовых экранах, но это не центровка.
Помните position: fixed? Можно сделать с ним то же самое, что и с абсолютной позицией, но вам не нужна относительная позиция для родительского элемента — она всегда будет позиционировать относительно окна браузера.
Центрируем два адаптивных div-элемента рядом друг с другом
Здесь у нас два расположенных рядом адаптивных div-элемента. Этот метод установки div по центру экрана будет работать во всех современных браузерах.
CSS
.container
{
     text-align: center;
}
.left-div
{
     display: inline-block;
     max-width: 300px;
     vertical-align: top;
}
.right-div
{
     display: inline-block;
     max-width: 150px;
}
 screen and (max-width: 600px)
{
     .left-div, .right-div
     {
        lef  max-width: 100%;
     }
}
HTML
<div class="container"><div class="left-div"></div><div class="right-div"></div></div>
Здесь у нас несколько элементов с примененным свойством inline-block, расположенных внутри центрированного контейнера. В этом примере также используются медиа-запросы CSS; то есть, если размер экрана меньше 600 пикселей, то свойство max-width как для левого, так и для правого div-элемента устанавливается на 100%.