Все уроки в gimp
Содержание:
- GIMP for Unix-like systems
- Paint Select tool
- Как пользоваться инструментами редактирования GIMP
- Off-canvas point snapping
- Metadata support
- Plug-ins
- Rotate and/or Flip an Image
- Что представляет собой редактор Gimp
- GIMP for Windows
- Input Devices dialog
- Step 2
- The Gimp module
- Multi-threading preferences now available from plug-ins
- Step 1
- Updated user interface and initial HiDPI support
- Background
- FTP and Web Mirrors
- Floating selections
- How You Can Help
- GIMP и прочие программы [ править | править код ]
GIMP for Unix-like systems
If available, the official package from your Unix-like
distribution is the recommended method of installing GIMP!
The flatpak build is new and has known limitations, though it
will likely provide faster updates, following GIMP releases
closely.
Therefore choose your installation medium according to your
needs.
Flatpak build available in: x86-64 and AArch64
(note: i386 and ARM-32 versions used to be published, yet
are now stuck at GIMP 2.10.14 and 2.10.22 respectively).
Flatpak additional instructions
The flatpak link above should open your software installer
and prompt you to install GIMP. Yet it may not work
out-of-the-box on some platforms since the flatpak technology is
new. If that is the case, ensure flatpak is
installed and if clicking the link still does not prompt to
install GIMP, then manually install by command line:
Once installed, it will be made available exactly the same way
as other applications (menus, desktop overview, or any specific
application launch process used by your desktop).
If this is not the case, we suggest to report a bug to your
desktop or distribution asking for proper support of flatpak. In
the meantime, you can still run it by command line (not as the
recommended method, only a workaround):
This installation will also provide regular update. You don’t
have to come back on this page and install again (it will not
work!) when a new version of GIMP is released. Instead if your
distribution and/or desktop has a good support for flatpak, it
should propose to perform updates.
Once again, if your distribution does not have proper support,
you can always fall back to using the following command line:
Paint Select tool
The tool is still listed as experimental as it is not yet deemed
finished by its contributor, Thomas Manni. Nevertheless it has already
improved quite a bit and starts getting really interesting.
Several bugs were fixed and selection is now viewport-based which allows
it to be much faster already depending on the zoom. Yet this is not even
the expected optimization which is planned to make the tool work really
fast. Expect more to come!
This work has been happening both on GIMP code base and on our graphics
engine library’s code base, GEGL.
Copy-pasting Wilber in a few seconds with the Paint Select tool (realtime GIF, faster as zoomed-in) — GIMP 2.99.6
As a side note, the Paint Select tool now has its own icons, original
design by Yash Arya, with collaborative work and design finalisation by Aryeom.
New Paint Select tool icon by Yash Arya and Aryeom — GIMP 2.99.6
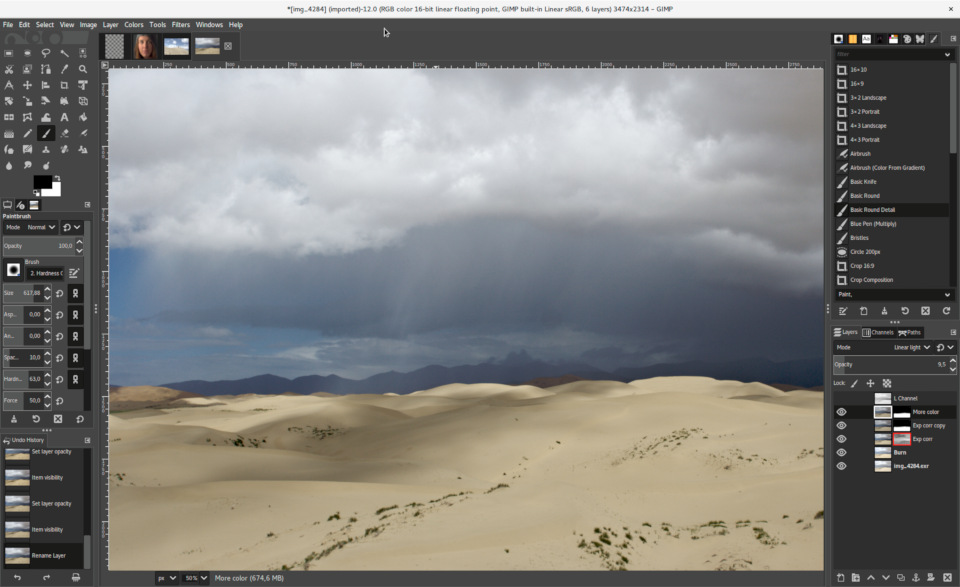
Как пользоваться инструментами редактирования GIMP
Рассматриваемый графический редактор характеризуется набором полезных инструментов для профессионального редактирования и обработки фотографий и картинок.
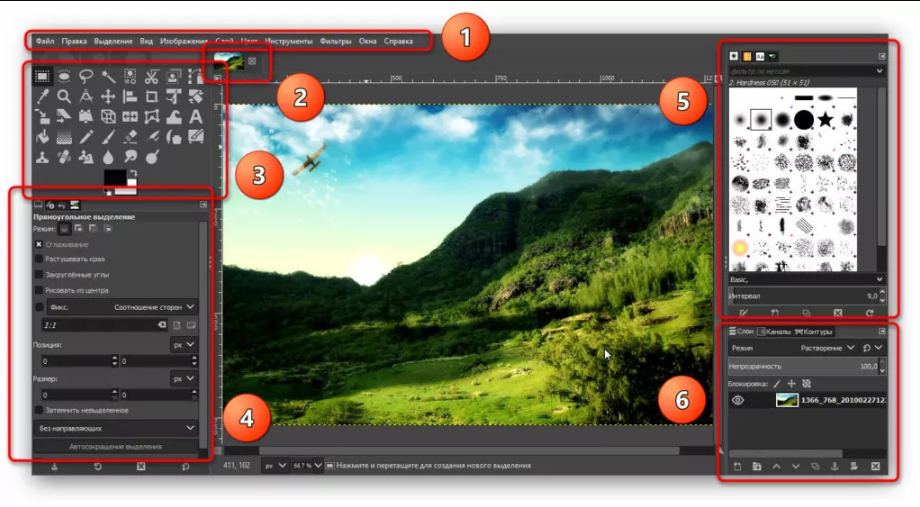
1. В главном меню доступно управлением изображением на глобальном уровне. Здесь переключаются окна, слои, цветовая гамма, фильтры – стандартные для работы инструменты.
2. С помощью следующего меню мастер переходит между фотографиями, который открыты в программе, для вставки или слияния.
3. Панель инструментов содержит полезный набор функций, чтобы выделить область, повернуть и увеличить изображение или текст, изменить цвет, закрасить отдельные элементы и так далее. Чтобы воспользоваться всплывающей подсказкой, наводим указатель мыши (курсор) на инструмент и ждем 1-2 секунды – программа отобразит наименование функции.
4. После выбора инструмента открывается соответствующее меню для настройки параметров выбранной функции. Для кисти – толщина, цвет, варианты закраски, для текста – шрифт, размер и так далее.
5. В правом верхнем меню также содержатся кисти, текстуры и шрифты.
6. Следующий раздел обрабатывает слои, цветовые каналы и выделенные контуры.
Off-canvas point snapping
Though there are various fixes in core code, this change is probably the
most worth mentionning. Ever since GIMP 2.10.14, we are now able to see
the .
Consequently, many features can now work outside the canvas, yet not all
features yet. This change is the continuation of this work, allowing you
to snap various tools to guides, grids or vectors, even outside the canvas.
 Snapping to guide/grid/vectors off-canvas made possible — GIMP 2.10.24
Metadata support
A lot of work has been going on in the metadata area, mostly
consolidating our support and fixing many issues.
The metadata viewer and editor also received a lot of love, making them
more robust to various edge cases, such as duplicate tags, but also
mapping equivalency between similar IPTC and XMP tags, better encoding
handling, and so on.
The GPS data is also handled a bit better with more precision, tooltips
and better formatting.
There are still a lot of improvements to be made in the metadata area
though we are probably on the right path. This part of the development
is not as visible as other, yet this is very time-consuming and
thankless groundwork while being useful to anyone who needs good
metadata support so we’d like to thank Jacob
Boerema who has worked tirelessly on
this for months.
Plug-ins
GIMP now ships with over 80 GEGL-based filters. A lot of those are former GIMP effects. Here is why GEGL-based implementations
are better:
- You can apply them on images in 32-bit per color channel precision mode.
- You can preview them right on the canvas, and if an image is larger than the
viewport, GIMP will render the viewport first for immediate feedback. - You can use split preview to compare original image with its processed version
and swap before/after sides both horizontally and vertically. - In a future non-destructive GIMP, you will be able to adjust settings of those
filters without undoing a ton of steps.

Some of the GEGL-based filters have OpenCL version for hardware acceleration.
This will come in handy, if OpenCL drivers work well for you.
Furthermore many operations can come multi-threaded to use your processor at
their full power.
Rotate and/or Flip an Image
There may be a time that you would need to rotate an image. For instance, you may have taken the image with your camera in a vertical orientation, and for some reason it wasn’t detected by GIMP as needing to be rotated (GIMP will normally figure this out for you, but not always).
There may also be a time that you’d like to flip an image as well. These commands are grouped together under the same menu item:
Image → Transform
Flip an Image
If you want to flip your image, the Transform menu offers two options, Flip Horizontally, or Flip Vertically. This operation will mirror your image along the specified axis. For example, here are all of the flip operations shown in a single image:
![]()
All flips applied to base image (top left).
Rotate an Image
Image rotation from the Transform menu is contrained to either 90° clockwise/counter-clockwise, or 180°.
Don’t mis-interpret this to mean that GIMP cannot do arbitrary rotations (any angle). Arbitrary rotations are handled on a per-layer basis, while the image rotation described here is applicable to the entire image at once.
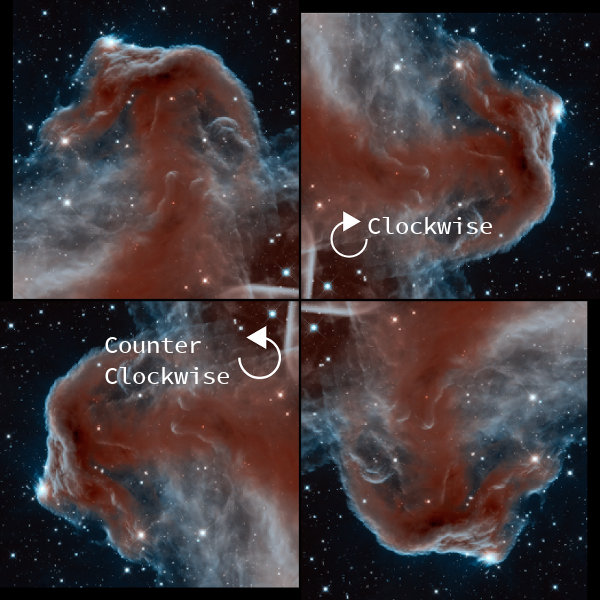
Original (top left), 90° clockwise (top right)
90° counter-clockwise (bottom left), 180° (bottom right)
Что представляет собой редактор Gimp
Графический редактор Gimp появился на свет в 1995 году. Проект не имеет официальной компании, ответственной за выпуск новых версий и поддержку старых. Эти функции исполняет сообщество разработчиков, состоящее из группы добровольцев. В первые 10 лет своего существования проект не имел единого представления о том, каким он должен быть для конечного потребителя. Лишь в 2005 году был разработан единый стандарт и составлены принципы, которым разработчики стараются следовать и по сегодняшний день. Программа является полностью бесплатной и распространяется с открытой лицензией. Это означает, что при желании вы можете стать частью сообщества разработчиков и выпускать собственные модификации без нарушения авторских прав.

GIMP for Windows
Download GIMP 2.10.28
via BitTorrent
Download GIMP 2.10.28
directly
The download links above will attempt to download GIMP from one of our trusted mirror servers.
If the mirrors do not work or you would rather download directly from our server, you can get the direct download here.
Supported OS: Windows 7 or over
These links download the official GIMP installer for Windows (~200 MB).
The installer contains both 32-bit and 64-bit versions of GIMP, and will automatically use the appropriate one.
BitTorrent is a peer-to-peer file sharing system. It works by downloading GIMP from a distributed network of BitTorrent users, and may improve download speed dramatically.
Choosing this option will download the torrent file for the GIMP installer.
You may need to install a torrent client to make use of this file. Learn more…
Hash Sum
The SHA256 hash sum for is:
2c2e081ce541682be1abdd8bc6df13768ad9482d68000b4a7a60c764d6cec74e
Check it on
VirusTotal:
Older Downloads
- Previous v2.10 installers for Windows can be found here: download.gimp.org.
- Previous v2.8 installers for Windows can be found here: download.gimp.org.
GIMP User Manual
These links download language-specific Windows installers for GIMP’s local help.
By default, they will place the help files with your GIMP installation.
Note: GIMP uses online help by default. If you want to use this local help offline, you will need to change GIMP’s help settings.
- In GIMP, select > >
- For «User manual», select «Use a locally installed copy»
- Under «Help Browser», you can choose between your system’s web browser and GIMP’s help browser plugin (if available).
See the for more settings.
Input Devices dialog
The infamous “Input Devices” dialog has always felt packed with arcane
features and devices. With GIMP 3, many features will be working
out-of-the-box and it felt like the right time to clean this dialog a bit.
- We now only show entries for actual physical devices attached to your
computer. So no more “virtual devices”. Similarly we now hide
the device which some kind of a test device generated by the X11
server (Linux). - We used to show all possible axes for all devices, including some axes
like “Rotation” or “Slider” which are present very rarely (only on
specific drawing styluses in the market, even uncommon among
professionals). The dialog will now only list the axes returned by the
backend (note that even this list may still show more than what a
specific device really has because drivers are sometimes over-listing,
yet it is still much closer to reality). - When a device is connected, the names of the axes will also be the
ones as listed by the backend, which will get us closer-to-reality
names. Typically the axis for a graphics tablet will be
because these devices are usually meant for absolute pointer
positioning whereas it will be on mice. - Curve editing for the tablet pressure response was one of the most
interesting configuration option in this dialog, even more now that we
don’t need to enable or disable specific devices. This is why when a
device has a “Pressure” axis, it will be selected by default, hence
allowing you to directly work on the curve, without unnecessary clicks.
Call for user input:
There are a few puzzling settings in this dialog and we would welcome
input from anyone who had an actual need for them. How were you using any
of these features? Which OS? What was the goal?
- There used to be a “Keys” list for every device in the dialog. We
actually removed this list back in 2.99.2. Based on tests, code
research, and discussion with Carlos Garnacho, our local GTK and input
device expert, we came to the conclusion that the “Keys” concept was
tied to “keyboard” devices (a type of devices not shown in this
dialog) and it was meaningless on “pointer” devices (mice, touchpads,
graphics tablets…). Yet here was the option! Maybe it actually had a
hidden usage to someone, someday? If this is your case, please explain
us so that we can think of a way to restore the feature with an
understandable interface. - The “Axes” list has the ability to set the “axis use” for a given
axis (the little numbers next to each axis). Yet we never managed to
do anything with it. This looks mostly either broken or meaningless.
Has anyone a use for this axis settings? - Each device has 3 “modes”: Disabled, Screen, and Window. “Disabled”
simply means that the device will share the main virtual device
pointer while “Screen” will make it look independent. The “Window”
mode, on the other hand, is a concept only meaningful for “floating”
devices (a concept maybe not even valid on all platforms) and even
then it looks broken, as far as our tests went. Is there anyone in the
world who actually uses the “Window” mode and sees a difference with
“Screen” in recent GIMP versions?
If anyone has the use for these features, we would definitely welcome
feedback because we are as puzzled as many others whether users actually
rely on these things. On one hand, we are tempted to remove these settings, because it doesn’t make sense to show a non-working configuration. On the
other hand, we don’t want to remove actual features if someone somewhere
has a use for them. So if you are one of those people, please contact us.
E.g. open a report
to tell us more.
Maybe there are other ways to improve this dialog for more people? Tell us
what you expect from it!
Step 2
Now we’re ready for the actual animation work. We will be creating a banner consisting of, say three lines of text being animated. Each frame will consist of the flower image and accompanied by some text. I don’t want to make this boring, so lets make it three frames. The first step will naturally be to copy our flattened image two times using the duplicate layer button in the layers window.
Then we’ll use the standard text tool to put a small text note on every frame. After typing the text onto the frame, GIMP will create a floating selection, that you need to position right using the move tool and anchor using Ctrl+H. The positioning might be crucial for the final animation, so you can use the following trick to make the positioning a piece of cake. Before using the text tool, set the layer (frame) transparency to a lower value, so you could see the layer below it. That way you can position the newly created text acording to the text below (on the previous frame).
The Gimp module
Most scripts make use of the simplified interface Gimp::Fu provided with the Gimp module. Gimp::Fu provides a framework for entering parameters to the script in a dialog-box interface, just like Script-Fu, but also allows running of the script in batch mode from the command line. This tutorial will go into detailed descriptions of the construction of a Gimp::Fu script, but before we do this, here is the general framework of such a script.
1 2 3 4 5 6 7 8 9 10 11 12 13 14 15 16 17 18 19 20 21 22 23 24 25 26 27 28 29 30 31 32 33 34 35 |
The key points to note in the script are:
- the use of the two modules and ,
- the podregister function, which will be described in detail below,
- the way the control is handed over to module on line 8, and
- the POD documentation below the line.
Multi-threading preferences now available from plug-ins
The Preferences dialog proposes a “Number of threads to use” setting,
allowing people to customize the thread usage (defaulting to system
threads detection). This was only used by core processing until now. We
now make this setting available to plug-ins too through the
API function, hence allowing plug-ins to
follow user preferences.
The HEIF/AVIF plug-in now uses this function (it was already
multi-threaded, yet was using system threads discovery with no way to
override the settings until now). The JPEG2000 loading code, which was
single-threaded until now, has been ported to use this new function,
hence decoding images much faster.
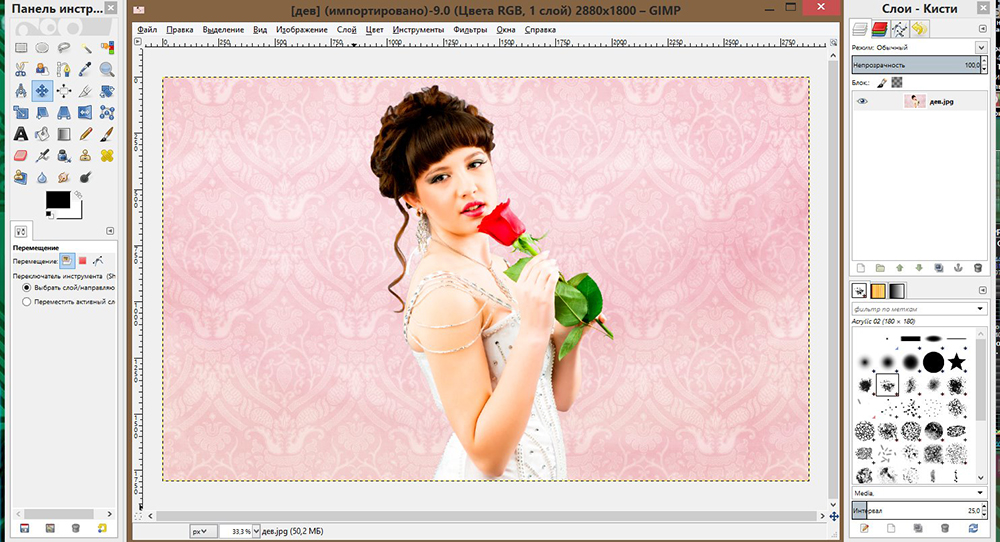
Step 1
We’ll create a very simple web banner. Let’s start with a new image 468×60 px. Use white as the background color. Create new transparent layer. Select the whole image with Ctrl+A and fill it with black (Ctrl+,). Shrink the selection by 1 px () and delete the selection with Ctrl+K. We created a 1 px frame around out banner.
Now it’s time to put our logo or the main theme picture into the banner. I have prepared a masked-out flower you see on the picture on the left. I just pasted the flower below the border frame, used alpha to selection, created an empty layer below it and filled the selection with black using Ctrl+,. After that I blurred the shadow using Gaussian blur RLE and offset it by 2px to bottom right. I couldn’t resist adding the interlace effect using and a layer mask. In that layer mask i applied a b/w gradient, so that the left of the flower is not interlaced.
This part of the tutorial is not the key element, so feel free to experiment. Once you’re ready flatten the image using the .
Updated user interface and initial HiDPI support
One thing immediately noticeable about GIMP 2.10 is the new dark theme and
symbolic icons enabled by default. This is meant to somewhat dim the environment
and shift the focus towards content.
There are now 4 user interface themes available in GIMP: Dark (default), Gray,
Light, and System. Icons are now separate from themes, and we maintain both
color and symbolic icons, so you can configure GIMP to have System theme with
color icons if you prefer the old look.
![]()
Color, Legacy, and Symbolic icons
Moreover, icons are available in four sizes now, so that GIMP would look better
on HiDPI displays. GIMP will do its best to detect which size to use, but you
can manually override that selection in Edit > Preferences > Interface >
Icon Themes.
![]()
Icons in various sizes to adapt for HiDPI displays.
Contributors: Benoit Touchette, Ville Pätsi, Aryeom Han, Jehan Pagès,
Alexandre Prokoudine…
Background
One of the wonderful features of GIMP is that it all its functionality may be accessed through scripting. Available scripting environments include Scheme through Script-Fu and Python.
Perl has CPAN, giving access to vast numbers of modules to get things done. Now, GIMP may also be scripted in Perl. This tutorial will describe how to write such plug-ins and scripts for Gimp.
As there are several excellent tutorial texts describing the perl language, this tutorial will assume a working knowledge of Perl, and will instead concentrate on the use of GIMP together with the perl modules Gimp and Gimp::Fu.
FTP and Web Mirrors
We had a server move a while back that caused us to lose our existing mirrors (moved from physical to virtual server and to an environment that doesn’t allow FTP access).
On the plus side, we are now able to offer rsync access to download.gimp.org.
If you are running one of the existing GIMP mirrors, or want to create a new one, please contact us to get your rsync credentials.
- Canada
- https://mirror.klaus-uwe.me/gimp/gimp/
- ftp://mirror.klaus-uwe.me/gimp/
- rsync://mirror.klaus-uwe.me/gimp/
- Finland
- https://www.nic.funet.fi/pub/mirrors/ftp.gimp.org/
- ftp://ftp.funet.fi/pub/mirrors/ftp.gimp.org/
- rsync://rsync.nic.funet.fi/ftp/pub/mirrors/ftp.gimp.org/
- France
- http://ftp.iut-bm.univ-fcomte.fr/gimp/
- ftp://ftp.iut-bm.univ-fcomte.fr/gimp/
- rsync://ftp.iut-bm.univ-fcomte.fr/gimp/
- https://gimp.ip-connect.info/gimp/
- rsync://gimp.ip-connect.info/gimp/
- ftp://gimp.ip-connect.info/mirror/gimp/
- Germany
- https://ftp.fau.de/gimp/gimp/
- ftp://ftp.fau.de/gimp/gimp/
- rsync://ftp.fau.de/gimp/
- https://artfiles.org/gimp.org/pub/gimp/
- https://ftp.gwdg.de/pub/misc/grafik/gimp/
- ftp://ftp.gwdg.de/pub/misc/grafik/gimp/
- Greece
- https://ftp.cc.uoc.gr/mirrors/gimp/
- ftp://ftp.cc.uoc.gr/mirrors/gimp/
- Japan
- http://www.ring.gr.jp/pub/graphics/gimp/
- Netherlands
- https://ftp.snt.utwente.nl/pub/software/gimp/gimp/
- ftp://ftp.snt.utwente.nl/pub/software/gimp/gimp/
- Philippines
- http://mirror.rise.ph/gimp/
- ftp://mirror.rise.ph/gimp/
- Poland
- https://ftp.icm.edu.pl/pub/graphics/gimp/
- ftp://ftp.icm.edu.pl/pub/graphics/gimp/
- rsync://ftp.icm.edu.pl/pub/graphics/gimp/
- gopher://ftp.icm.edu.pl/1/pub/graphics/gimp/
- Sweden
- https://ftp.lysator.liu.se/pub/gimp/
- ftp://ftp.lysator.liu.se/pub/gimp
- rsync://ftp.lysator.liu.se/pub/gimp
- United Kingdom
- https://www.mirrorservice.org/sites/ftp.gimp.org/pub/gimp/
- ftp://ftp.mirrorservice.org/sites/ftp.gimp.org/pub/gimp/
- rsync://rsync.mirrorservice.org/ftp.gimp.org/pub/gimp/
- https://mirrors.ukfast.co.uk/sites/gimp.org/pub/gimp/
- ftp://mirrors.ukfast.co.uk/gimp.org/pub/gimp/
- rsync://mirrors.ukfast.co.uk/gimp.org/pub/gimp/
- United States
- http://gimp.cp-dev.com/
- ftp://devhost.cp-dev.com/gimp
- rsync://gimp.cp-dev.com/gimp
- https://mirrors.dotsrc.org/gimp/gimp/
- ftp://mirrors.dotsrc.org/gimp/
- rsync://mirrors.dotsrc.org/gimp/
- https://mirrors.syringanetworks.net/gimp/gimp/
- ftp://mirrors.syringanetworks.net/gimp/
- rsync://mirrors.syringanetworks.net/gimp/
- https://mirror.jaleco.com/gimp/gimp/
- https://mirror.umd.edu/gimp/gimp/
- https://mirrors.xmission.com/gimp/gimp/
- ftp://mirrors.xmission.com/gimp/gimp/
Floating selections
When a region has been selected through one of the selection routines, the area outlined by the selection may be copied to the cut-buffer through the gimp_edit_copy command. The cut-buffer may subsequently be pasted into a different layer through the gimp_edit_paste command. When a layer is pasted it becomes a floating selection. This floating selection may be moved to its required position by the command gimp_layer_set_offsets, and finally it is pasted by the gimp_floating_sel_anchor command. Another way of determining the position of a pasted layer is to create a selection in the target image before the cut-buffer is pasted.
This is illustrated in the following program, which works on one image and takes as a parameter another image, which it concatenates to the right of the first image. The lines 28-38 shows how the second image is copied and glued into the first image.
| (horiz-cat) |
|---|
|
:::perl use Gimp; podregister { exit main; =head1 NAME horiz_cat — Horizontal concat =head1 SYNOPSIS /Filters/Tutorial/Horizontal Concat =head1 DESCRIPTION Horizontal concatenation of images. =head1 PARAMETERS , =head1 IMAGE TYPES * =head1 AUTHOR Dov Grobgeld =head1 DATE 2004-03-27 =head1 LICENSE Dov Grobgeld |
You might notice something very important on lines 7 and 8: we “know” that we’ll always pass a layer as the first drawable, but we’re checking that anyway. Then we’re telling Gimp-Perl the drawable definitely is a layer. The reason for that is that (obviously) Gimp::Layer and Gimp::Drawable have different methods available to them, and what matters here is that Gimp::Drawable does not have a resize method. (i.e. The PDB does not have a gimp_drawable_resize function)
How You Can Help
GIMP is Free Software and a part of the GNU Project. In the free software world, there is generally no distinction between users and developers. As in a friendly neighbourhood, everybody pitches in to help their neighbors. Please consider the time you give in assistance to others as payment.
Ways in which you can help:
- program new features,
- report bugs (errors in the program),
- test existing features and provide feedback,
- add documentation,
- translate GIMP to your own language,
- translate the documentation,
- write tutorials,
- improve this website,
- make artwork for GIMP,
- let people know you used GIMP for your artwork,
- give away copies of GIMP,
- help others to learn to use GIMP, etc.
As you can see, anyone can help.
Development Status
The team is currently busy working on v3.0. This will be a port of GIMP to
GTK+3, much newer and better supported version of the user interface toolkit.
Most of GIMP’s source code is related to the user interface, so this port is a
major undertaking, especially since we shall break API and refactor numerious
parts of the program.
We still need to port more plugins to become GEGL operations. If you are willing
to help with that, please refer to the Porting filters to GEGL
page to see what you could work on.
To get a better understanding of where the project is heading to, which features
are planned etc., please visit the Roadmap page.
Bug Reports
GIMP is not a bug-free application nor is any other application so reporting the bugs that you will encounter is very important to the development, it helps the developers to make GIMP more stable and more bug free.
You don’t have to be a developer or a everyday user to report bugs. It can be hard to report a bug the first time you try it out but don’t just quit the whole bug report if you think it is hard. Instead, look at the bugs page you will find some very good help about this.
Web Development
Creating websites that contain useful information is very important. It is actually just as important as doing bug reports. A website contains a lot of information that is needed for the development to move on and it also contains information that will help the public to understand what the application is all about.
GIMP и прочие программы [ править | править код ]
FilmGimp/Cinepaint/Glasgow
FilmGimp, теперь называемый Cinepaint — это ответвление от GIMP 1.0.4, с тех пор самостоятельно развиваемое. Cinepaint специально приспособлен для раскраски и ретуширования видеокадров с использованием менеджера кадров и «слоёв луковицы». Глубина представления цвета увеличена до 32 разрядов с плавающей точкой на канал вместо 8, как у GIMP. Файлы, создаваемые Cinepaint, несовместимы с GIMP, главным образом, из-за разницы в поддерживаемой глубине цвета. По той же причине GIMP не поддерживает кисти и текстуры Cinepaint.
В течение некоторого времени Cinepaint полностью переписывался под именем Glasgow. В феврале 2007 года была выпущена альфа-версия продукта.
GIMPshop
GIMPshop является форком GIMP, созданным для пользователей Adobe Photoshop с целью упростить миграцию. GIMPshop является продуктом стороннего разработчика, не являющегося членом команды GIMP.
Изменения GIMPshop относительно GIMP:
- реорганизация меню и переименование пунктов меню до соответствия c меню Adobe Photoshop
- клавиатурные комбинации Photoshop, используемые по умолчанию
- в версии для Windows используется расширение, помещающее окна с изображениями внутрь одного окна (MDI-интерфейс).
В настоящее время домен не принадлежит оригинальному разработчику GIMPshop, использование актуальных сборок не рекомендуется разработчиками GIMP .
Seashore
Seashore — редактор растровой графики на основе GIMP для Mac OS X, переписанный на Cocoa и использующий тот же формат файлов. Разработчики Seashore принципиально удалили ряд инструментов, чтобы сделать программу максимально лёгкой и не пытающейся конкурировать с более «тяжёлыми» программными продуктами.
Adobe Photoshop
GIMP может использовать данные в различных форматах Adobe Photoshop (наиболее известного профессионального растрового редактора):
- файлы в формате PSD (с ограничениями);
- файлы кистей (почти все версии, но без поддержки динамики);
- действия (actions), за счёт gimp-sharp (порядка 50% действий);
- расширения в формате 8bf — проект PSPI