How to install & use virtualbox guest additions on ubuntu
Содержание:
- Set optimal framebuffer resolution
- Страница загрузки пакета virtualbox-guest-additions-iso_6.1.16-1_all.deb
- How to Install Virtualbox Guest Additions in Linux Mint
- Virtualbox Guest Additions Download and Install Process (Step by Step with Screenshots)
- Установка VirtualBox Guest Additions в Ubuntu
- Extras (missing Guest Additions)
- Что такое гостевые дополнения VirtualBox?
- Download VirtualBox
- How to Install VirtualBox Guest Additions on Windows Guest
- How to Install Guest Additions on Ubuntu VirtualBox
- Some Problems with Installing Guest Additions for VirtualBox
- Почему вы должны использовать гостевые дополнения VirtualBox?
- Why should you use VirtualBox Guest Additions?
- Установка VirtualBox Guest Additions в Ubuntu
- Install Guest Additions on Linux guest
- Windows XP для виртуальных машин
- Guest Additions Make VirtualBox Even Better
- Troubleshooting
- Подключение образа
- Whonix-Custom-Workstation ™[edit]
- Установка
- Почему вы должны использовать гостевые дополнения VirtualBox?
- Mouse Integration
Set optimal framebuffer resolution
This article or section is a candidate for merging with .
Typically after installing Guest Additions, a fullscreen Arch guest running X will be set to the optimal resolution for your display; however, the virtual console’s framebuffer will be set to a standard, often smaller, resolution detected from VirtualBox’s custom VESA driver.
To use the virtual consoles at optimal resolution, Arch needs to recognize that resolution as valid, which in turn requires VirtualBox to pass this information along to the guest OS.
First, check if your desired resolution is not already recognized by running the command ( need to be installed):
hwinfo --framebuffer
If the optimal resolution does not show up, then you will need to run the tool on the host machine and add «extra resolutions» to your virtual machine (on a Windows host, go to the VirtualBox installation directory to find ). For example:
$ VBoxManage setextradata "Arch Linux" "CustomVideoMode1" "1360x768x24"
The parameters «Arch Linux» and «1360x768x24» in the example above should be replaced with your VM name and the desired framebuffer resolution. Incidentally, this command allows for defining up to 16 extra resolutions («CustomVideoMode1» through «CustomVideoMode16»).
Afterwards, restart the virtual machine and run once more to verify that the new resolutions have been recognized by your guest system (which does not guarantee they will all work, depending on your hardware limitations).
Note: As of VirtualBox 5.2, might not show any output, but you should still be able to set a custom resolution following this procedure.
Finally, add a kernel parameter to set the framebuffer to the new resolution, for example:
video=1360x768
Additionally you may want to configure your bootloader to use the same resolution. If you use GRUB, see .
Note: Neither the kernel parameter nor the bootloader’s resolution settings (e.g. GRUB’s ) will fix the framebuffer, since they are overriden by virtue of Kernel Mode Setting. The framebuffer resolution must be set by the kernel parameter as described above.
Страница загрузки пакета virtualbox-guest-additions-iso_6.1.16-1_all.deb
Если вы работаете в Ubuntu, для загрузки и установки пакетов настоятельно советуем использовать менеджер пакетов, например aptitude или synaptic, а не делать это вручную через данный сайт.
Используйте любой из серверов-зеркал, добавив его в свой файл /etc/apt/sources.list, например так:
deb http://cz.archive.ubuntu.com/ubuntu groovy main multiverse
Заменив cz.archive.ubuntu.com/ubuntu нужным сервером.
Вы можете скачать требуемый файл из подкаталога pool/multiverse/v/virtualbox-guest-additions-iso/ с любого из этих сайтов:
Северная Америка
- mirrors.kernel.org/ubuntu
- ftp.osuosl.org/pub/ubuntu
- lug.mtu.edu/ubuntu
- ubuntu.mirrors.tds.net/ubuntu
- ubuntu.secs.oakland.edu
- mirror.mcs.anl.gov/pub/ubuntu
- mirrors.cat.pdx.edu/ubuntu
- ubuntu.cs.utah.edu/ubuntu
- ftp.ussg.iu.edu/linux/ubuntu
- mirrors.xmission.com/ubuntu
- mirrors.cs.wmich.edu/ubuntu
- gulus.USherbrooke.ca/pub/distro/ubuntu
Азия
- kr.archive.ubuntu.com/ubuntu
- th.archive.ubuntu.com/ubuntu
- mirror.lupaworld.com/ubuntu
- kambing.vlsm.org/ubuntu
- ubuntu.mithril-linux.org/archives
- mirror.in.th/ubuntu
- mirror.rootguide.org/ubuntu
Африка
za.archive.ubuntu.com/ubuntu
Европа
- cz.archive.ubuntu.com/ubuntu
- de.archive.ubuntu.com/ubuntu
- dk.archive.ubuntu.com/ubuntu
- es.archive.ubuntu.com/ubuntu
- fr.archive.ubuntu.com/ubuntu
- ge.archive.ubuntu.com/ubuntu
- gr.archive.ubuntu.com/ubuntu
- hr.archive.ubuntu.com/ubuntu
- mt.archive.ubuntu.com/ubuntu
- nl.archive.ubuntu.com/ubuntu
- no.archive.ubuntu.com/ubuntu
- se.archive.ubuntu.com/ubuntu
- yu.archive.ubuntu.com/ubuntu
- nz.archive.ubuntu.com/ubuntu
- nz2.archive.ubuntu.com/ubuntu
- ftp.iinet.net.au/pub/ubuntu
- mirror.optus.net/ubuntu
- ftp.filearena.net/pub/ubuntu
- mirror.pacific.net.au/linux/ubuntu
Если загрузка с этих сайтов происходит медленно, попробуйте другие из полного списка серверов-зеркал.
Заметим, что при работе с некоторыми браузерами вам придётся указать браузеру, что вы хотите сохранить информацию в файл. Например, в Firefox или Mozilla вам нужно удерживать клавишу Shift при щелчке по URL.
Подробней о virtualbox-guest-additions-iso_6.1.16-1_all.deb:
| Точный размер | 44741068 байт (42,7 MByte) |
|---|---|
| Контрольная сумма MD5 | e97320e834b57281d5952f2c45eb0cab |
| Контрольная сумма SHA1 | 12d02cbbb1040be962e9b6e4df69450839a7fdfe |
| Контрольная сумма SHA256 | efdd8e88e427f78a8643b558e58cc8cf5fb31aff166f87a7e2196989afb3b05f |
How to Install Virtualbox Guest Additions in Linux Mint
Log into Linux Mint (guest OS) and run the following command in a terminal window to update software packages.
sudo apt update
sudo apt upgrade
Please note that if a new Linux kernel is installed in the upgrade process, then you need to reboot Linux Mint virtual machine. After that, run the following command to install required packages for building kernel modules.
sudo apt install build-essential module-assistant
Next, prepare Linux Mint for building kernel module with the following command.
sudo m-a prepare
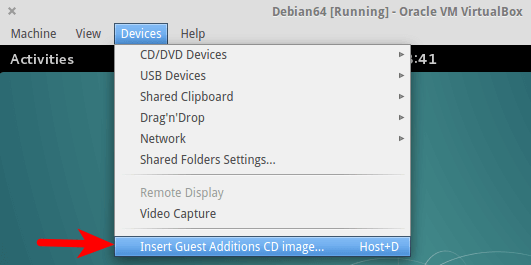
Then in the VirtualBox window menu bar, select Devices > Insert Guest Additions CD image.
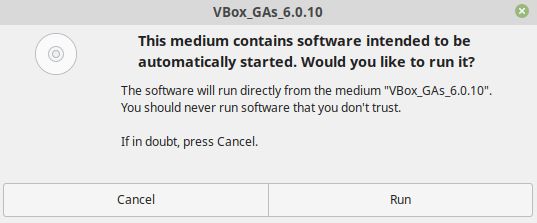
If your host OS already has the CD image, then you will be asked if you want to run the software. Select Run.
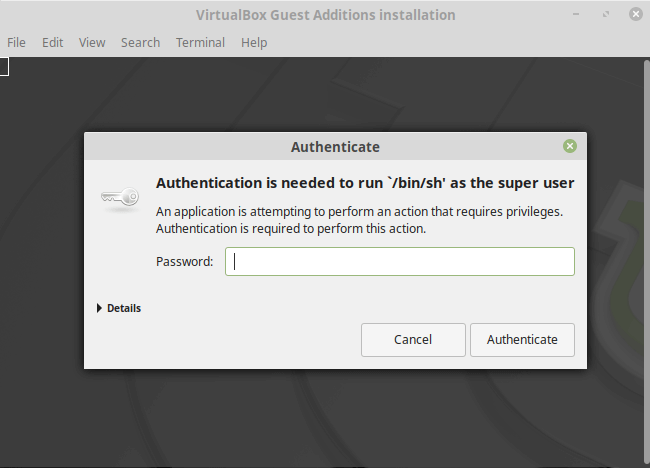
Then you will need to enter your password in order to install the guest additions.
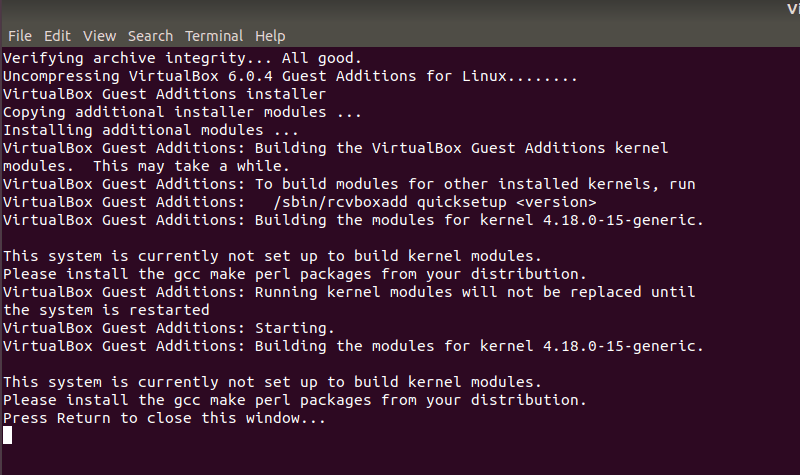
Output in terminal window.
Verifying archive integrity... All good.
Uncompressing VirtualBox 6.0.10 Guest Additions for Linux........
VirtualBox Guest Additions installer
Copying additional installer modules ...
Installing additional modules ...
VirtualBox Guest Additions: Starting.
VirtualBox Guest Additions: Building the VirtualBox Guest Additions kernel
modules. This may take a while.
VirtualBox Guest Additions: To build modules for other installed kernels, run
VirtualBox Guest Additions: /sbin/rcvboxadd quicksetup <version>
VirtualBox Guest Additions: or
VirtualBox Guest Additions: /sbin/rcvboxadd quicksetup all
VirtualBox Guest Additions: Building the modules for kernel 4.15.0-55-generic.
update-initramfs: Generating /boot/initrd.img-4.15.0-55-generic
VirtualBox Guest Additions: Running kernel modules will not be replaced until
the system is restarted
Press Return to close this window...
Once the guest additions is installed, press to close the terminal window and restart your Linux Mint virtual machine. Now the resizeable display should be working. The screen resolution of Linux Mint VM will adjust with the size of VirtualBox window. You can press right Ctrl and F keyboard shortcut to enter full-screen mode. You can now also configure shared folder and bidirectional shared clipboard.
Virtualbox Guest Additions Download and Install Process (Step by Step with Screenshots)
Ubuntu VirtualBox and VirtualBox for Windows are versatile virtualization products that can be boosted with Guest Additions The VirtualBox Guest Additions comprise device drivers and other system applications for optimizing the operating system for better performance and usability. When installed, the VirtualBox Additions tools allow the system guests to run faster and better, to use shared folders, to share mouse and clipboard with the host, and plenty more. Overall, it is an appreciated addition.
Guest Additions are pretty much similar to VMware tools for VMware workstation. This tutorial will clearly explain the procedure to install VirtualBox Guest Additions on Windows client. VirtualBox can be downloaded from here.
Установка VirtualBox Guest Additions в Ubuntu
Я продемонстрирую процесс установки на минимальной установке для виртуальной машины с Ubuntu. Сначала запустите вашу виртуальную машину:
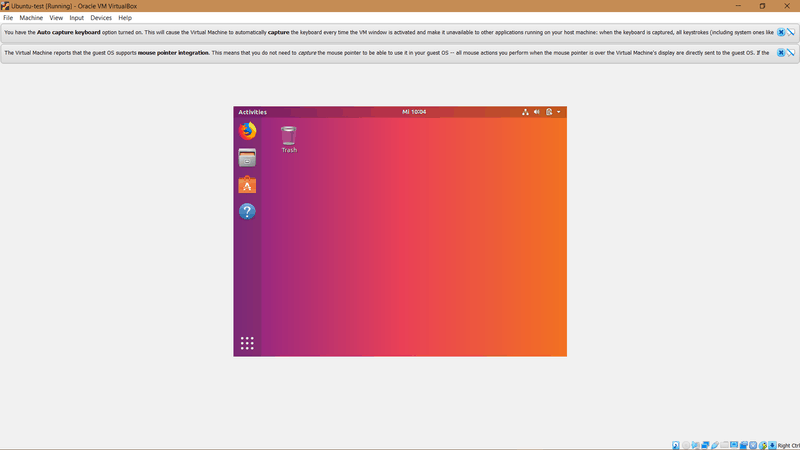 Виртуальная машина с Ubuntu Linux
Для начала выберите Devices > Insert Guest Additions CD image… :
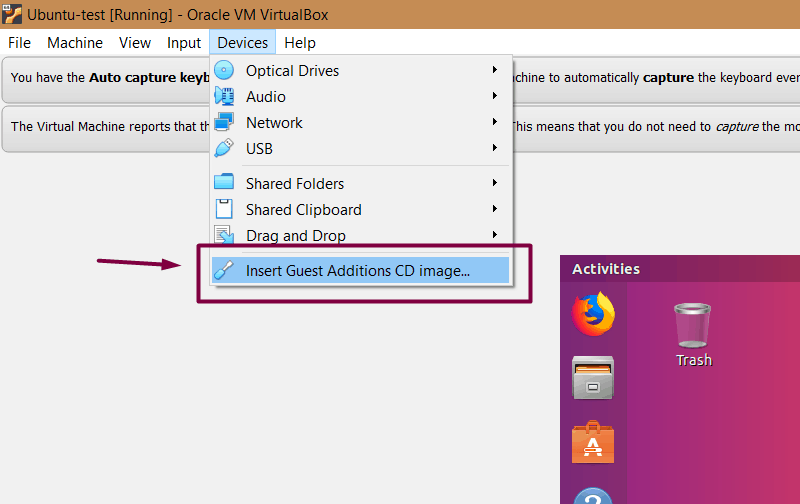 Вставка образа компакт-диска “Гостевого дополнения”
Это предоставит вам необходимый установщик в гостевой системе (то есть виртуальной операционной системы). Он попытается запустится автоматически, поэтому просто нажмите Run:
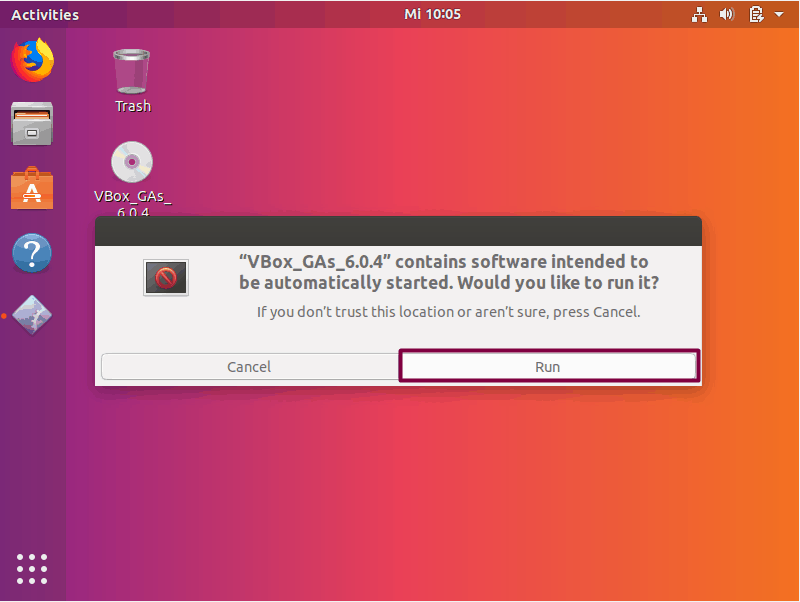 Автоматический запуск образа диска “Гостевого дополнения”
После этого должна открыться установка в окне терминала. Следуйте инструкциям на экране, и гостевые дополнения будут установлены максимум через несколько минут.
Советы по устранению неполадок
Если вы получаете ошибку, подобную этой, это означает, что вам не хватает некоторых модулей ядра (в некоторых случаях, например, при минимальной установке):
Вам придётся установить еще несколько пакетов. Для этого вам нужно запустить следующие команды в виртуальной системе Ubuntu:
И запустите повторную установку:
Extras (missing Guest Additions)
This extra section is necessary, because sometimes people have trouble finding the Guest Additions! In general,
whenever you click Install Guest Additions …, VirtualBox is supposed to mount
the Guest Additions ISO. But this may not happen. There are several ways to rectify the situation:
First, if the Guest Additions are not found, VirtualBox may prompt you to access Internet and download the ISO
file. You only have to do this once. Unfortunately, I do not have a screenshots to share on this one.
Alternatively, you can download the image yourself and then manually mount it as a CD-ROM, under the
Settings for the particular virtual machine.

Then, the next time you launch the virtual machine, the Guest Additions will be mounted as a CD-ROM. To install
the Additions, on Windows, double-click the executable; on Linux, run the scripts as demonstrated above.

From here, you’re on common grounds.
Что такое гостевые дополнения VirtualBox?
Гостевые дополнения – это дополнительные функции, которые делают VirtualBox еще более мощным. Некоторые примеры функций, добавленных гостевыми дополнениями VirtualBox, перечислены ниже:
- Лучшее разрешение экрана – позволяет работать в полноэкранном режиме
- Автоматическое изменение размера окна устройства
- Бесшовный режим – гостевая ОС сливается с хост-ОС
- Общий буфер обмена между хост-и гостевой ОС
- Улучшена производительность гостевой ОС
- Перетаскивание между гостевой и хост-ОС
Установка гостевых дополнений VirtualBox на гостевые ОС Ubuntu / Debian – это первое, что я делаю после создания виртуальной машины. Теперь давайте посмотрим, как установить гостевые дополнения в VirtualBox.
Download VirtualBox
Before we providing you an installer files of virtualbox guest additions, please download the master of virtualbox installation file on below if you don’t have it. On this page you will find the last version of virtualbox for windows/mac/linux, and the old version of virtualbox.
VirtualBox for Windows
On below you will find the installation file of VirtualBox for Windows 10 64 bit and 32 bit. This executable file is also compatible for windows 7 and windows 8 version.
| File Name | Version | Last Update | File Size |
| (Open the link to download) | |||
| VirtualBox-6.0.4-128413-Win.exe | 6.0 | 28-Jan-2019 | 23 MB |
| VirtualBox-5.2.26-128414-Win.exe | 5.2 | 28-Jan-2019 | 110 MB |
| VirtualBox-5.1.38-122592-Win.exe | 5.1 | 09-May-2018 | 119 MB |
| VirtualBox-5.0.40-115130-Win.exe | 5.0 | 28-Apr-2017 | 109 MB |
| VirtualBox-4.3.40-110317-Win.exe | 4.3 | 22-Aug-2016 | 99 MB |
| VirtualBox-4.2.38-110681-Win.exe | 4.2 | 14-Sep-2016 | 102 MB |
| VirtualBox-4.1.44-104071-Win.exe | 4.1 | 11-Nov-2015 | 98 MB |
| VirtualBox-4.0.36-104075-Win.exe | 4.0 | 11-Nov-2015 | 88 MB |
VirtualBox for MAC
| File Name | Version | Last Update | File Size |
| (Open the link to download) | |||
| VirtualBox-6.0.4-128413-OSX.dmg | 6.0 | 28-Jan-2019 | 158 MB |
| VirtualBox-5.2.26-128414-OSX.dmg | 5.2 | 28-Jan-2019 | 92 MB |
| VirtualBox-5.1.38-122592-OSX.dmg | 5.1 | 09-May-2018 | 91 MB |
| VirtualBox-5.0.40-115130-OSX.dmg | 5.0 | 28-Apr-2017 | 87 MB |
| VirtualBox-4.3.40-110317-OSX.dmg | 4.3 | 22-Aug-2016 | 104 MB |
| VirtualBox-4.2.38-110681-OSX.dmg | 4.2 | 14-Sep-2016 | 108 MB |
| VirtualBox-4.1.44-104071-OSX.dmg | 4.1 | 11-Nov-2015 | 99 MB |
| VirtualBox-4.0.36-104075-OSX.dmg | 4.0 | 11-Nov-2015 | 87 MB |
VirtualBox for Linux
Please choose the installation file that fit with your Linux OS
| File Name | Version | OS | File Size |
| (Open the link to download) | |||
| virtualbox-6.0_6.0.4-128413~Ubuntu~bionic_amd64.deb | 6.0 | Ubuntu | 124 MB |
| virtualbox-6.0_6.0.4-128413~Debian~jessie_amd64.deb | 6.0 | Debian | 130 MB |
| VirtualBox-6.0-6.0.4_128413_openSUSE132-1.x86_64.rpm | 6.0 | Open Suse | 130 MB |
| VirtualBox-6.0.4-128413-Linux_amd64.run | 6.0 | Linux | 148 MB |
| VirtualBox-6.0-6.0.4_128413_fedora26-1.x86_64.rpm | 6.0 | Fedora | 130 MB |
| VirtualBox-6.0.4-128413-SunOS.tar.gz | 6.0 | SunOS | 159 MB |
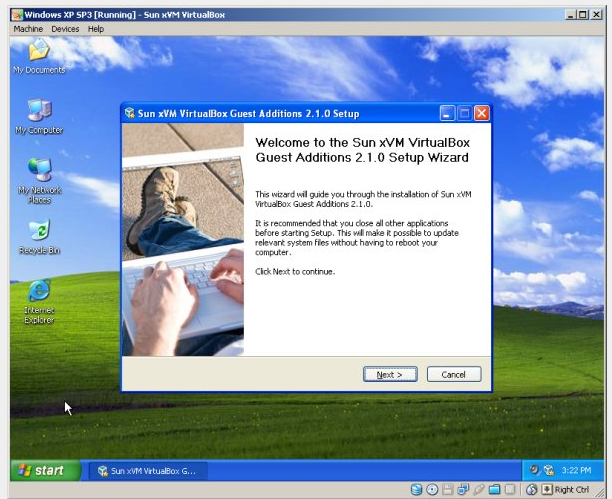
How to Install VirtualBox Guest Additions on Windows Guest
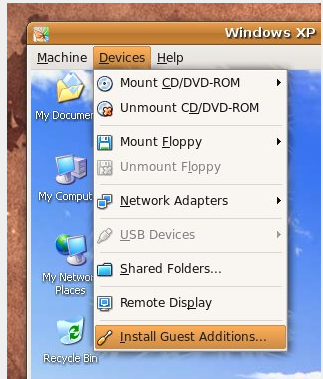
The procedure is straightforward. You need to boot into your guest. Then go to VirtualBox menu. Click the option of “Install Guest Additions” under Devices.
This action will pop up a wizard in your guest window. Follow it through. Now reboot and enjoy.
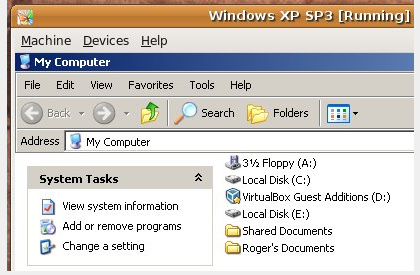
Once you have restarted, look for the VirtualBox icon in the system tray. It’s all smooth sailing.
How to Install Guest Additions on Ubuntu VirtualBox
The procedure for installing Guest Additions on Linux guest is again very simple. You need to repeat the first step for Ubuntu as well for mounting VirtualBox Guest Additions ISO in the form of CD ROM drive in the virtual machine.
You will see a file manager window popping up, depending on the configuration of your guest, showing all the available options. It will also show the options for including Guest Additions for 32-bit and 64-bit systems, creating similar versions for Windows and Ubuntu. It may even include Solaris considering the fact the VirtualBox is owned by Sun. The system will automatically mount CD ROMs and will run the browsers/managers.
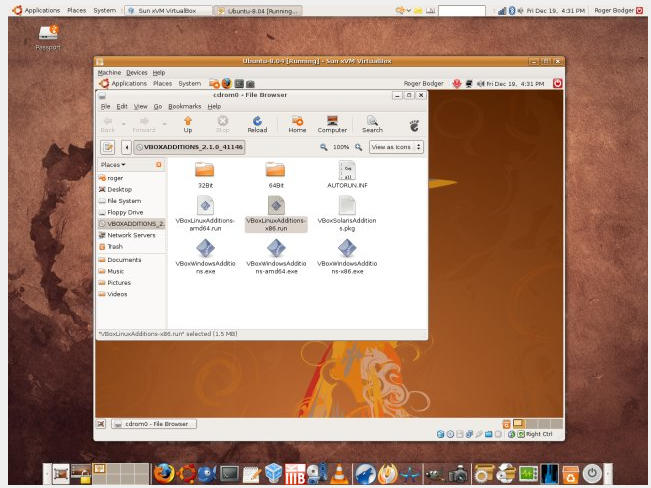
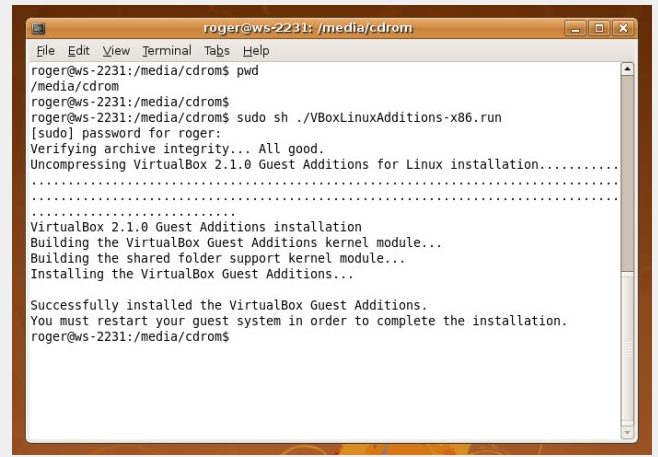
You need to choose the right package for your hardware architecture for example x86. Open a terminal window and run the script with root privileges.
“sudo sh ./<script-relevant-for-your-architecture>”

Now wait for some time till the completion of installation. Now reboot.
This completes the procedure.
Some Problems with Installing Guest Additions for VirtualBox
In general, whenever the users click the option of “Install Guest Additions”, Guest Additions ISO is supposed to be mounted by the VirtualBox. There are plenty of methods to rectify the situation.
First of all, if you don’t find the Guest Additions, VirtualBox may prompt you to access internet and then download the ISO file. This might be required to be done only once. You can also download the image by yourself and then mount manually as a CD ROM, under the Settings for the selected virtual machine.

The next time you run the virtual machine, the Guest Additions should be mounted as a virtual CD ROM. To install the Guest Additions on Windows, you need to double-click the executable. For Linux, you have to run the scripts as mentioned above.
 ,
,
It must be kept in mind that the installation of Guest Additions is even easier than VMware tools. The procedure is fast, simple and convenient. Only a little amount of playing with the commands is involved.
Почему вы должны использовать гостевые дополнения VirtualBox?
С включенными гостевыми дополнениями VirtualBox использование виртуальной машины становится намного удобнее. Не веришь мне? Вот важные функции, которые предлагает гостевые дополнения:
- Интеграция указателя мыши: вам больше не нужно нажимать какие-либо клавиши, чтобы «освободить» курсор от гостевой ОС.
- Общий буфер обмена: с установленными гостевыми дополнениями вы можете копировать и вставлять данные между гостевой и хост-операционной системами.
- Перетаскивание: вы также можете перетаскивать файлы между хостом и гостевой ОС.
- Общие папки: Моя любимая функция; эта функция позволяет обмениваться файлами между хостом и гостем. Вы можете указать VirtualBox обрабатывать определенный каталог хоста как общую папку, и программа сделает его доступным для гостевой операционной системы как сетевой ресурс, независимо от того, есть ли у гостевой системы сеть.
- Улучшенная поддержка видео: пользовательские драйверы видео, которые устанавливаются с гостевыми дополнениями, предоставляют вам сверхвысокие и нестандартные режимы видео, а также повышенную производительность видео. Это также позволяет изменить размер окна виртуальной машины. Разрешение видео в гостевой системе будет настроено автоматически, как если бы вы вручную вводили произвольное разрешение в настройках дисплея гостевой системы.
- Бесшовные окна: отдельные окна, которые отображаются на рабочем столе виртуальной машины, могут быть сопоставлены на рабочем столе хоста, как если бы основное приложение фактически выполнялось на хосте.
- Общие каналы связи хоста/гостя: гостевые дополнения позволяют вам контролировать и мониторить действия гостевой системы. «Свойства гостя» предоставляют общий механизм на основе строк для обмена битами данных между гостем и хостом, некоторые из которых имеют особые значения для управления и контроля гостевой системы. Приложения могут быть запущены на гостевой машине с хоста.
- Синхронизация времени: благодаря гостевые системы будут регулярно синхронизировать время с хост-машиной. Параметры механизма синхронизации времени могут быть настроены.
- Автоматические входы в систему: это может быть полезной функцией.
Под впечатлением от функций, которые предоставляет гостевое дополнение? Давайте посмотрим, как вы можете установить VirtualBox Guest Additions в Ubuntu Linux.
Why should you use VirtualBox Guest Additions?

With VirtualBox Guest Additions enabled, using the virtual machine becomes a lot more comfortable. Don’t believe me? Here are the important features that the Guest Additions offer:
- Mouse pointer integration: You no longer need to press any key to “free” the cursor from the Guest OS.
- Shared clipboard: With the Guest Additions installed, you can copy-paste between the guest and the host operating systems.
- Drag and drop: You can also drag and drop files between the host and the guest OS.
- Shared folders: My favorite feature; this feature allows you to exchange files between the host and the guest. You can tell VirtualBox to treat a certain host directory as a shared folder, and the program will make it available to the guest operating system as a network share, irrespective of whether guest actually has a network.
- Better video support: The custom video drivers that are installed with the Guest Additions provide you with extra high and non-standard video modes, as well as accelerated video performance. It also allows you to resize the virtual machine’s window. The video resolution in the guest will be automatically adjusted, as if you had manually entered an arbitrary resolution in the guest’s Display settings.
- Seamless windows: The individual windows that are displayed on the desktop of the virtual machine can be mapped on the host’s desktop, as if the underlying application was actually running on the host.
- Generic host/guest communication channels: The Guest Additions enable you to control and monitor guest execution. The “guest properties” provide a generic string-based mechanism to exchange data bits between a guest and a host, some of which have special meanings for controlling and monitoring the guest. Applications can be started in the Guest machine from the Host.
- Time synchronization: The Guest Additions will resynchronize the time with that of the Host machine regularly. The parameters of the time synchronization mechanism can be configured.
- Automated logins: Basically credentials passing, it can be a useful feature.
Impressed by the features it provides? Let’s see how you can install VirtualBox Guest Additions on Ubuntu Linux.
Установка VirtualBox Guest Additions в Ubuntu
Я продемонстрирую процесс установки на минимальной установке для виртуальной машины с Ubuntu. Сначала запустите вашу виртуальную машину:
Для начала выберите Devices > Insert Guest Additions CD image… :
Это предоставит вам необходимый установщик в гостевой системе (то есть виртуальной операционной системы). Он попытается запустится автоматически, поэтому просто нажмите Run:
После этого должна открыться установка в окне терминала. Следуйте инструкциям на экране, и гостевые дополнения будут установлены максимум через несколько минут.
Советы по устранению неполадок
Если вы получаете ошибку, подобную этой, это означает, что вам не хватает некоторых модулей ядра (в некоторых случаях, например, при минимальной установке):
Вам придётся установить еще несколько пакетов. Для этого вам нужно запустить следующие команды в виртуальной системе Ubuntu:
И запустите повторную установку:
Install Guest Additions on Linux guest
Again, a fairly simple procedure. Repeat the first step. This will mount the VirtualBox Guest Additions ISO
(included with the program) as a CD-ROM drive inside the virtual machine.
A file manager windows might popup, depending on your guest configuration, showing all the available options,
including Guest Additions for both 32-bit and 64-bit systems, Windows and Linux alike — and even Solaris, not
surprising, considering VirtualBox owned by Sun. On most modern Linux distros, the system will auto-mount
CD-ROMs and launch file browsers / managers.

Choose the right package for your hardware architecture. In our case, this is x86. Open a terminal window and
run the script with root privileges:
sudo sh ./<script-relevant-for-your-architecture>
See image:

Wait a few moments until the installation is complete. Reboot.

And that’s it!
Windows XP для виртуальных машин
Виртуализация — довольно обсуждаемая тема в мире операционных систем. За возможность запустить одну операционную систему внутри другой специалисты по информационным технологиям, ответственные за масштабные фермы серверов, а так же домашние пользователи просто ликуют. Однако, нет ничего более противоречивого, чем преимущества виртуальной операционки на вашем настольном ПК. Конечно, экспериментаторам и вирусмэйкерам нравится возможность запускать Windows XP под Vista, Windows 7, MacOS, под операционными системами на базе Linux для тестирования своих “шедевров” и запуска необходимых программ. Так же эта возможность пригодиться тем, кто хочет навсегда покончить с ОС от «мелкомягких», но не решается это сделать из-за невозможности запуска некоторых программ под эмулятором Wine.
Для того, чтобы понять, нужна ли вам виртуальная система Windows XP, ответьте на следующие вопросы:
- У Вас есть желание пробовать переустанавливать операционку, под которой работаете?
- Желаете проверить действие программы, скачанной из сети, на каком то другом «не моем» компьютере, чтобы посмотреть как она устанавливается, на наличие вирусов, удовлетворит ли программа, чтобы затем решать, стоит ставить ее на реальный компьютер или нет?
- Хотите, чтобы Ваши эксперименты никаким образом не влияли на работу реального компьютера, за которым, возможно, работаете не только Вы??
Если на вопросы ответ положительный, то прочитав эту статью, Вы получите виртуальную Windows XP на борту Вашего ПК.
Рассмотрим виртуализацию на примере VirtualBox, так как эту программу можно установить практически на любую ОС, однако, безглючная работа, включающая все его возможности (как то, подключение по протоколу RDP к консоли виртуальной системы) доступны только на Линуксе, поэтому была выбрана Ubuntu Linux. Для самого VirtualBox специальной настройки установленной оси не требуется, вполне хватит выделить отдельный диск или раздел для хранения образов виртуальных систем и папки с образами инсталляционных дисков для установки.
Ключевые возможности программы:
- Кроссплатформенность (возможность запуска на любом компьютере)
- Модульность (дополнительные модули, увеличивающие функционал)
- Поддержка USB 2.0, когда девайсы основной машины становятся открытыми для гостевой операционной системы
- Поддержка 64-битных гостевы хсистем
- Поддержка уже созданных образов хард – диск VMDK (VMware) и VHD (Microsoft Virtual PC), включая snapshots
- Встроенный сервер RDP, с возможной поддержкой клиентских USB-устройств поверх протокола RDP
- Экспериментальная поддержка аппаратного 3D-ускорителя (Open GL, Direct X)
- Поддержка виртуализации и аудио-устройств (эмуляция кодеков AC 97 или Sound Blaster16 либо Intel HD Audio по выбору)
- Поддержка различных типов конфигурации сетевой инфраструктуры (NAT, Host Networking via Bridged, Internal)
- Возможность создания цепочек сохраненных состояний виртуальной машины (snapshots), к которым может быть применен откат из последнего сохраненного состояния гостевой операционной системы
- Поддержка Shared Folders для быстрого обмена информацией между хостовой и гостевой системой
- Возможная интеграция рабочего стола (seamless mode) хостовой и гостевой операционной системой
- Поддержка русскоязычного интерфейса
Пакет с дополнениями включает в себя следующие модули:
- VirtualBox Guest Additions — комплект софта, устанавливаемый в гостевую операционку и повышающий спектр ее применения по взаимосвязи с системой виртуализации и хост-системой (например, после инсталляции специальных драйверов «виртуальной видеокарточки» появляется возможность изменить разрешение рабочего стола гостевой оси произвольным образом следуя за размером окна VirtualBox, в котором запущена эта виртуальная машина)
- Базовая версия является целиком открытой по лицензии GNU GPL, соответственно нет ограничений в использовании
- RDP сервер (дает возможность подключиться к виртуальной системе удаленно при помощи любого из совместимых клиентов)
Поддержка порта USB позволяет передать виртуальной машине доступ к USB устройствам
Intel PXEboot — загрузка операционки по сетке (возможно при использовании при создании тонкого клиента / бездисковой рабочей станции)
Guest Additions Make VirtualBox Even Better
As we’ve seen, the Guest Additions make running virtual machines with VirtualBox much smoother. You should always take a few moments to install the Guest Additions when setting up a new VM, as there’s no drawback to doing so.
If VirtualBox isn’t working for you, check out how VirtualBox compares to other virtualization tools.
5 Free Ways to Block YouTube on Your Kid’s iPhone or iPad
Are your kids spending too long watching YouTube? Here are all the best ways to block YouTube on their iPhone or iPad.
Read Next
About The Author
Ben Stegner
(1749 Articles Published)
Ben is a Deputy Editor and the Onboarding Manager at MakeUseOf. He left his IT job to write full-time in 2016 and has never looked back. He’s been covering tech tutorials, video game recommendations, and more as a professional writer for over seven years.
More
From Ben Stegner
Troubleshooting
Fullscreen mode shows blank screen
If the guest’s screen goes black above a certain size (e.g. above 2048 pixels wide), increasing the Settings > Display > Screen > Video Memory can help.
Linux guests have slow/distorted audio
The AC97 audio driver within the Linux kernel occasionally guesses the wrong clock settings when running inside VirtualBox, leading to audio that is either too slow or too fast. To fix this, create a file in with the following line:
options snd-intel8x0 ac97_clock=48000
Linux guests have slow/laggy audio
In some cases, audio can have laggy performance (for example lag behind video when streaming video online). A possible workaround can be to use the Intel HD Audio controller in VirtualBox and disable its power saving by adding the following line in a file in in the guest OS:
options snd_hda_intel power_save=0 power_save_controller=N
Arch: pacstrap script fails
If you used pacstrap in this article to also before performing a first boot into the new guest, you will need to as root before using pacstrap again; a failure to do this will render it unusable.
Подключение образа
Есть два способа подключить образ.
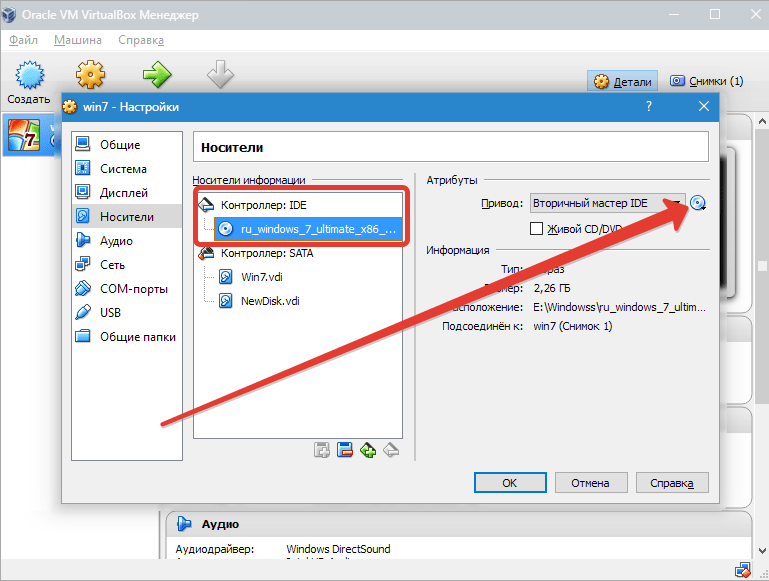
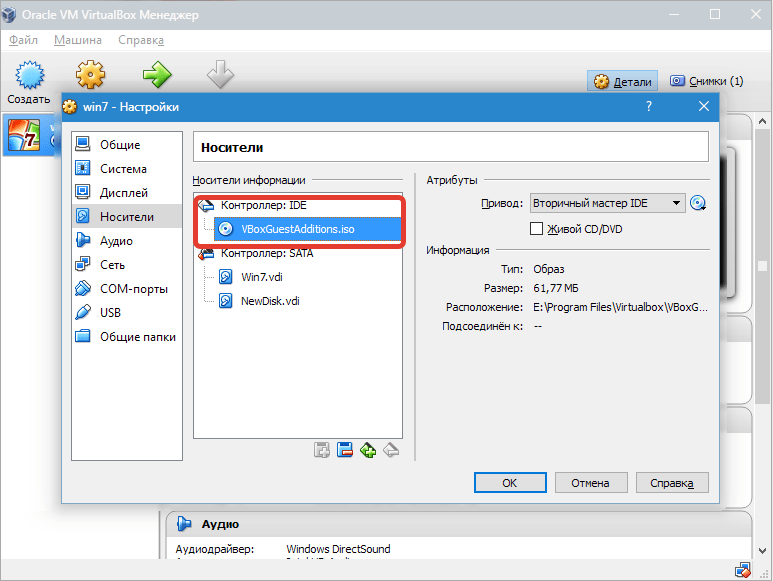
Первый – через настройки виртуальной машины в менеджере. Машина при этом должна быть остановлена. 1. Выбираем нужную машину в списке и нажимаем «Настроить».

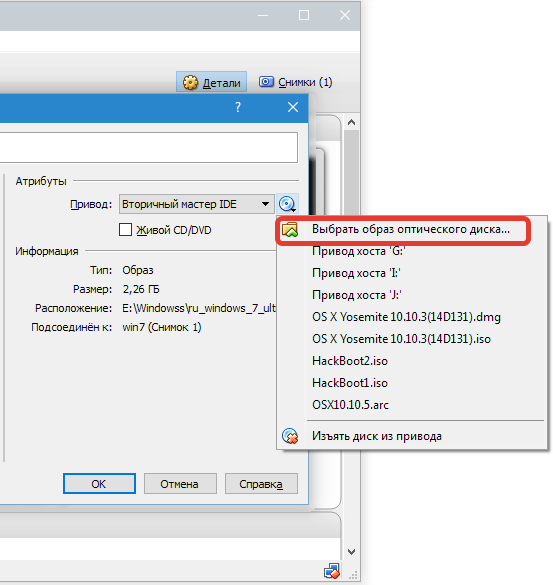
2. Переходим на вкладку «Носители», выделяем виртуальный CD привод и нажимаем на значок выбора образа. Затем выбираем пункт «Выбрать образ оптического диска».
3. В открывшемся окне находим образ дополнений. Он находится в корне папки с установленной VirtualBox.
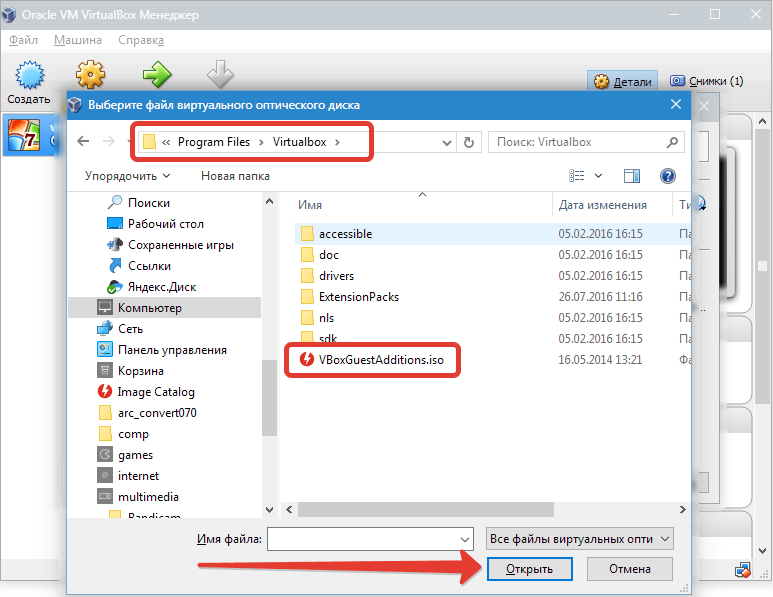
4. Образ смонтирован, теперь запускаем виртуальную машину.
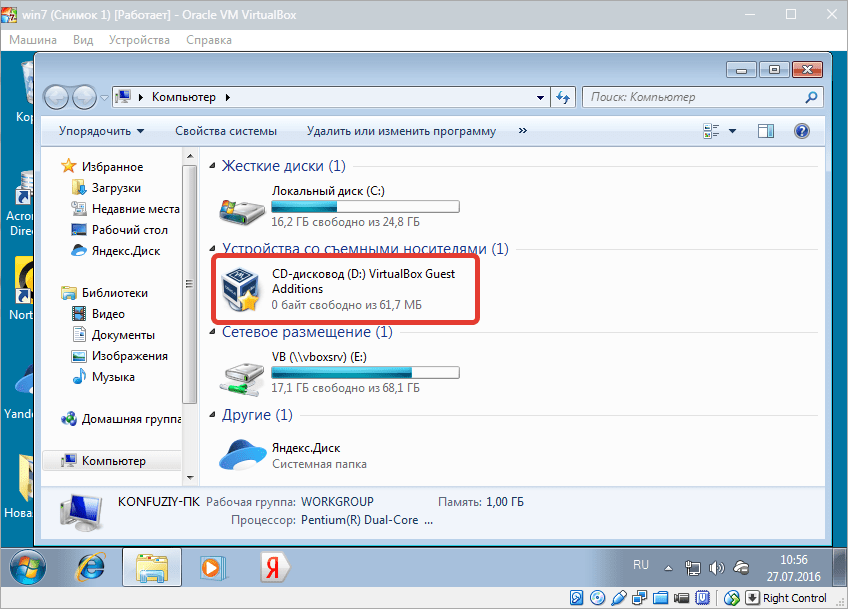
5. Открываем папку «Компьютер» (в виртуалке) и видим смонтированный образ.
Такое решение является универсальным для подключения образов дисков к виртуальным машинам. Оно может пригодиться в случае, если Вы подключаете образ, не входящий в состав дистрибутива.
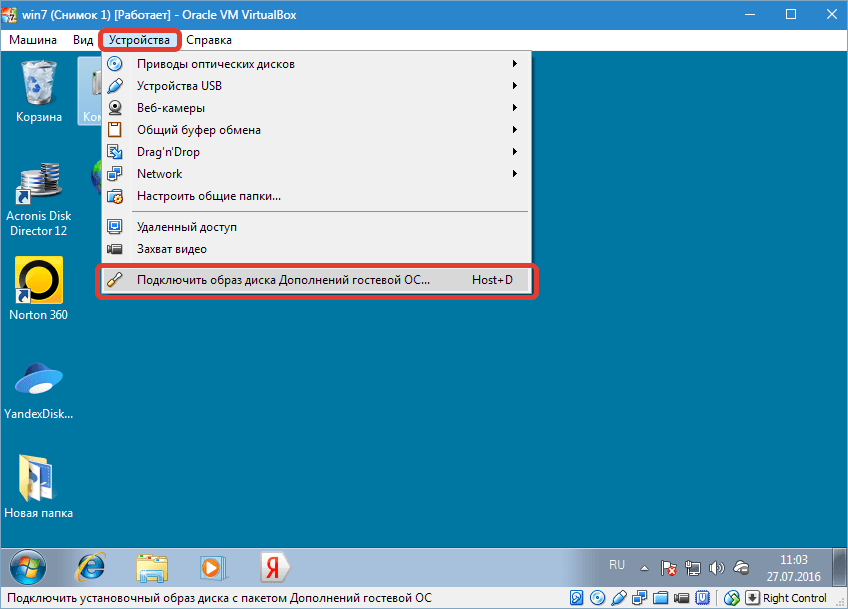
Второй, гораздо более простой способ – подключить Guest Additions прямо из меню запущенной машины.
1. Переходим в меню «Устройства» и выбираем пункт «Подключить образ диска Дополнений гостевой ОС».
Как и в предыдущем варианте, образ появится в папке «Компьютер» на виртуалке.
Whonix-Custom-Workstation ™[edit]
If you are using a Whonix-Custom-Workstation additional steps are required. Please click on expand on the right.
Two options exist: automatic mounting or manual mounting. The automatic mounting method is described below. For additional information on shared folders refer to the . Any additional questions are unspecific to Whonix and should be addressed as per the Free Support Principle.
- Install VirtualBox guest additions inside the VM.
-
Add the user that will utilize shared folders from inside the VM to group :
sudo addgroup user vboxsf
sudo addgroup user vboxsf
- A reboot is required to make group changes take effect.
- Follow the instructions above.
Установка
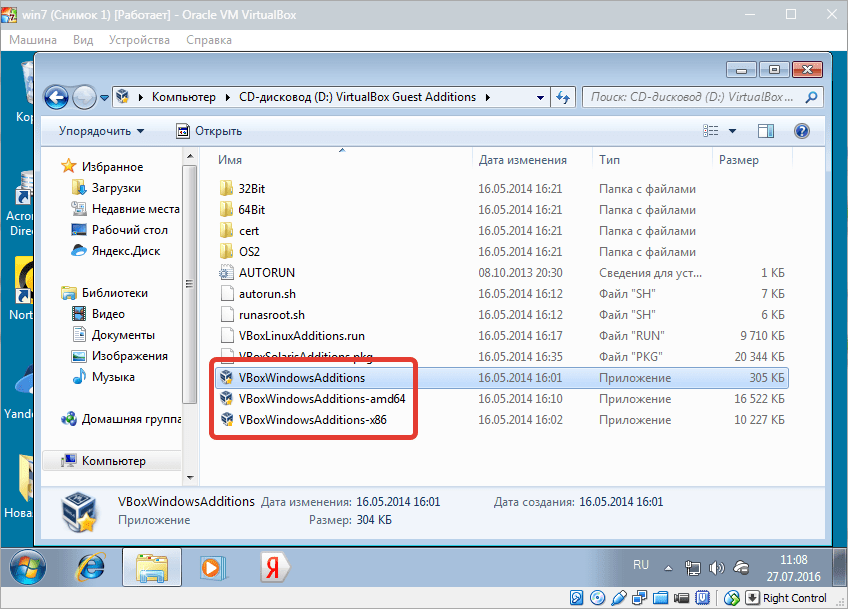
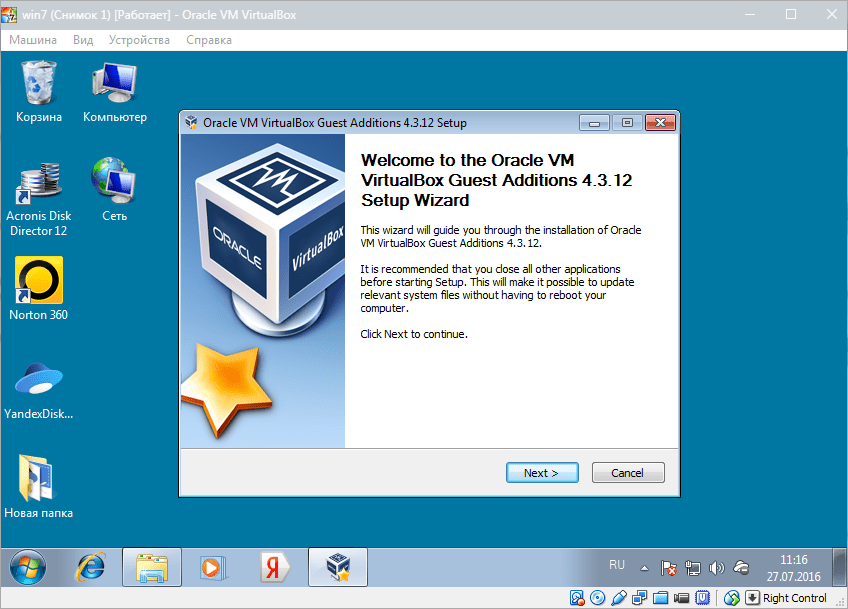
1. Открываем смонтированный диск с дополнениями и запускаем файл VBoxWindowsAdditions. Здесь также возможны варианты: можно запустить универсальный установщик, либо выбрать версию, учитывая разрядность гостевой операционной системы.
2. В открывшемся окне установщика нажимаем «Далее».
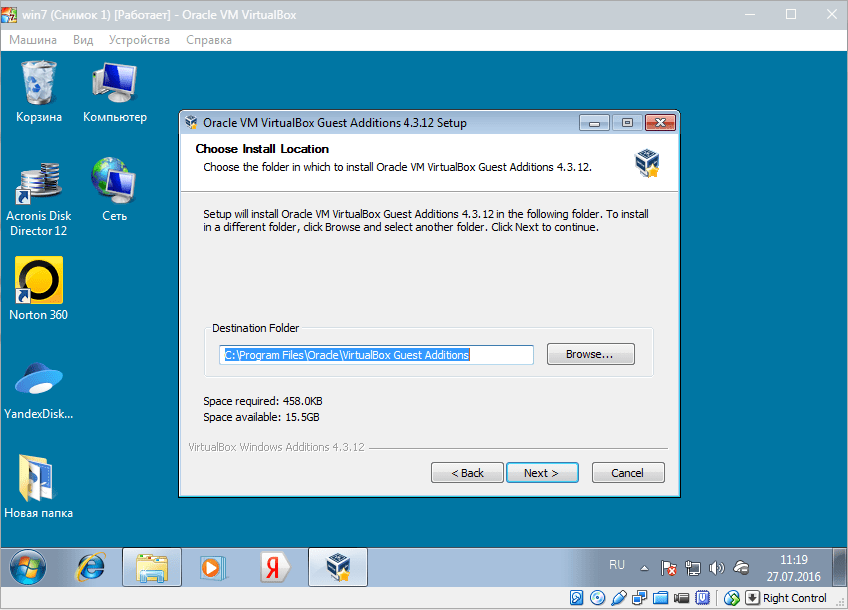
3. Выбираем место для установки. В данном случае ничего не меняем.
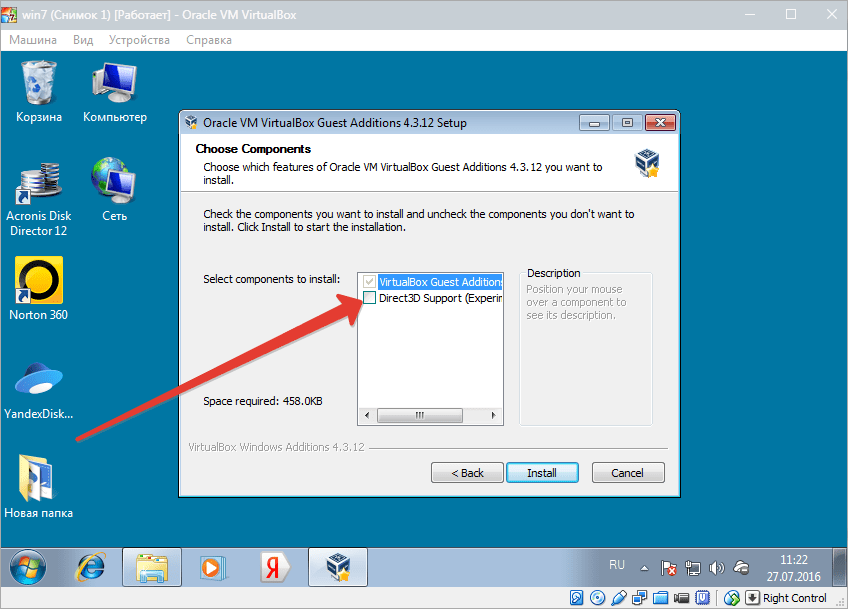
4. Здесь видим пустой чекбокс рядом с «Direct 3D Support». Данный драйвер можно установить только в безопасном режиме, поэтому галку не ставим и нажимаем «Install».
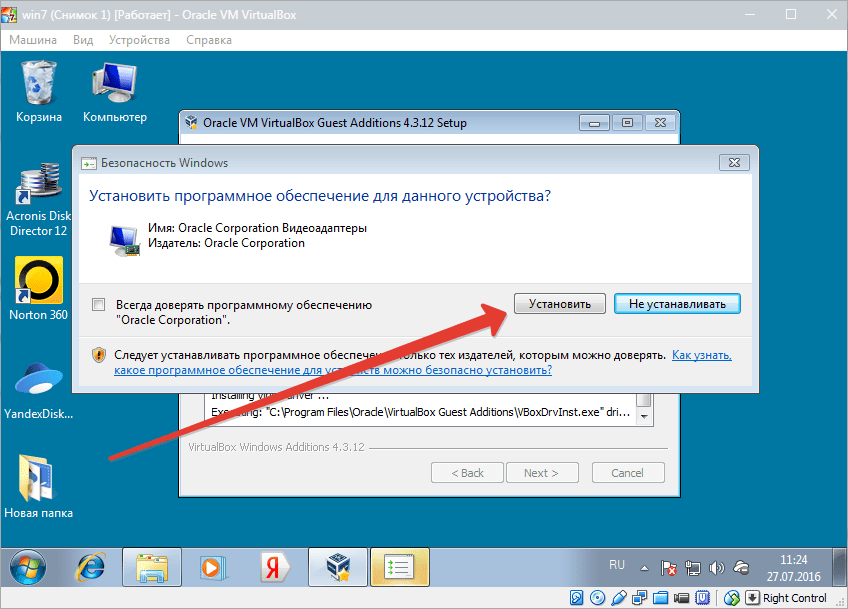
5. В процессе установки несколько раз появится окно с предложением подтвердить установку драйверов. Везде соглашаемся.
6. По завершению установки VirtualBox предложит перезагрузить машину. Это необходимо сделать.
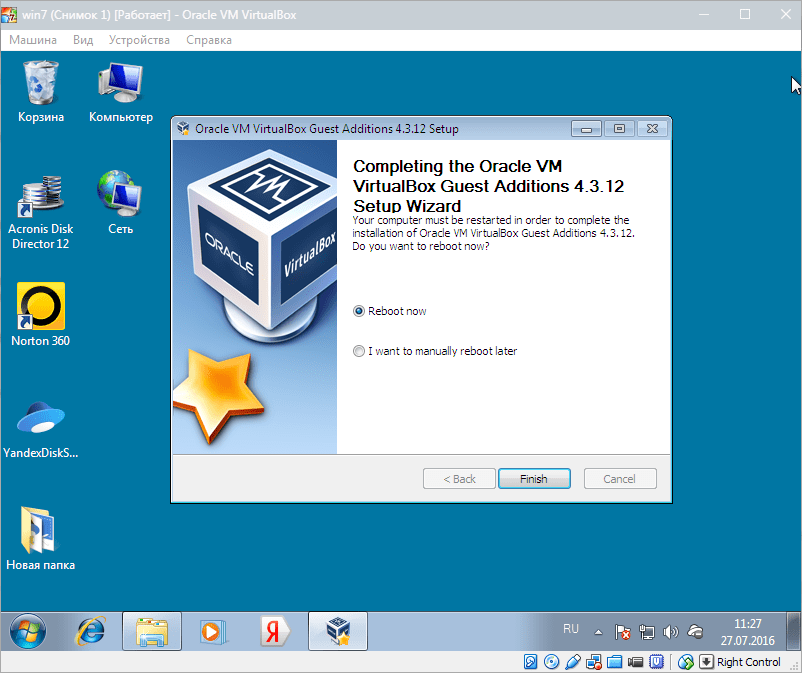
На этом процесс установки VirtualBox Guest Additions завершен. Теперь можно менять разрешение экрана, создавать общие папки и выходить в интернет с виртуальной машины.
Почему вы должны использовать гостевые дополнения VirtualBox?
С включенными гостевыми дополнениями VirtualBox использование виртуальной машины становится намного удобнее. Не веришь мне? Вот важные функции, которые предлагает гостевые дополнения:
- Интеграция указателя мыши: вам больше не нужно нажимать какие-либо клавиши, чтобы «освободить» курсор от гостевой ОС.
- Общий буфер обмена: с установленными гостевыми дополнениями вы можете копировать и вставлять данные между гостевой и хост-операционной системами.
- Перетаскивание: вы также можете перетаскивать файлы между хостом и гостевой ОС.
- Общие папки: Моя любимая функция; эта функция позволяет обмениваться файлами между хостом и гостем. Вы можете указать VirtualBox обрабатывать определенный каталог хоста как общую папку, и программа сделает его доступным для гостевой операционной системы как сетевой ресурс, независимо от того, есть ли у гостевой системы сеть.
- Улучшенная поддержка видео: пользовательские драйверы видео, которые устанавливаются с гостевыми дополнениями, предоставляют вам сверхвысокие и нестандартные режимы видео, а также повышенную производительность видео. Это также позволяет изменить размер окна виртуальной машины. Разрешение видео в гостевой системе будет настроено автоматически, как если бы вы вручную вводили произвольное разрешение в настройках дисплея гостевой системы.
- Бесшовные окна: отдельные окна, которые отображаются на рабочем столе виртуальной машины, могут быть сопоставлены на рабочем столе хоста, как если бы основное приложение фактически выполнялось на хосте.
- Общие каналы связи хоста/гостя: гостевые дополнения позволяют вам контролировать и мониторить действия гостевой системы. «Свойства гостя» предоставляют общий механизм на основе строк для обмена битами данных между гостем и хостом, некоторые из которых имеют особые значения для управления и контроля гостевой системы. Приложения могут быть запущены на гостевой машине с хоста.
- Синхронизация времени: благодаря гостевые системы будут регулярно синхронизировать время с хост-машиной. Параметры механизма синхронизации времени могут быть настроены.
- Автоматические входы в систему: это может быть полезной функцией.
Под впечатлением от функций, которые предоставляет гостевое дополнение? Давайте посмотрим, как вы можете установить VirtualBox Guest Additions в Ubuntu Linux.
Mouse Integration
Mouse Integration provides mouse position information using an absolute coordinate system. It does not provide information on mouse buttons, though, and that continues to go through the standard PS/2 (or USB) mouse devices. If your OS supports USB devices, mouse integration can implemented through a USB tablet devices instead of the mechanism described in this article.
Mouse Integration operates entirely over the guest device. Once enabled, mouse movements are sent to the guest through mouse packet requests and a corresponding interrupt. It is important to note that the format of the coordinates in these packets is based on a range from 0 to 0xFFFF which needs to be scaled to the display resolution. Why this approach was taken over using actual pixel coordinates (scaled or otherwise) is unknown.
#define VBOX_REQUEST_GET_MOUSE 1
#define VBOX_REQUEST_SET_MOUSE 2

/* The Mouse packet is used both to advertise our guest capabilities and to receive mouse movements. */
struct vbox_mouse_absolute {
        struct vbox_header header;
        uint32_t features;
        int32_t x;
        int32_t y;
};

static uint32_t vbox_mouse_phys;
static vbox_mouse_absolute * vbox_mouse;

static int vbox_irq_handler(struct regs * r) {
    ...

    outportl(vbox_port, vbox_mouse_phys);

    ...

    /* The mouse coordinates are scaled to the range (0x0,0xFFFF) independently in each dimension, so let's convert to pixels.
       If you prefer to have a more accurate mouse (subpixel support, etc.) you can convert to something else. */
    unsigned int x = ((unsigned int)vbox_mouse->x * display_resolution_width)  0xFFFF;
    unsigned int y = ((unsigned int)vbox_mouse->y * display_resolution_height)  0xFFFF;
    do_something_useful_with_mouse_coordinates(x,y);

    ...
}

static void vbox_guest_init(void) {
    ...

    vbox_mouse = allocate_physical_page(&vbox_mouse_phys);
    vbox_mouse->header.size = sizeof(struct vbox_mouse_absolute);
    vbox_mouse->header.version = VBOX_REQUEST_HEADER_VERSION;
    vbox_mouse->header.requestType = VBOX_REQUEST_SET_MOUSE;
    vbox_mouse->header.rc = ;
    vbox_mouse->header.reserved1 = ;
    vbox_mouse->header.reserved2 = ;
    vbox_mouse->features = (1 << ) | (1 << 4); /* bit 0 says "guest supports (and wants) absolute mouse"; bit 4 says we'll query absolute positions on interrupts */
    vbox_mouse->x = ;
    vbox_mouse->y = ;
    outportl(vbox_port, vbox_mouse_phys);

    vbox_mouse->header.requestType = VBOX_REQUEST_GET_MOUSE; /* Change the packet to a Get packet for use in the interrupt handler. */

    ...
}