Чистая установка windows 10 с помощью загрузочного носителя
Содержание:
- How to download the Windows 10 Media Creation Tool
- Способы обновления Windows 10
- Use the Windows 10 Media Creation Tool to create a bootable USB memory stick with the Windows 10 setup
- Обновление или восстановление Windows 10 с помощью Media Creation Tool.
- Как исправить ошибки с минимальными аппаратными требованиями
- Способы обновления Windows 10
- What you should know before you go ahead
- Новая материнская плата? Потеря Windows
- What You Will Require?
- How to use the Media Creation Tool to download an ISO file with the latest Windows 10 setup
- Download Windows 11 Media Creation Tool
- Create an Installation Media or Download ISO file
- Как установить Windows 10 на компьютер и на ноутбук.
How to download the Windows 10 Media Creation Tool
If you’re wondering what the Windows 10 Media Creation Tool is, here’s the answer: a small executable file made by Microsoft, that allows you to download Windows 10 and create your installation media both on USB devices or in an ISO file. Furthermore, the Windows 10 Media Creation Tool also lets you directly upgrade your current computer or device to the latest version of the operating system.
The next question you might ask is: «How do I get Windows 10 Media Creation Tool?» To download the Media Creation Tool, open your favorite web browser and go to this webpage: Download Windows 10. Scroll until you reach the «Download tool now» button found in the «Create Windows 10 installation media» section.

Download the Windows 10 Media Creation Tool
Microsoft asks you to download an executable file called MediaCreationTool21H1.exe, with a size of 18.5 MB. The file name ends with the version number of the latest Windows 10 update. In our case, 21H1 is the version number for Windows 10 with May 2021 Update. Save the executable file for the Windows 10 Media Creation Tool somewhere on your PC and then run it with a double-click or double-tap.

Double-click on MediaCreationTool21H1.exe
When you see the UAC prompt on your screen, choose Yes to allow the MediaCreationTool21H1.exe to run.

UAC asks your approval to run the Media Creation Tool
Depending on what you want to do, read the next section of this tutorial or the one after it.
TIP: The future versions of the MediaCreationTool21H1.exe file and of Windows 10 will have a different version number at the end. To learn more about Windows 10 versions, read: How to check the Windows 10 version, OS build, edition, or type.
Способы обновления Windows 10
Обновление системы выполняется с помощью нескольких способов:
- Автоматически через Центр обновлений Windows.
- С помощью специальной программы — Помощника по обновлению Windows 10.
- При помощи средства Media Creation Tool.
- Можно выполнить переустановку Виндовс 10 поверх ранее установленной системы.
Несколько разнообразных способов для получения и установки самой последней версии Windows 10 будут полезны в некоторых случаях.
После выхода финального релиза, обновления постепенно начинают отправляться на компьютеры пользователей по всему миру. Естественно, что новая версия операционной системы не сразу дойдет до многих пользователей, а через некоторый период времени. В этом случае, нетерпеливые пользователи могут использовать другой канал для получения обновленной сборки системы.
Бывают случаи, когда обновление заканчивается неудачно, по каким-то внутренним причинам. После этого, Windows 10 автоматически производит откат системы до предыдущей версии ОС.
А как быть, если установить вышедшую версию Windows 10 все равно желательно? Выходом из этого положения, станет использование другого способа для получения и установки обновления системы.
В данной статье, мы рассмотрим использование программы Media Creation Tool для выполнения обновления Windows 10 до последней из вышедших версий.
Утилита Media Creation Tool разработана корпорацией . Приложение не требуется устанавливать на компьютер, оно работает на русском языке. Для запуска средства, достаточно кликнуть два раза левой кнопкой мыши по исполняемому файлу.
Сначала необходимо скачать приложение Media Creation Tool с официального сайта загрузок Microsoft. На сайте: https://www.microsoft.com/ru-ru/software-download/windows10 под вопросом «Хотите установить Windows 10 на своем компьютере?», нажмите на кнопку «Скачать средство сейчас».
Use the Windows 10 Media Creation Tool to create a bootable USB memory stick with the Windows 10 setup
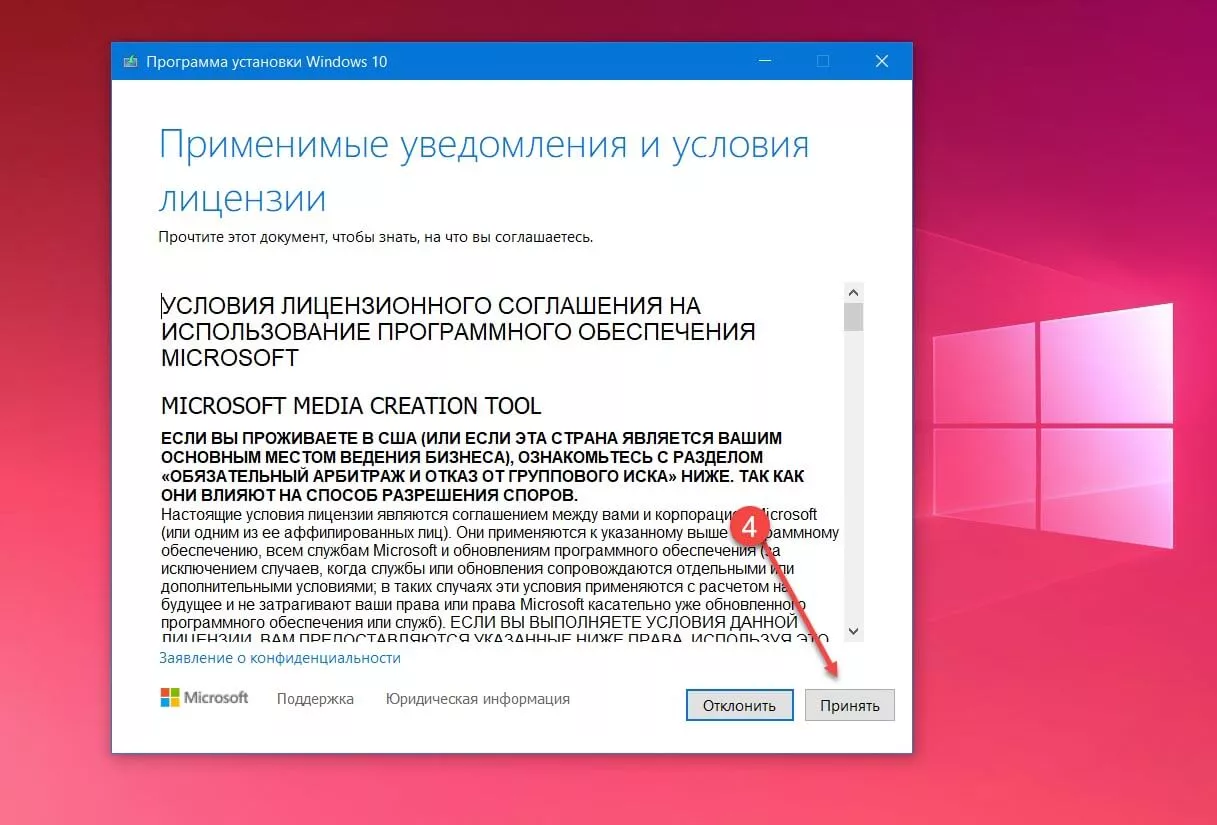
You can use the Media Creation Tool as a Windows 10 USB tool. In other words, it can download the Windows 10 setup files and automatically create a bootable Windows 10 USB memory stick, which you can then use to install the operating system on any computer. When the Windows 10 Media Creation Tool loads its user interface, it asks you to accept its license terms. Read the terms, and click or tap Accept to continue.

Accept the license terms for the Windows 10 Media Creation Tool
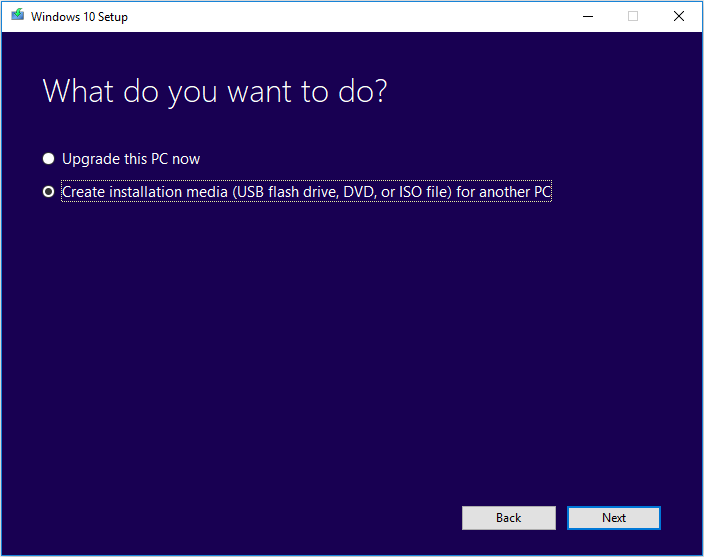
Media Creation Tool needs a few seconds to «get a few things ready.» Then, it asks whether you want to upgrade your PC or create installation media that you can use to install Windows 10. Check the second option: «Create installation media (USB flash drive, DVD, or ISO file) for another PC,» and press Next.

Choose to create installation media (USB flash drive, DVD, or ISO file)
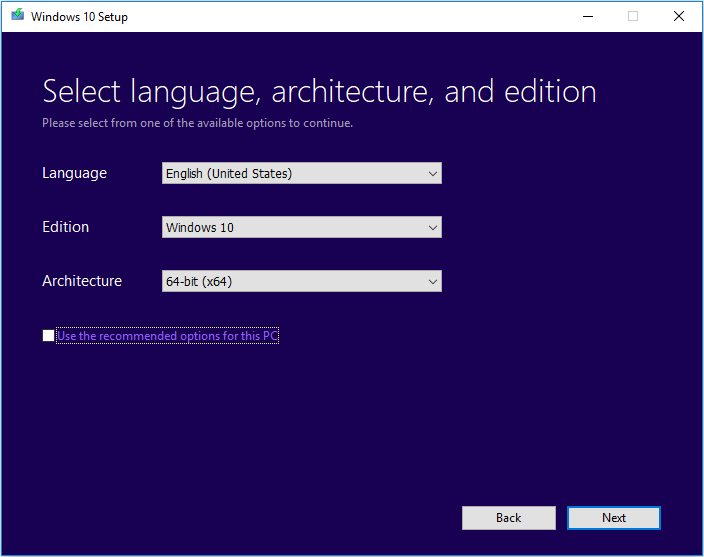
Next, you can choose the Language, Edition, and Architecture (32-bit, 64-bit, or both) that you want to use for the Windows 10 setup media. By default, the Media Creation Tool uses the recommended options for your PC. It is best to leave these options as they are and just press Next. However, if you uncheck the box for «Use the recommended options for this PC,» you can set things in detail before moving on to the next step.

Select the language, architecture, and edition
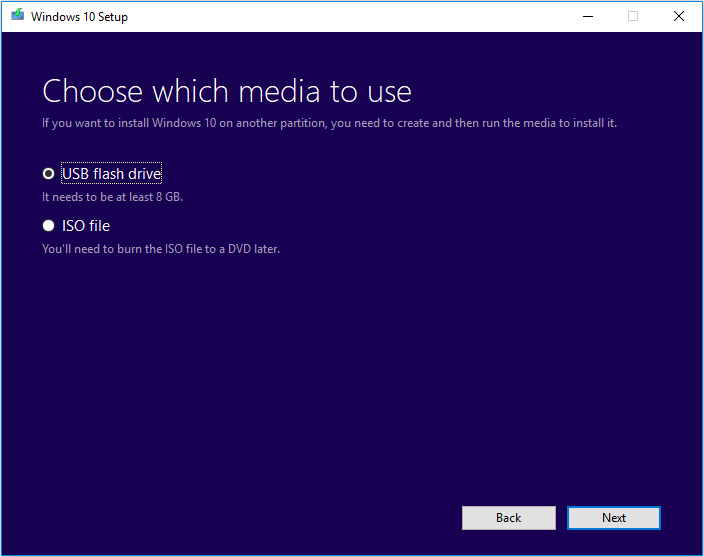
You are prompted about the media storage you want to use. Plugin the USB memory stick on which you want to store the Windows 10 setup files, select «USB flash drive» and press Next.

Choose to create a bootable USB flash drive with the Windows 10 setup
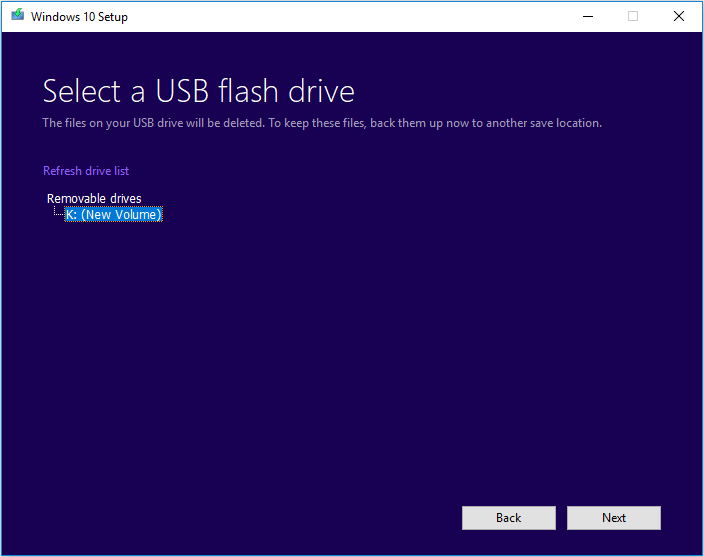
You see all the flash drives and external hard disks currently connected to your Windows computer or device. Select the one you want to use for creating Windows 10 installation media, and then press Next. Do not forget that all the data on the drive is going to get wiped during this process. Make sure that you have a copy of it before moving forward.

Select the flash drive or external hard drive for the Windows 10 setup files
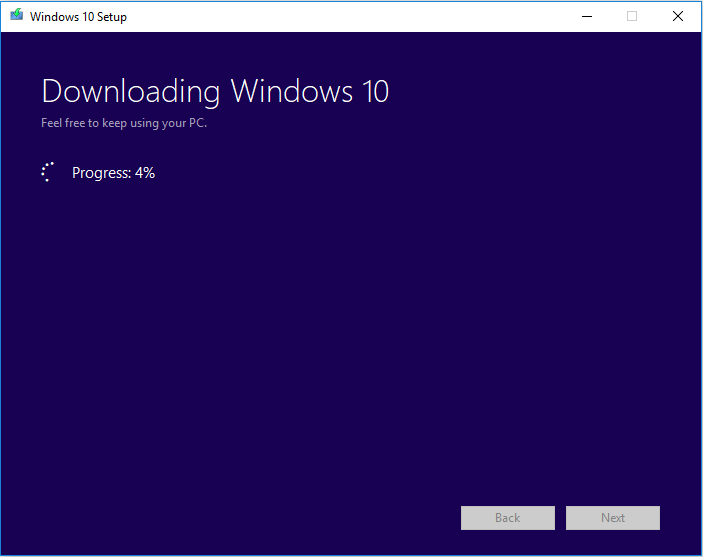
Once you have selected the USB flash drive, the Windows 10 Media Creation Tool starts to download the latest installation files. Depending on your internet connection speed and the load on Microsoft’s servers, this might take a while. All you need is patience.

Downloading the Windows 10 setup files
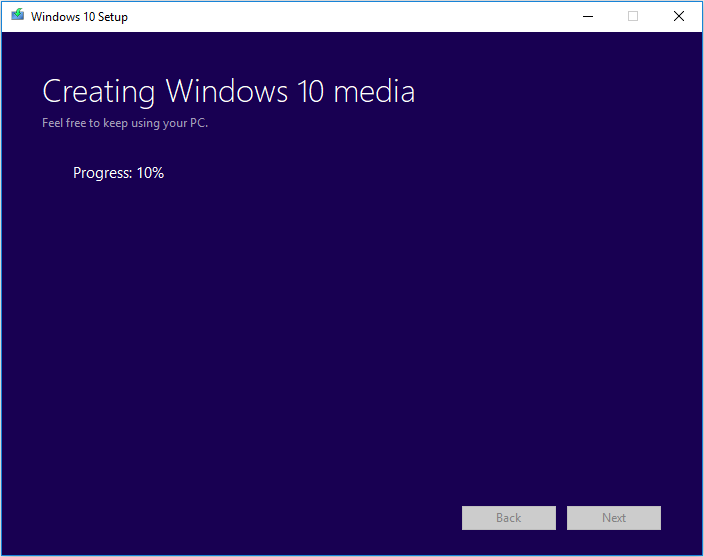
Once the download of the Windows 10 setup files is over, it is verified for integrity. Then, the USB memory stick you selected is made bootable, with the newest Windows 10 setup. This process may take another couple of minutes.

Creating the Windows 10 media
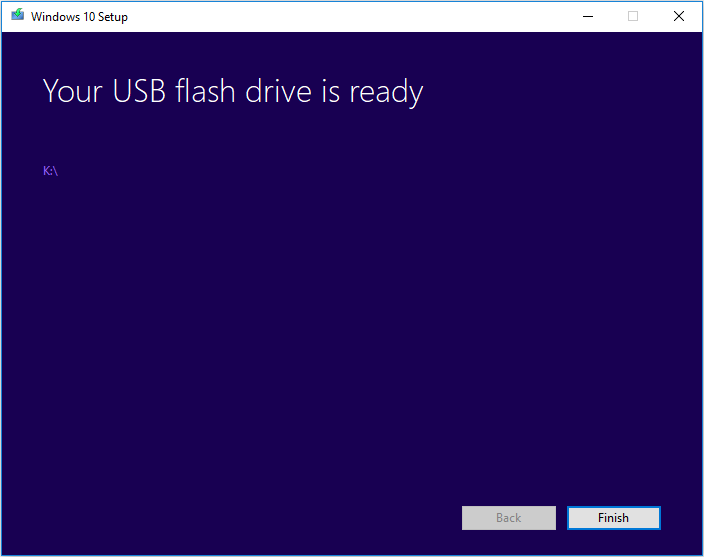
When the process is finished, you are informed that the USB memory stick is ready. Click or tap Finish, and then you can use that drive to boot from and install Windows 10.

Click or tap Finish
Safely remove the USB flash drive from your computer, and use it as you see fit.
TIP: To install Windows 10 without problems, read: How to install Windows 10 from DVD, USB, or ISO file.
Обновление или восстановление Windows 10 с помощью Media Creation Tool.
- Перейдите на страницу загрузки Media Creation Tool
- На странице нажмите кнопку «Скачать средство сейчас» и сохраните приложение в любой удобной вам папке.
- Запустите инструмент Media Creation Tool.
- Примите условия лицензионного соглашения, кнопка «Принять».
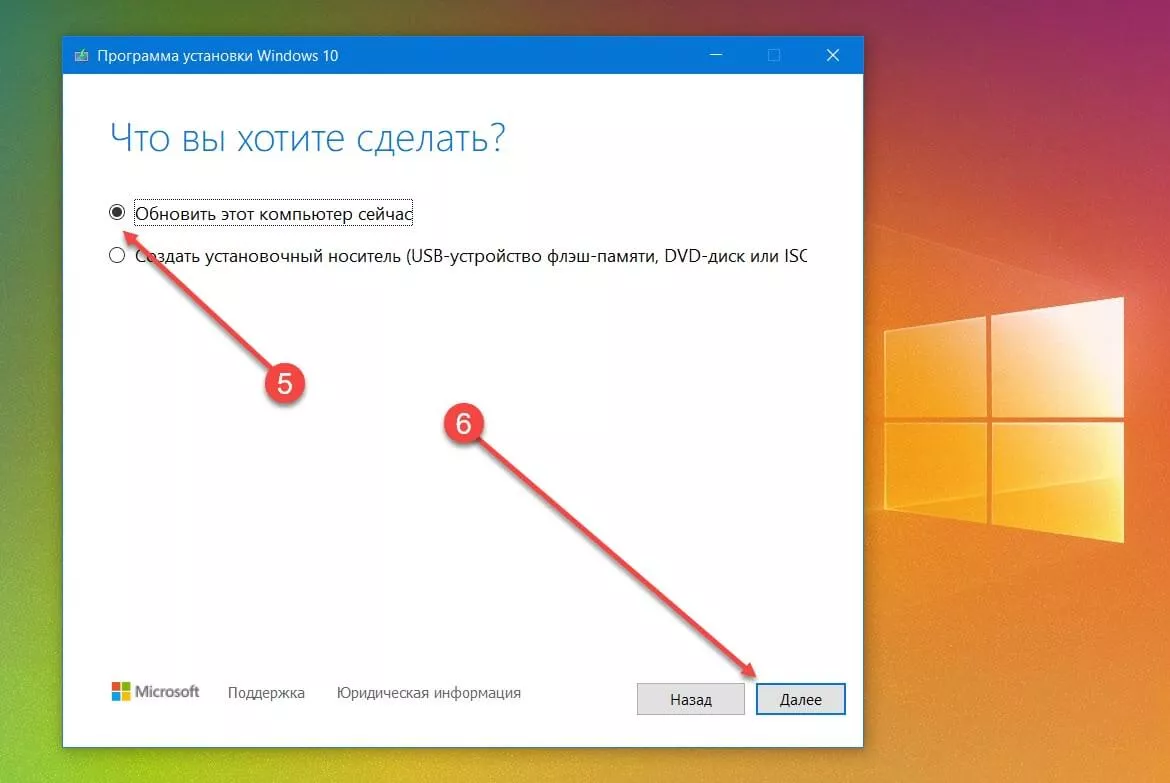
- Выберите «Обновить это устройство сейчас» и нажмите «Далее».
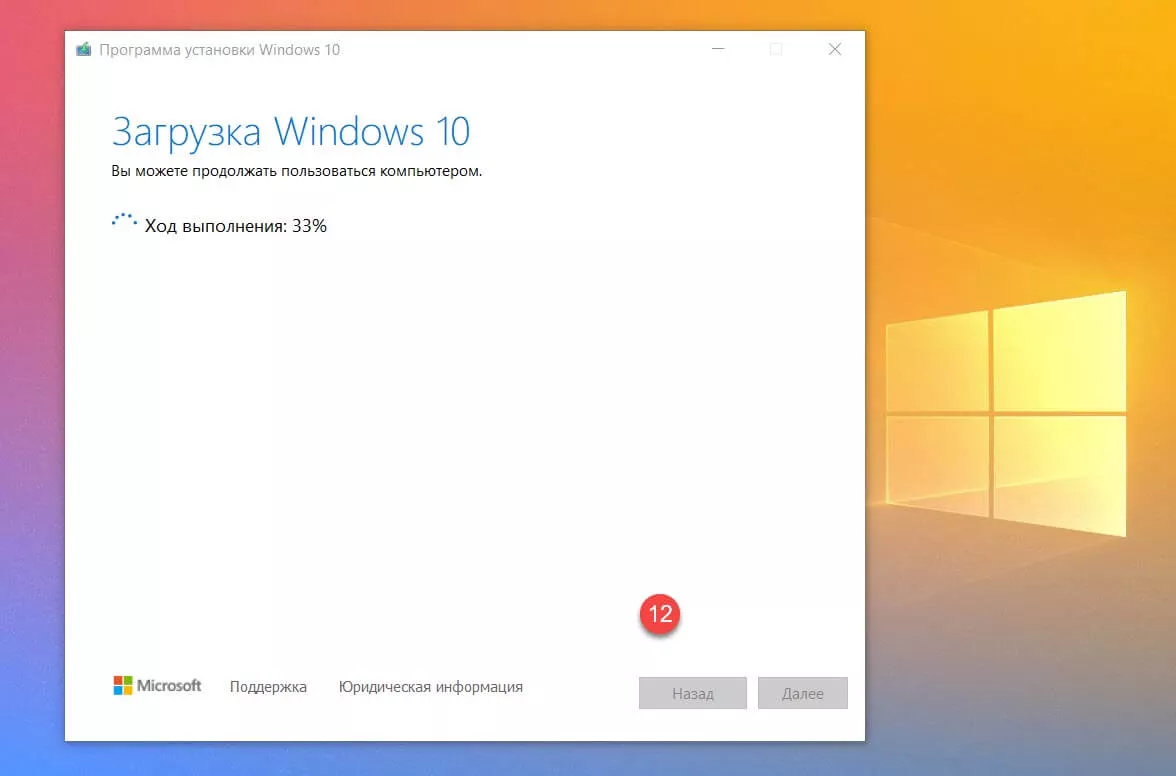
Утилита выполнит загрузку установочных файлов на серверах Microsoft.
Media Creation Tool сохраняет ваши персональные файлы и приложения и устанавливает Windows 10 Домашняя (или Pro, в зависимости от вашей старой системы). Выполняется обновление компьютера, никакие данные не стираются.
- Снова примите условия лицензионного соглашения, кнопка «Принять».
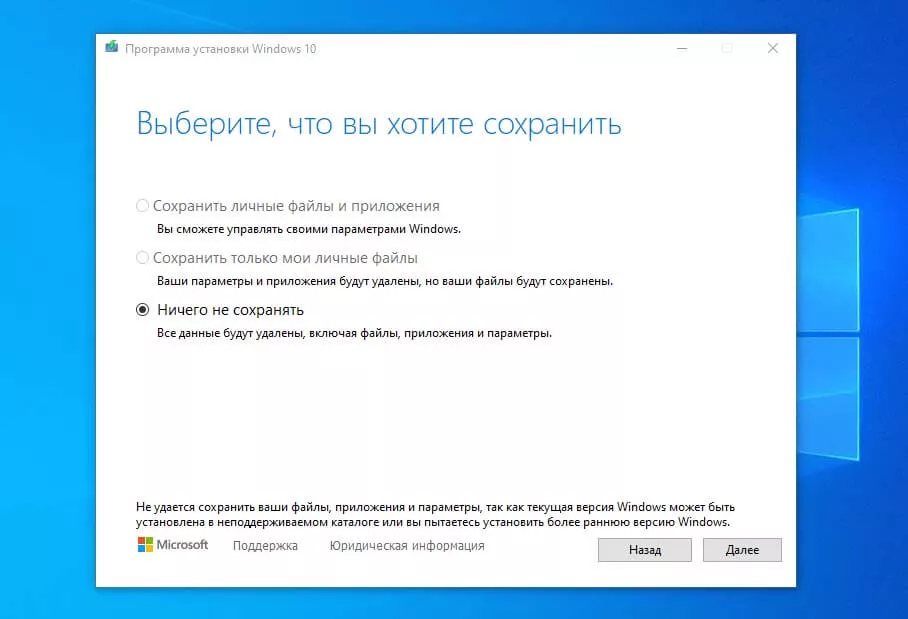
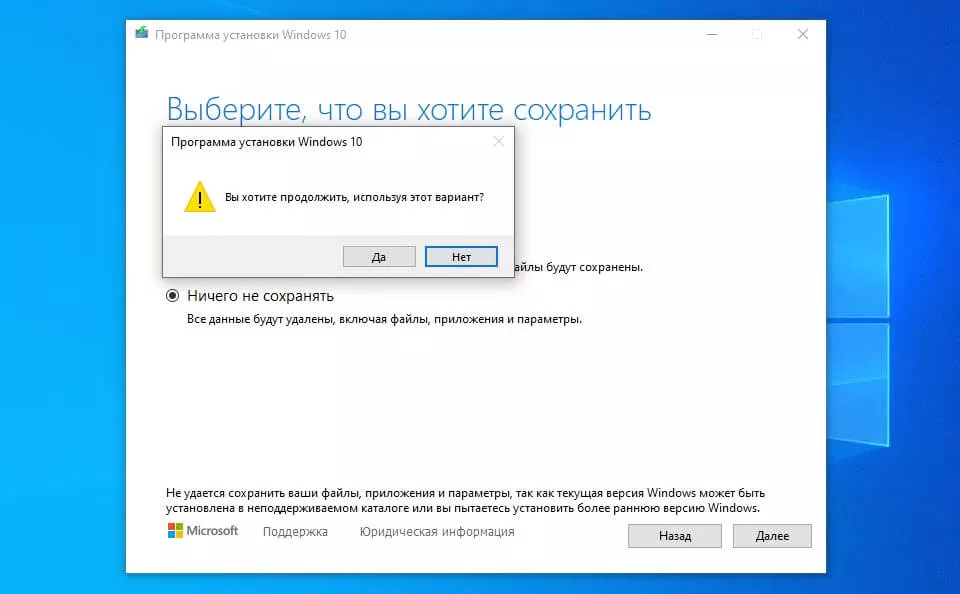
- Выберите что вы хотите сохранить и нажмите «Далее»:
- Сохранить личные файлы и приложения
- Сохранить только мои личные файлы
- Ничего не сохранять
- Подтвердите свои действия нажав кнопку «Да».
- Система проверит и установит последние обновления.
- В окне «Готово к установке» нажмите кнопку «Установить».
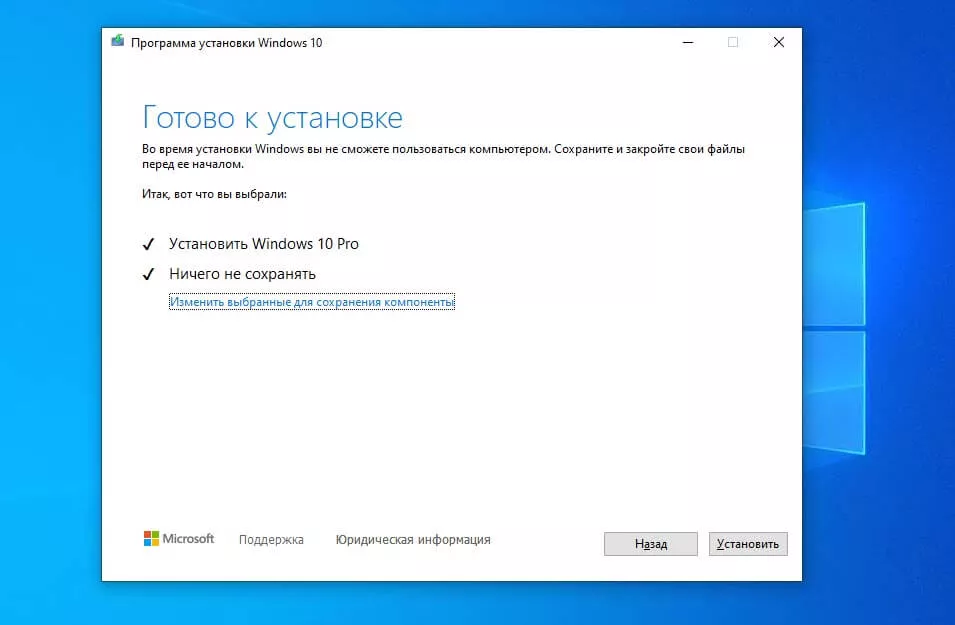
Приложение установит файлы и автоматически перезагрузит компьютер. После перезагрузки инициализируется процесс настройки операционной системы.
Все! Надеюсь эта информация пригодится.
Рекомендуем: Загрузочная флешка Windows 10 с помощью командной строки.
Как исправить ошибки с минимальными аппаратными требованиями
Ошибки • 0хС1900200 — 0х20008 • 0хС1900202 — 0х20008
Описание
Хотя все устройства под управлением Windows 10 должны быть совместимы с Creators Update, после версии Anniversary Update Microsoft изменила минимальные системные требования. Если вы работаете на 32-разрядной версии Windows 10, объём оперативной памяти для установки Creators Update должен быть как минимум 2 Гб.
Минимальные системные требования Windows 10 Creators Update следующие:
• Процессор: 1 ГГц; • Оперативная память: 2 Гб; • Свободное дисковое пространство: 16 Гб для 32 бит и 20 Гб для 64 бит; • Видеокарта: DirectX 9 или новее с драйвером WDDM 1.0; • Монитор: 800 х 600.
Решение
Это малораспространённая проблема, от которой могут страдать бюджетные планшеты и ноутбуки. Рекомендуется увеличить объём оперативной памяти; если это невозможно, придётся покупать новое устройство.
Способы обновления Windows 10
Обновление системы выполняется с помощью нескольких способов:
- Автоматически через Центр обновлений Windows.
- С помощью специальной программы — Помощника по обновлению Windows 10.
- При помощи средства Media Creation Tool.
- Можно выполнить переустановку Виндовс 10 поверх ранее установленной системы.
Несколько разнообразных способов для получения и установки самой последней версии Windows 10 будут полезны в некоторых случаях.
После выхода финального релиза, обновления постепенно начинают отправляться на компьютеры пользователей по всему миру. Естественно, что новая версия операционной системы не сразу дойдет до многих пользователей, а через некоторый период времени. В этом случае, нетерпеливые пользователи могут использовать другой канал для получения обновленной сборки системы.
Бывают случаи, когда обновление заканчивается неудачно, по каким-то внутренним причинам. После этого, Windows 10 автоматически производит откат системы до предыдущей версии ОС.
А как быть, если установить вышедшую версию Windows 10 все равно желательно? Выходом из этого положения, станет использование другого способа для получения и установки обновления системы.
В данной статье, мы рассмотрим использование программы Media Creation Tool для выполнения обновления Windows 10 до последней из вышедших версий.
Утилита Media Creation Tool разработана корпорацией . Приложение не требуется устанавливать на компьютер, оно работает на русском языке. Для запуска средства, достаточно кликнуть два раза левой кнопкой мыши по исполняемому файлу.
Сначала необходимо скачать приложение Media Creation Tool с официального сайта загрузок Microsoft. На сайте: https://www.microsoft.com/ru-ru/software-download/windows10 под вопросом «Хотите установить Windows 10 на своем компьютере?», нажмите на кнопку «Скачать средство сейчас».
What you should know before you go ahead
Before creating an ISO file, a USB memory stick, or a DVD with the Windows 10 setup, you should first check these requirements and recommendations:
- You must have a working internet connection to be able to download the installation files.
- You must have sufficient free storage space on your hard disk or solid-state drive for the installation files. Microsoft recommends you have at least 8 GB of free space. However, the ISO file we last downloaded had 4.24 GB for the 64-bit version of Windows 10. When we chose to create an ISO file with both the 32-bit and the 64-bit setup, the file had 7.37 GB.
- If you want to create a USB memory stick, note that any data stored on it gets deleted. Media Creation Tool needs to format it before creating the bootable memory stick with the Windows 10 setup.
- If you want to create media with Windows 10 setup, you need to use a DVD or a USB memory stick with at least 8 GB of storage space.
- If you intend to upgrade your computer or device to Windows 10, make sure it meets the system requirements. You can check them here: Windows 10 Specifications.
- You must be logged in as an administrator on your computer to use the Media Creation Tool.
Новая материнская плата? Потеря Windows
При активации Microsoft сразу связывает лицензию ОС с уникальным кодом различных компонентов вашего ПК, называемым также Product ID. Благодаря этому становятся возможным обновления и возможные переустановки Windows 10 на этом компьютере в будущем. Однако существует риск отказа системы из-за слишком большого количества замененных системных компонентов.
После покупки нового жесткого диска или же обновления BIOS «десятку» придется активировать заново — это мы поняли во время тестирования. Однако все иначе в случае с материнской картой: после замены этого критического компонента Windows 10 больше не может быть активирована на этом компьютере. Необходимо покупать лицензию или же сначала установить старую версию, а уже с нее провести обновление до «десятки».
Этот метод, впрочем, работает только с Retail-вариантами с ключом в комплекте. Если же у вас OEM-версия, а материнская плата от того же производителя, что и ПК и была заменена в рамках ремонта, необходимо к нему же и обратиться. Производитель несет ответственность за восстановление прежнего состояния вашего компьютера.
What You Will Require?
Before we continue with the guide to using Windows 11 Media Creation Tool, let’s discuss a few things that you will need throughout the process. There are certain things that you require to continue with the process of upgrading Windows with the media creation tool.
- Ensure you have a computer to install Windows.
- Take a backup of your data before you continue with the process. In case of data loss, you can easily restore the data if you have a backup of it.
- Ensure you have a stable internet connection. You will need a good speed internet connection to download Windows and then upgrade your Windows or create a bootable USB drive.
- Ensure you have a USB drive with at least 8GB of storage. You will need this if you are not upgrading your Windows but creating a bootable USB drive from the Media Creation tool.
How to use the Media Creation Tool to download an ISO file with the latest Windows 10 setup
You can also use the Media Creation Tool to create a Windows 10 setup ISO file. When the Windows 10 Media Creation Tool loads its user interface, it asks you to accept its license terms. Read the terms, and click or tap Accept to continue.

Accept the license terms for the Windows 10 Media Creation Tool
You are asked to choose what you want to do. Select «Create installation media (USB flash drive, DVD, or ISO file) for another PC,» and click or tap Next.

Choose to create installation media (USB flash drive, DVD, or ISO file)
By default, the Media Creation Tool chooses for you a recommended language, architecture, and edition of Windows 10. If you want to personalize these settings, uncheck the box for «Use recommended settings for this PC,» and make your selections. When you are done, press Next.

Select the language, architecture, and edition
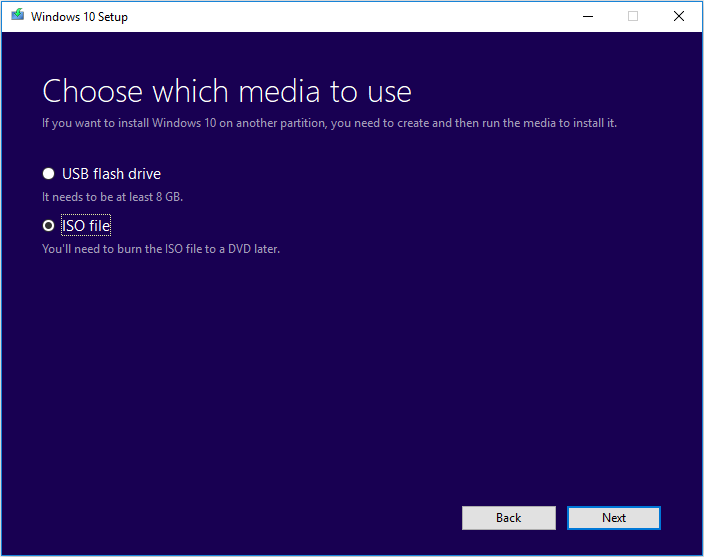
You are asked to choose which media to use. Select «ISO file» and click or tap Next.

Select ISO file and press Next
The Windows 10 Media Creation Tool asks you to select where you want to save the ISO file and the name you want to give it. Browse your computer or device, choose the location that you want, choose a file name (by default it is named Windows.iso), and then click or tap the Save button.

Choose where to save the Windows 10 ISO file on your PC
Media Creation Tool starts to download the latest Windows 10 installation files to your computer or device. Depending on your internet connection speed and the load on Microsoft’s servers, this might take a while, so give it a couple of minutes.

Downloading the Windows 10 setup files
Once the download is over, it is verified for integrity to make sure that everything is OK. Then, the ISO file is created in the folder you selected, with the file name you chose.

The Windows 10 setup ISO file is created
When the Windows 10 ISO file is created, you are shown where it was saved. Click or tap Finish.

The ISO file was created
You can burn the ISO file with the Windows 10 setup to a DVD or mount the ISO file in a virtual machine.
Download Windows 11 Media Creation Tool
First of all, make sure you have registered in the Windows Insider program. To download the official file, you will need a Windows Insider account, So make it first. Now go to this official page and download the Windows 11 installation media. Click on Windows 11 icon and then click on the download tool now. Your Windows 11 Installation media will be now downloaded successfully in minutes (depending upon your network speeds).
After installing the file, run it on your PC system. After this, you’ll get a prompt saying “Getting a few things ready!”. Now, you’ll see two options: “Upgrade the PC Now” and “Create Installation Media (USB flash drive, DVD, or ISO file) for another PC”.
You can choose the option accordingly, if you choose “Upgrade the PC Now”, then your system will be upgraded to Windows 11. While, on the other hand, if you choose “Create installation media” then it will create a bootable file instead of upgrading your system.

Upgrade the PC Now
If you choose the “Upgrade the PC Now” option, then the Media Creation tool will start downloading the Windows 11 File and upon downloading successfully, you will be able to install it in your system. After successful installation, complete the setup and you will be now able to run Windows 11 in your system seamlessly.
Create Installation Media
If you choose the option “Create installation media.” then you will now get a prompt asking for language, edition, and architecture details of your system. Make sure to enter the details correctly and also you can choose the option “Use the recommended option for the PC!”. It will automatically select the option compatible with your system.
Now click on Next and you’ll get two options namely “Create USB flash drive” and “ISO file”. In create a USB flash drive option, it will create a bootable USB drive for you. And if you choose the second option, you will be able to burn the ISO file later to create a bootable USB drive or a DVD.
- If you select the “Create USB Flash drive” option, then make sure to connect the USB. The tool will automatically download and burn into the US connection. And you can flash it later.
- For the “ISO File” option, it will download the ISO file of Windows 11 and you’ll later have to burn it using any third-party apps to make it bootable.
We recommend you to use the “Create USB Flash Drive” option here, as it is easier to use.
Ready to Install
After creating the bootable Windows 11, plug the USB Drive in which you’ve installed the bootable file. Boot the PC into BIOS and install the system. You can now use Windows 11 seamlessly if you have followed all the steps mentioned above correctly. You can read our “types of Windows 11 product key”, “Password Reset”, and TPM 2.0 Bypass” article here.
Create an Installation Media or Download ISO file
Another function of Window 10 Media Creation Tool is that it can help you create an installation media for another PC or download ISO file. And all Windows 10 editions are available when you select Windows 10, except for Enterprise edition. When finished, you can use the bootable USB drive or DVD disc to install Windows 10.
Note: Before you install or reinstall Windows on your PC, remember to back up important files on your system disk.
Before you download Windows 10 Media Creation tool, make sure you have:
- A PC with a working Internet connection
- A blank USB flash drive or DVD with at least 8 GB of available storage space
- A product key if you’ve not installed Windows 10 before or if you want to perform a clean install
Now you can follow the steps as below to create Windows 10 installation media (USB flash drive or DVD) and use it to install a new copy of Windows 10, perform a clean installation, or reinstall Windows 10.
Step 1. Download Windows 10 Media Creation Tool and follow the instruction to get the following page. Then, check the second option Create installation media (USB flash drive, DVD, or ISO file) for another PC and click Next.
Step 2. Choose the Language, Windows Edition, and Architecture that you want to use for creating the installation media. After selection, then click Next to continue.
You can also choose to Use the recommended options for this PC, which automatically selects the language, edition, and architecture that match the PC that you are using right now.
Step 3. Choose what kind of media storage device you want to use. Here I take USB flash drive as an example. Choose USB flash drive and press Next.
Step 4. Select the USB drive you want to use for creating Windows 10 installation media and click Next.
Step 5. Then Microsoft Media Creation Tool starts to download the latest Windows 10 installation files on your computer or device.
Step 6. When the download is completed, it will start to create Windows 10 media.
Step 7. When it is done, click Finish and then you can use that drive to boot up your computer and install Windows 10.
If the computer that you want to install Windows 10 has a DVD player, you can also select ISO file to burn the ISO file to a DVD later.
Just follow the step-by-step prompts on the Media Creation Tool to download Windows 10 installation files and save the ISO file to a specific location. When it is finished, you can burn the ISO file to a DVD.
Как установить Windows 10 на компьютер и на ноутбук.
Чтобы установить виндовс 10, что на ноутбук, что на стационарный компьютер, нужно выполнять абсолютно одни и те же действия, так что инструкция будет одинаковая.
Если все описанное выше вы сделали правильно, то после того как вы вставили диск в дисковод, настроили BIOS, и включили (или перезагрузили компьютер) у вас должно выскочить вот такое окно

Тут выбираете все по стандарту. Ничего сложного нет. Далее выскочит такое окно. Нажимаем Установить

На следующей картинке предлагается ввести ключ. Если у вас его нет, то нужно выбрать – У меня нет ключа продукта.

Если же у вас уже была установлена легальная версия виндовс 10, и вы просто её переустанавливаете по какой-то причине, то привязка ключа выполниться автоматически после установки. После, нужно выбрать версию системы, которую вы хотите установить. Если вы не знаете что выбрать, выбирайте Домашнюю.

Далее добровольно-принудительно соглашаемся с условиями

Теперь вам предложется выбрать Тип установки. Нам нужен пункт, «Выборочная: только установка Windows (для опытных пользователей)». Не бойтесь фразы “для опытных пользователей”, дальше вы поймете, что сложного там нет абсолютно ничего

После откроется окно «Где вы хотите установить Windows?»
И тут есть два варианта:
- Вы удаляете все. И устанавливаете систему на чистый и пустой компьютер (это самый лучший вариант). Но до этого не забудьте скопировать нужную информацию на внешние носители (диски, флешки и д.т.), т.к. удалено будет все.
- Вам нужно сохранить то, что храниться на НЕ системном диске (ваши личные фото, видео и т.д.), а старую виндовс удалить.
В первом случае, в окне «Где вы хотите установить Windows?», вам нужно отформатировать все диски, которые там есть, называться они будут примерно так “Диск 0 Раздел 1”, “Диск 0 Раздел 2” выглядеть они будут так

Вам нужно выбрать мышкой сначала первый диск, и нажать “Удалить”, после этого тоже самое сделать со вторым, и со всеми остальными. После всех этих манипуляций у вас останется только одна строка “Незанятое пространство на диске 0”

Теперь все пространство, которое у вас есть на жестком диске, нужно разделить на две части: системную и для всего остального :). Системный диск должен быть не меньше 20 Гигабайт для нормальной работы системы. Но обычно выбирается больше. Сейчас у меня диск на 1 Терабайт (1024 гигабайта), из них 200 Гб идут на систему и разные программы, а 800 с лишним Гб, на все остальное.
Чтобы разбить пространство на две части, выбираем “Незанятое пространство на диске 0” правой кнопкой мыши и нажимаем на слово Создать. Выбираем где-то 1/5 часть диска, но не меньше 20 Гб. Только помните, что при выборе размера диска все меряется в Мегабайтах, а 1 Гигабайт = 1024 Мегабайтам. Т.е. чтобы разбить диск на две части, так как показано на предыдущем рисунке, нужно выбрать мышкой “Незанятое пространство на диске 0″, после нажать Создать, в появившемся поле выбрать размер – 27545 Мегабайт (это 26,9 Гигабайт), после нажимаете Применить. Второй раз проделываете туже процедуру, выбираете оставшийся размер и нажимаете Применить. Можно распределить практически все пространство. После первого разбития, какую-то часть система оставит для себя. Все остальное пространство вы можете потратить на второй диск.
Вообще вы можете разбить память насколько угодно дисков, но обычно делается всего два. ОДНАКО! Мастера советуют, если ваше Незанятое пространство составляет 100 Гигабайт и меньше, разбивать его не имеет смысла (выше я показал просто пример ). В таком случае вы НИЧЕГО не создаете и не разбиваете, просто выбираете Незанятое пространство и нажимаете Далее.
Во втором случае, вам нужно выбрать мышкой только системный диск, т.е. тот на котором была установлена старая винда и диск, и диск где будет написано Зарезервировано системой (выделены зеленым). И нажать на слово “Форматировать“. Естественно по очереди

Как только отформатируете необходимые диски, на тот, где НЕТ фразы Зарезервировано системой, можно устанавливать свежую операционку. Далее инструкция для первого и второго случая совпадают.
После того как вы “разобьете” всю память, нажмите левой кнопкой мыши на диск, который вы делали поменьше (или на диск который вы форматировали, для второго случая), и нажмите на кнопку Далее.
После начнется процесс установки. С компьютером начнут происходить страшные вещи – будет тухнуть экран, он будет перезагружаться и т.п. Это нормальный процесс установки.
В общем, у нас получилось установить виндовс 10. Однако, это не все. Нужно произвести настройки, которые идут сразу после установки. Формально они тоже считаются установкой.